
A 360° product photo is more than just a spinning image. It's a collection of pictures, stitched together, that lets a customer digitally "pick up" your product and inspect it from every angle. It’s the closest you can get to bridging the physical gap of online shopping.
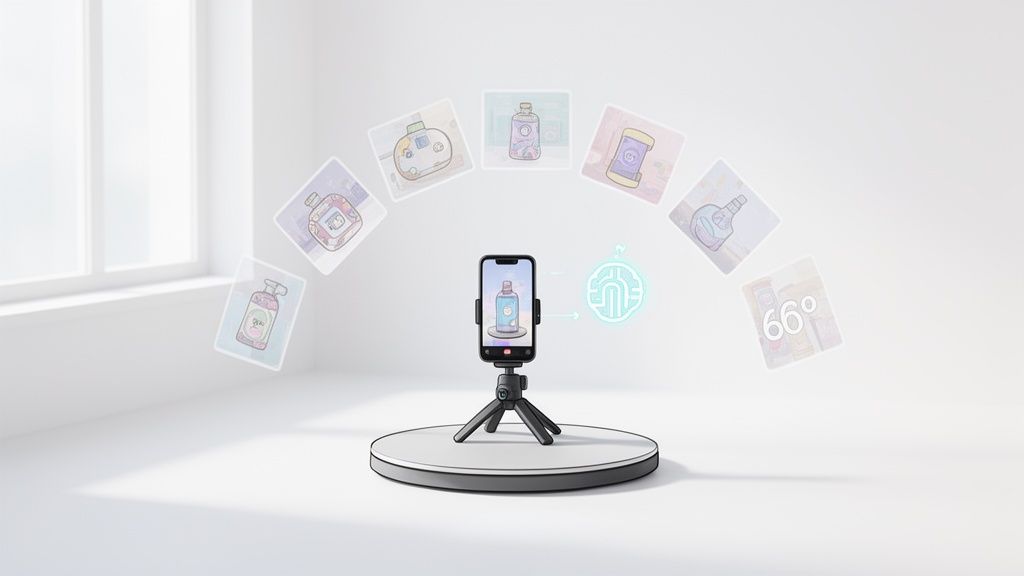
And here's the best part: this kind of tech isn't just for the big-box retailers anymore. With your smartphone and the right AI tools, you can create these high-impact visuals yourself.
Why 360° Product Photos Just Sell More
Let's get real for a second. Flat, static images don't cut it in today's market. Online shoppers are smarter and more skeptical than ever. They want to feel confident before they hit "buy," and nothing builds that trust like letting them see a product from all sides. A 360° view isn't just a picture; it's an experience that tackles customer doubt head-on.
Imagine someone shopping for a new hiking backpack. They land on your page, but your three static photos don't show the side pockets, the quality of the strap stitching, or the ventilated back panel. That tiny bit of uncertainty is often all it takes for them to click away and find a competitor who shows them everything. That's a lost sale that a simple 360° spin could have saved.
Building Buyer Confidence and Slashing Return Rates
A 360° photo hands the controls over to the shopper, just like in a real store. They can spin the product around, zoom in on the details, and answer their own questions without having to read a wall of text.
This simple interaction has a huge impact:
- It’s all about transparency. Showing every angle proves you have nothing to hide, which instantly builds trust in your product's quality.
- It keeps people engaged. Interactive content makes users stick around on your page longer, and the longer they stay, the more likely they are to buy.
- It kills buyer's remorse. When customers know exactly what they're getting, you see a natural drop in product returns. No more nasty surprises when the box arrives.
Here’s a perfect example of how a 360° view looks on a product page. It lets the customer explore every feature on their own terms.
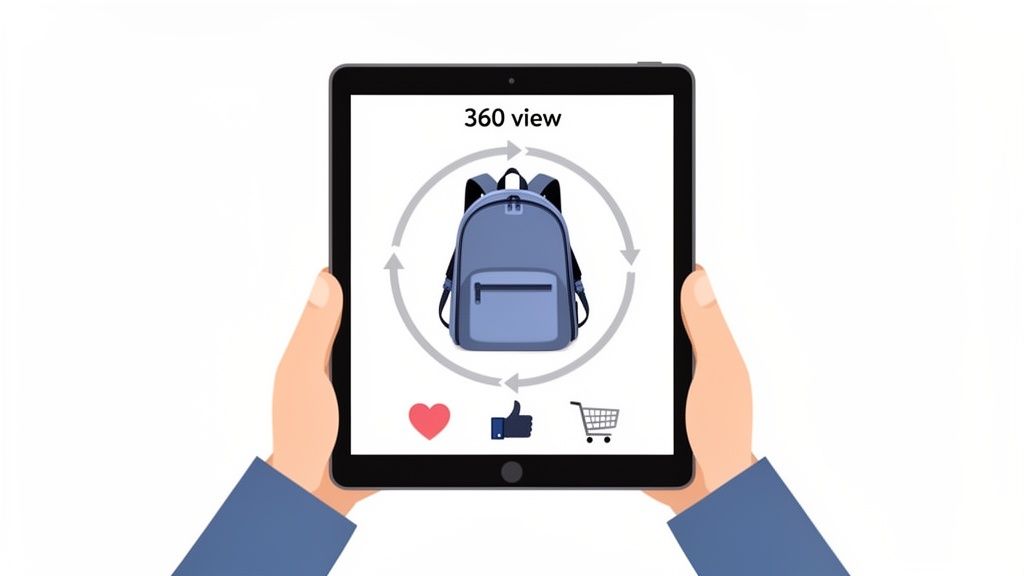
This level of detail empowers customers to click "add to cart" without a second thought.
The Market is Demanding Immersive Visuals
This isn't just a hunch; the industry data backs it up. The e-commerce product photography market is massive—expected to hit $38.08 billion by 2025—and 360° photography is one of its fastest-growing corners. Brands know there's a direct line connecting better visuals to higher sales.
For another modern way to showcase products, a business guide to 3D rendering of products explores how you can even visualize items before they're physically made.
When you turn passive viewing into an active exploration, you're letting customers sell themselves on your product. It’s a game-changer in a crowded e-commerce space.
The good news is that you no longer need a massive budget for this. As you'll see in this guide, creating a polished 360° product photo is totally achievable with the phone in your pocket and some clever AI software. If you're curious how this stacks up against traditional methods, it’s worth understanding the cost of professional product photography to see the full picture.
Carving Out Your At-Home Photo Studio
You don't need a fancy studio to create a killer 360 product photo. Honestly, a well-prepped corner in your home or office will do the trick just fine. A few minutes spent getting your setup right can save you a mountain of editing headaches later, ensuring your final spin is clean, consistent, and looks totally professional. The real goal here is to build a little environment you can use over and over for great results.
And it’s a smart move. This whole immersive visual thing is blowing up. The market for 360-degree photography booths was already valued at $890.45 million in 2025 and is on track to smash $2 billion by 2034. That's a huge shift in e-commerce, but the good news is you can get in on the action without the expensive gear. If you're curious about the numbers, you can dig into some of the recent industry analysis on the 360 photography booth market.
Pick the Right Product and Find Your Spot
First things first, choose a product that actually gets a boost from a 360-degree view. Anything with interesting details on all sides is a perfect candidate. Think about a pair of sneakers with cool embroidery on the heel, a handbag with hidden compartments, or a gadget with ports on different sides. These are the exact details shoppers are dying to inspect.
Once you’ve got your product, it's time to find your "studio." The most important thing to get right? Lighting. You're looking for a spot with soft, consistent, and diffused light.
- Your Best Bet: Set up next to a big window on an overcast day. This gives you broad, even lighting that keeps harsh shadows away.
- A Solid Alternative: If you’ve got direct sun, just hang a thin white sheet or a sheer curtain over the window. It acts like a giant, cheap diffuser and softens that light beautifully.
- What to Run From: Avoid rooms with mixed light sources (like a window and an overhead lamp) or direct, harsh sunlight. This just creates weird color shifts and distracting glares that are a pain to fix.
Your Simple DIY Turntable and Tripod
Forget about those pricey, automated turntables for now. The only thing that really matters is smooth, consistent rotation, and you can pull that off with stuff you probably already have. A simple kitchen lazy Susan is a fantastic starting point. For just a few bucks, you get the steady rotation you need. Just grab some tape and mark the base at even intervals—say, every 15 degrees for 24 shots—to keep your turns precise.
The secret to a flawless 360 spin isn't expensive equipment—it's consistency. A stable camera and evenly spaced turns are what separate a wobbly, amateur video from a smooth, professional product experience.
Just as important is keeping your smartphone perfectly still. Seriously, even the tiniest wobble between shots can ruin the final spin. A cheap smartphone tripod isn't a suggestion; it's a must-have. Mount your phone, frame your product, and then don’t touch it again until you’ve captured every single angle. This one simple step guarantees every frame is perfectly aligned, creating a seamless 360 product photo that builds customer trust and gets you that sale.
Alright, this is where the magic happens. You’ve got your DIY studio ready, and now it’s time to actually capture the images that will become your interactive 360 product photo.
With your setup in place, the shooting process itself is pretty straightforward. The real goal here isn't just to snap a bunch of pictures; it's to create a sequence of perfectly aligned, consistently lit frames that blend together into one seamless, fluid spin.
It all comes down to controlling the variables—your product, the lighting, the turntable, and your phone’s camera.
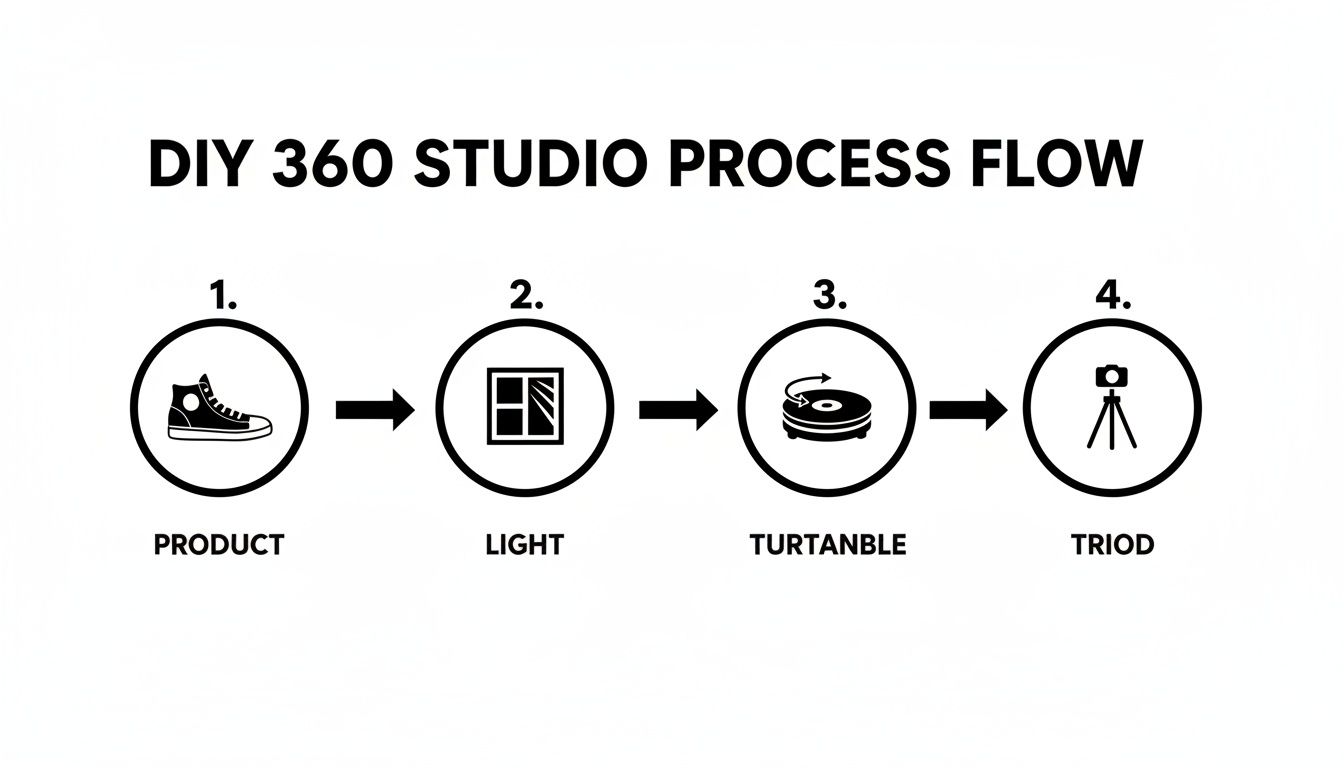
Think of these four elements as your core toolkit. Get them working in harmony, and you're golden. Before you take a single shot, there's one tiny but game-changing step you need to take on your smartphone.
Lock Your Camera Settings
Ever noticed how a video shot on a phone seems to flicker or suddenly get brighter or darker? That’s the camera's auto-exposure and auto-focus working overtime, constantly adjusting to tiny shifts in light and distance. On a 360 spin, that flicker looks amateurish and jarring.
You can prevent this with a simple trick.
On your smartphone's camera app, just tap and hold on your product until you see a notification pop up, usually saying something like "AE/AF LOCK" (Auto-Exposure/Auto-Focus Lock). This one action freezes the camera's settings. Now, every single photo in your sequence will have the exact same brightness, color temperature, and focus point. It's a non-negotiable step.
Locking your camera's exposure and focus is the secret sauce for a professional-looking spin. It’s a ten-second move that saves you from the nightmare of trying to color-correct dozens of inconsistent frames later.
With your camera locked and loaded, you need to decide just how smooth you want your spin to be.
Determine Your Frame Count
How many photos should you actually take for a full rotation? The number of frames you capture directly impacts the smoothness of the final 360 view. More frames mean a more fluid spin, but it also means a larger final file size, which can slow down your product page.
You're looking for the sweet spot between a great user experience and good page performance. Here’s what I’ve found works best:
- 24 Frames: This is the perfect starting point for most products. It gives you a complete rotation that feels smooth and interactive without creating a massive file. To get this, you’ll rotate your turntable 15 degrees for each shot.
- 36 Frames: This is what I’d call the e-commerce industry standard. It delivers a noticeably smoother spin that’s ideal for products with interesting details you want customers to see. Each turn is a precise 10 degrees.
- 72 Frames: If you’re shooting premium items like jewelry, watches, or complex electronics, 72 frames will give you an ultra-fluid, almost video-like experience. This requires tiny, meticulous 5-degree turns.
The right number of frames really depends on what you're selling. Something simple like a mug doesn't need a hyper-smooth spin, but a detailed handbag or a pair of intricate sneakers definitely benefits from more frames.
Optimal Frames for Different Product Types
| Product Category | Recommended Frames | Why It Works |
|---|---|---|
| Simple Items (Mugs, Bottles) | 24 | Delivers a smooth-enough spin for basic shapes without bogging down the page. |
| Apparel & Shoes | 36 | Captures texture and form from all angles, which is critical for fashion items. |
| Handbags & Accessories | 36 to 72 | Highlights hardware, stitching, and material quality with a more fluid rotation. |
| Jewelry & Watches | 72 | Essential for showcasing fine details, facets, and reflective surfaces with a premium feel. |
| Electronics & Gadgets | 36 to 72 | Allows shoppers to inspect ports, buttons, and design features from every angle. |
Choosing the right frame count sets expectations for the customer. A smoother spin on a high-end product subconsciously signals higher quality.
To make sure your rotations are perfectly even, grab a marker and map out your angles directly on your turntable. For a 36-photo spin, you’ll make a new mark every 10 degrees. It’s a simple, low-tech trick that guarantees professional consistency.
One last thing: watch your shadow. As you rotate the product, make sure you aren't accidentally blocking your light source and casting a shadow onto your set. Stand in the same spot for every single shot and do a quick check on your screen before you snap each picture. It’s this kind of obsessive consistency that makes all the difference.
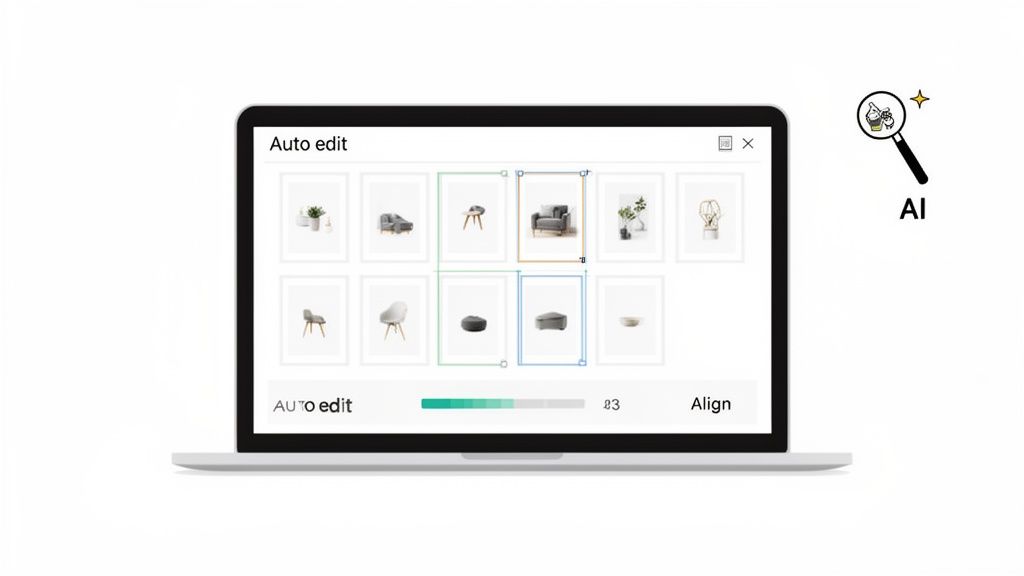
Using AI Tools for Effortless Editing
Okay, you've captured all the frames for your spin. Now comes the part that used to be a total nightmare: editing.
Honestly, the sheer grind of editing dozens of photos one-by-one is what kept amazing 360 product photo creation out of reach for most sellers. It was just too much work. But thankfully, AI-powered editing tools have completely flipped the script.
These platforms are built to take on the repetitive, soul-crushing tasks that are absolutely essential for a flawless spin. Instead of getting bogged down for hours in complex software, you can now upload your entire sequence of images and just let an algorithm do the heavy lifting in a few minutes. This is what makes professional-grade results accessible to anyone, no matter their editing skills.
Automated Background Removal in Bulk
One of the most tedious jobs in product photography is cutting the product out from its background. Getting that clean, white backdrop—a must-have for marketplaces like Amazon—is a huge time-sink. Trying to do this manually for 36 to 72 images isn't just slow; it's almost impossible to get it perfectly consistent every single time.
This is where AI tools are a lifesaver. You can just dump all your photos in at once, and the software is smart enough to find the product's edges and cleanly remove the background from every single frame. It gives you a consistent, pro look across the entire spin and saves you from hours of mind-numbing clicking. If you want to dive deeper into how this works, our guide on the AI product photo generator breaks down the technology.
Perfecting Color and Lighting Consistency
Even if you locked your camera settings, tiny little fluctuations in light can happen as your product rotates. Manually color-correcting dozens of images to make them match perfectly is something that even seasoned pros struggle with. Mismatched frames create this distracting flicker in the final spin, which can make the whole thing look cheap and unprofessional.
AI-driven color correction, on the other hand, looks at your entire photo set as a single unit. It figures out a baseline for brightness, contrast, and warmth, then automatically tweaks each frame to match. This makes sure every image is perfectly uniform, giving you a smooth, seamless rotation without any jarring visual glitches.
The real magic of AI in editing a 360 product photo isn't just about speed—it's about achieving a level of frame-to-frame consistency that is practically impossible to do by hand.
This kind of automation is a big reason why the broader photographic services market is projected to swell to $66.8 billion by 2035. Businesses are realizing how powerful immersive content like 360-degree photos is for grabbing customer attention, and AI editing is what makes creating it at scale actually feasible. You can read more about the trends in the photographic services market and see for yourself.
Automatic Centering and Frame Alignment
Let's be real—no matter how careful you are with your turntable, slight wobbles or an off-center placement can happen. These little imperfections might not seem like a big deal, but they become glaringly obvious in the final spin, making the product look like it's jumping or shifting around.
AI editing tools can automatically find the product in each frame, then crop and align every single image so your item stays perfectly centered. It's a simple fix that makes a world of difference.
This is the final touch that separates a shaky, amateur attempt from a polished, professional 360 product photo. It cleans up minor shooting mistakes and delivers a stable, high-quality spin that builds trust with your buyers and helps you make the sale.
You've done the hard work—the planning, the shooting, the editing. Now for the fun part: getting your interactive 360° product photo live and in front of your customers. This is the moment you transform that folder of perfectly edited images into a tangible, engaging experience that actually drives sales. The goal isn't just to show the spin; it's to make it an irresistible part of the shopping journey.
Thankfully, putting your frames together into a final viewer is way easier than it used to be. Most modern AI editing tools, including ProdShot, will automatically assemble your aligned images into a ready-to-use spin. You'll get a single piece of code or a file that you can just drop onto your website, completely sidestepping the technical headaches of the past.
Choosing the Right Format and Settings
Before you hit publish, you have a key decision to make: the export format. For e-commerce, you really have two main options, each with its own set of trade-offs.
- Animated GIF: Sure, GIFs are super easy to embed and they play automatically. But that's where the benefits end. They offer zero interactivity—customers can't control the spin, pause on a detail, or zoom in. They also pack a punch in file size and have a limited color palette, which can really hurt your image quality.
- Interactive HTML5 Player: This is the undisputed champion for a true 360° product photo experience. An HTML5 player is fully interactive. It lets shoppers click and drag to spin the product, zoom in on the texture of the fabric, and explore at their own pace. It delivers far superior image quality and is built for speed on both desktop and mobile.
For a product page that’s actually designed to convert, an interactive HTML5 player is always the right call. It turns passive browsing into active exploration, a shift that is proven to keep people on your page longer and build their confidence.
Just remember to compress your images first. Fast load times are non-negotiable. Using a good image resizer can slash your file sizes without anyone noticing a drop in visual quality.
Embedding on Your Storefront for Maximum Impact
Where you put your 360° view is just as important as how it looks. Burying it at the end of your image gallery is a classic mistake and a huge missed opportunity. To really move the needle on conversions, your interactive spin needs to be front and center.
If you're on a platform like Shopify or WooCommerce, placement is everything. Here are a few battle-tested tips:
- Make it the star of the show. Ditch your static hero image and replace it with the interactive 360° view. It’s an instant attention-grabber that practically begs shoppers to engage.
- Add a clear call-to-action. Don't just assume people will know what to do. A subtle overlay with an icon or text like "Spin Me!" or "360° View" can dramatically increase how many people actually interact with it.
- Check it on mobile. The vast majority of your customers are shopping on their phones. Pull up your product page on your own device and make sure the spin is responsive and feels smooth and intuitive to a thumb.
A well-placed 360° photo does more than just show off your product—it acts as a silent salesperson, answering customer questions visually and building the confidence needed to click "Add to Cart."
If you're looking for great ways to showcase your spins, exploring the best WordPress plugins for photographers can give you some powerful tools for creating beautiful galleries and presentations.
Ultimately, the goal is to weave your spin seamlessly into the shopping experience, turning it into a powerful tool that doesn't just look cool but actively helps you sell more.
Jumping into the world of smartphone-powered 360 photography always brings up a few good questions. Let's walk through some of the most common ones I hear to get you past any sticking points and on your way to shooting with confidence.
One of the first things people ask is about the magic number of photos. You're aiming for a spin that feels buttery smooth, not like a jumpy slideshow. The trick is hitting that perfect balance between a high-end user experience and a file size that won’t make your product page load at a snail's pace.
How Many Photos Do I Really Need for a Smooth Spin?
For most products you see in e-commerce, shooting between 24 to 36 photos is the sweet spot. This range gives you a seamless, professional-looking 360 product photo without bloating the file size. It’s just enough detail to feel interactive and premium.
But, if you're working with something highly detailed—say, intricate jewelry or a gadget with lots of ports and buttons—you might want to level up. Bumping the frame count to 48 or even 72 will create an ultra-fluid rotation, letting shoppers zoom in and appreciate every tiny feature. Just remember, consistency is everything. More frames only help if they're captured at perfectly spaced intervals.
Can I Create a Spin Without a Turntable?
Technically, yes, but I honestly wouldn't recommend it. While you can try to create a spin without a turntable, it's a massive headache. You'd have to physically move your smartphone in a perfect circle around your product, maintaining the exact same distance, angle, and height for every single shot.
This manual approach is just begging for wobbly, unprofessional results. It’s incredibly difficult to get right and you’ll spend ages trying to fix it in post-production. A simple, cheap lazy Susan from a home goods store is a much better starting point and will save you from a world of frustration.
Here's a pro tip: The best and most affordable lighting is sitting right outside your window. Set up near a large window to bathe your product in soft, natural daylight. This minimizes harsh shadows and highlights all the important details beautifully.
How Do AI Tools Handle Reflections on Shiny Products?
This is where modern tools really shine, no pun intended. Today's AI-powered photo editors are incredibly smart when it comes to tackling tricky, reflective surfaces. For those glossy products, advanced algorithms can intelligently spot and tone down distracting glares from your room or camera, all while keeping the product's natural shine intact.
By analyzing the entire sequence of images, these tools learn to tell the difference between the product’s inherent glossy finish and unwanted, accidental reflections. They clean them up for you, delivering a polished look that would otherwise mean hours of painstaking manual retouching on every single frame.
Ready to turn those smartphone shots into scroll-stopping 360° product photos? With ProdShot, you can automate background removal, color correction, and spin creation in just a few clicks. Try it free and see how easy professional product photography can be.