
When we talk about e-commerce photo editing, we're really talking about the art of making your product images look their absolute best for an online audience. This isn't just about applying a filter; it's a detailed process that can involve everything from background removal and color correction to fine-tuned retouching. In a world where customers can't physically touch your products, these edited images do all the heavy lifting to build trust and, ultimately, drive sales.
Why Great Product Photos Are Your Best Sales Tool
Let's get straight to the point: in e-commerce, your product photos are your sales team. They're working around the clock, telling your product's story and convincing shoppers to buy. A customer can't hold your product, feel its weight, or see the texture up close, so your photos have to fill in all those sensory gaps. High-quality editing is what makes that connection possible.
It really all comes down to trust. A professionally edited image does more than just look polished—it sets accurate expectations. When the shade of a t-shirt or the grain of a wooden table is represented perfectly, the customer trusts that what they see is what they'll get. This simple act of showing your product honestly leads directly to happier customers and, just as importantly, fewer returns.
The Psychology Behind a Perfect Shot
Imagine you're scrolling online and see a blurry, poorly lit photo of a product. What’s your first impression? Probably that the seller doesn't care much. Now, picture a sharp, vibrant, and perfectly lit image of the same item. That photo instantly signals quality, professionalism, and value. The psychological impact is huge, and it happens in a split second.
This is exactly why the demand for expert photo editing is exploding. The global market for e-commerce product photography is projected to jump from USD 1 billion in 2024 to nearly USD 2 billion by 2033. This massive growth shows just how much brands are realizing that visual perfection is a non-negotiable part of the online shopping experience.
A great product photo stops the scroll. A perfectly edited one closes the sale. It’s the final, silent pitch that convinces a customer to click "Add to Cart."
More Than Just a Pretty Picture
Think of professional photo editing not as a final touch-up, but as a core piece of your sales and branding strategy. These polished images become powerful assets you can use everywhere—on your website, in social media ads, and in your email campaigns.
Beyond the initial sale, these visuals are also crucial for boosting e-commerce customer engagement. By turning a standard photo into a compelling visual story, you create a consistent and trustworthy brand image that keeps people coming back for more.
Setting Up Your Shots for Editing Success
Great e-commerce photos aren’t born in editing software—they start with a smart setup. The quality of your original shot is the single biggest factor in how the final image turns out. A well-planned photo session can save you hours of headaches later.
Think of it this way: your goal is to give your editing tools, especially AI, the cleanest possible starting point. When you capture a sharp, well-lit image from the get-go, you're not wasting time on basic fixes. Instead, you can focus on making your product look its absolute best.
Creating Your DIY Photography Studio
You don't need to rent a professional studio to get professional results. A simple, consistent setup in the corner of a room can work just as well. The name of the game is control.
First, tackle the background. A simple roll of white paper or even a large piece of poster board creates that clean, neutral look you see on major e-commerce sites. This simple step makes it incredibly easy for AI tools to remove the background later.
Next up is lighting, which is where many people stumble. Natural light from a window is lovely, but it's unreliable—it changes by the hour and with the weather. For consistent results shot after shot, a basic artificial lighting kit is your best friend.
- Two Light Sources: A main light (the "key light") and a secondary, softer light (the "fill light") are perfect for eliminating harsh shadows.
- Softboxes or Diffusers: These are worth every penny. They fit over your lights to spread a soft, flattering glow over your product, avoiding those ugly "hot spots."
- Tripod: This is non-negotiable. A sturdy tripod guarantees your shots are sharp and consistently framed every single time. No shaky hands, no blurry products.
Dialing in the Right Camera Settings
Your phone can absolutely take incredible product photos, but you have to get out of "auto" mode. Taking a moment to adjust a few key settings manually will make a world of difference.
Getting the shot 90% right in the camera means you spend less time fixing it and more time perfecting it. A clean source image is the secret to fast and effective e-commerce photo editing.
Before you start snapping away, lock in these three settings:
- Low ISO: Keep your ISO as low as it will go (usually 100 or 200). This prevents that grainy, noisy look and keeps your images looking crisp and professional.
- Aperture (f-stop): To ensure your entire product is in focus from front to back, use a mid-to-high f-stop, like f/8 or f/11. This creates a deep depth of field, which is exactly what you want for product shots.
- White Balance: Don't let your camera guess the color. Set your white balance manually to match your lights (e.g., "Daylight" or "Tungsten"). This ensures your product's colors are true-to-life right from the start.
Finally, do yourself a huge favor and create a simple style guide. Just a few notes on the angles you'll use, your exact lighting setup, and the background color. This little bit of prep work ensures all your product photos have a cohesive, professional look that builds trust with your customers.
Core Techniques for Polished Product Images
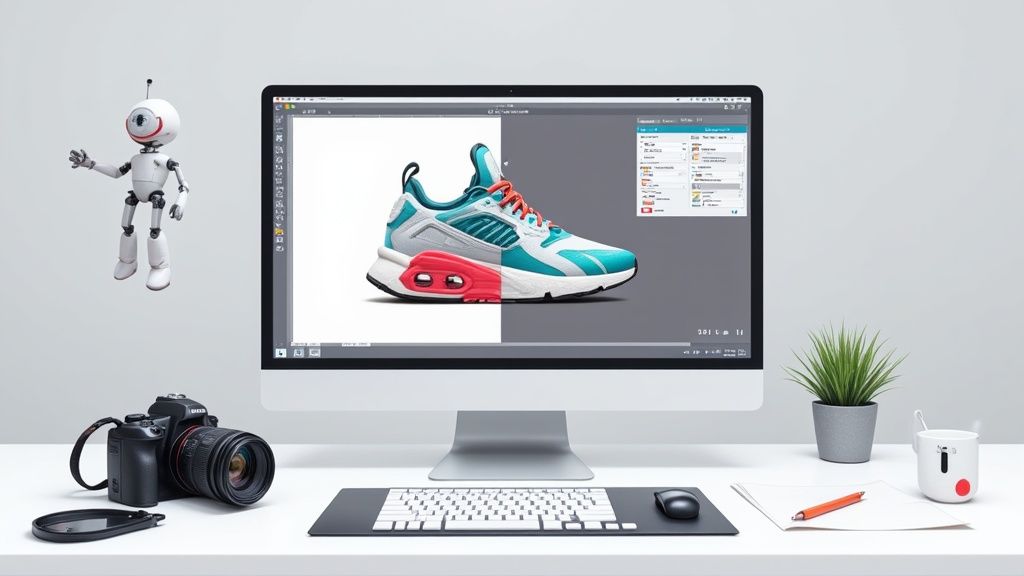
Once you've got your shots, the real work begins. This is where you take good raw images and turn them into the kind of professional, trust-building photos that actually sell products. If you can get a handle on a few key e-commerce photo editing techniques, you’ll be well on your way to a consistent and appealing online store.
Remember, the goal isn't to make your product look like something it's not. It's about presenting it in its absolute best light. That means getting the colors just right, clearing away any distractions, and making sure the product itself is sharp and clear. This is what separates an amateur-looking listing from a truly professional brand experience.
Consistency Through Cropping and Straightening
The simplest, yet most effective, first step toward a pro-level catalog is consistency. By cropping and straightening your images, you ensure every product is framed the same way, creating a clean, organized look across your category pages. This subtle alignment makes your whole store feel more intentional and trustworthy.
Just picture a customer browsing your site. If every product is a different size and sitting at a slightly different angle, the whole experience feels messy and unprofessional. By setting a standard aspect ratio (a 1:1 square is a safe bet for most marketplaces) and making sure every shot is perfectly level, you create a visual rhythm that makes browsing a breeze. This attention to detail signals quality before a shopper even clicks on an item.
The most crucial element of e-commerce photo editing is creating a uniform look. A consistent presentation across all your listings builds brand credibility and makes your store easier for customers to navigate.
The Art of Accurate Color Correction
Nothing kills a sale or leads to a return faster than a customer receiving an item that looks nothing like the color they saw on their screen. This is why color correction is one of your most important jobs as an editor. The mission is simple: make the product on the screen look exactly like the product in real life.
This goes way beyond just cranking up the saturation. You have to carefully adjust the white balance to get rid of any weird color casts from your lighting. Then, you'll need to tweak hues to perfectly match the physical item, all while keeping the tones consistent from one photo to the next. Nailing this will dramatically slash your return rates because you're setting clear, accurate expectations for your customers.
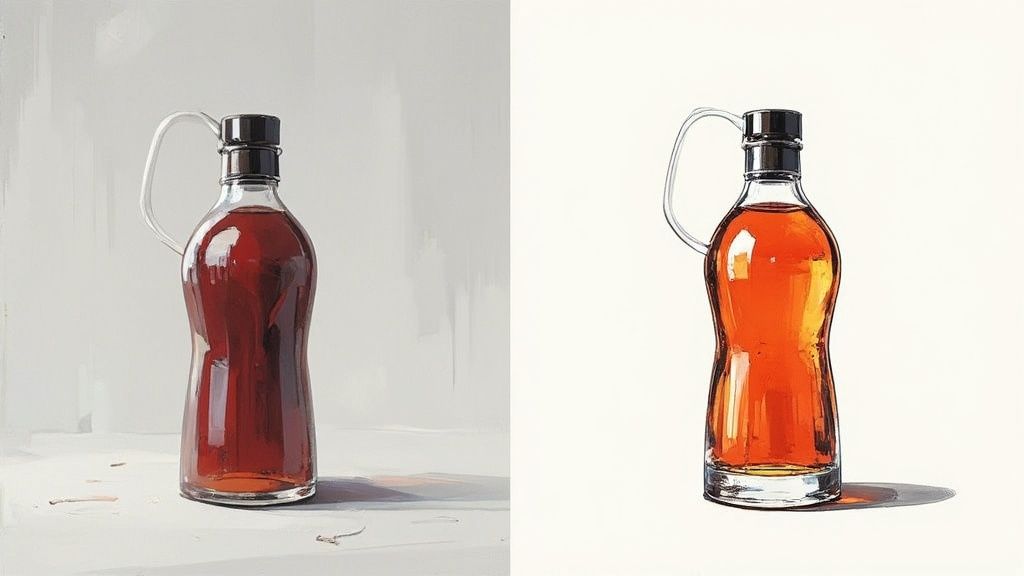
Clean Backgrounds and Subtle Retouching
There's a reason the clean, pure white or light grey background is an industry standard. It gets rid of all distractions, making your product the undeniable star of the show. Removing the background is arguably the single most impactful edit you can make to achieve that high-end, professional look.
Even if you shoot on a white backdrop, you’ll still need to clean it up in post-production to get it perfect. Thankfully, modern AI-powered tools have made this incredibly fast, often letting you isolate your product with just one click. From there, you can do some light retouching—removing tiny dust specks, fingerprints, or minor scratches the camera picked up. The idea is to make it look flawless without appearing fake.
For those with a high volume of products, this can be a real time-sink. Many brands find it’s a smart move to look into professional product photo editing services to handle the more repetitive tasks, freeing them up to focus on other parts of the business.
Adding Depth with Natural Shadows
After you've removed the background, your product might look a bit odd, like it's just floating in space. That's why adding a soft, realistic shadow is such a critical final touch. A well-placed drop shadow or a subtle reflection grounds the product, giving it a sense of weight, dimension, and realism.
Stay away from the harsh, generic-looking default shadows you see in some older software. The best approach is to create a soft, diffused shadow that looks like it was cast by natural light. It’s a small detail, but it adds a layer of professionalism that makes your product look tangible and much more desirable.
The growing demand for these skills is clear when you look at market trends. North America continues to be a major player in the photo editing software space, with a market valued at around USD 377.44 million in 2024. Simpler, more accessible tools are especially popular with small businesses trying to elevate their digital content without a huge budget or a steep learning curve.
To illustrate how you can efficiently apply these edits across many photos, here's a look at a typical batch editing workflow.
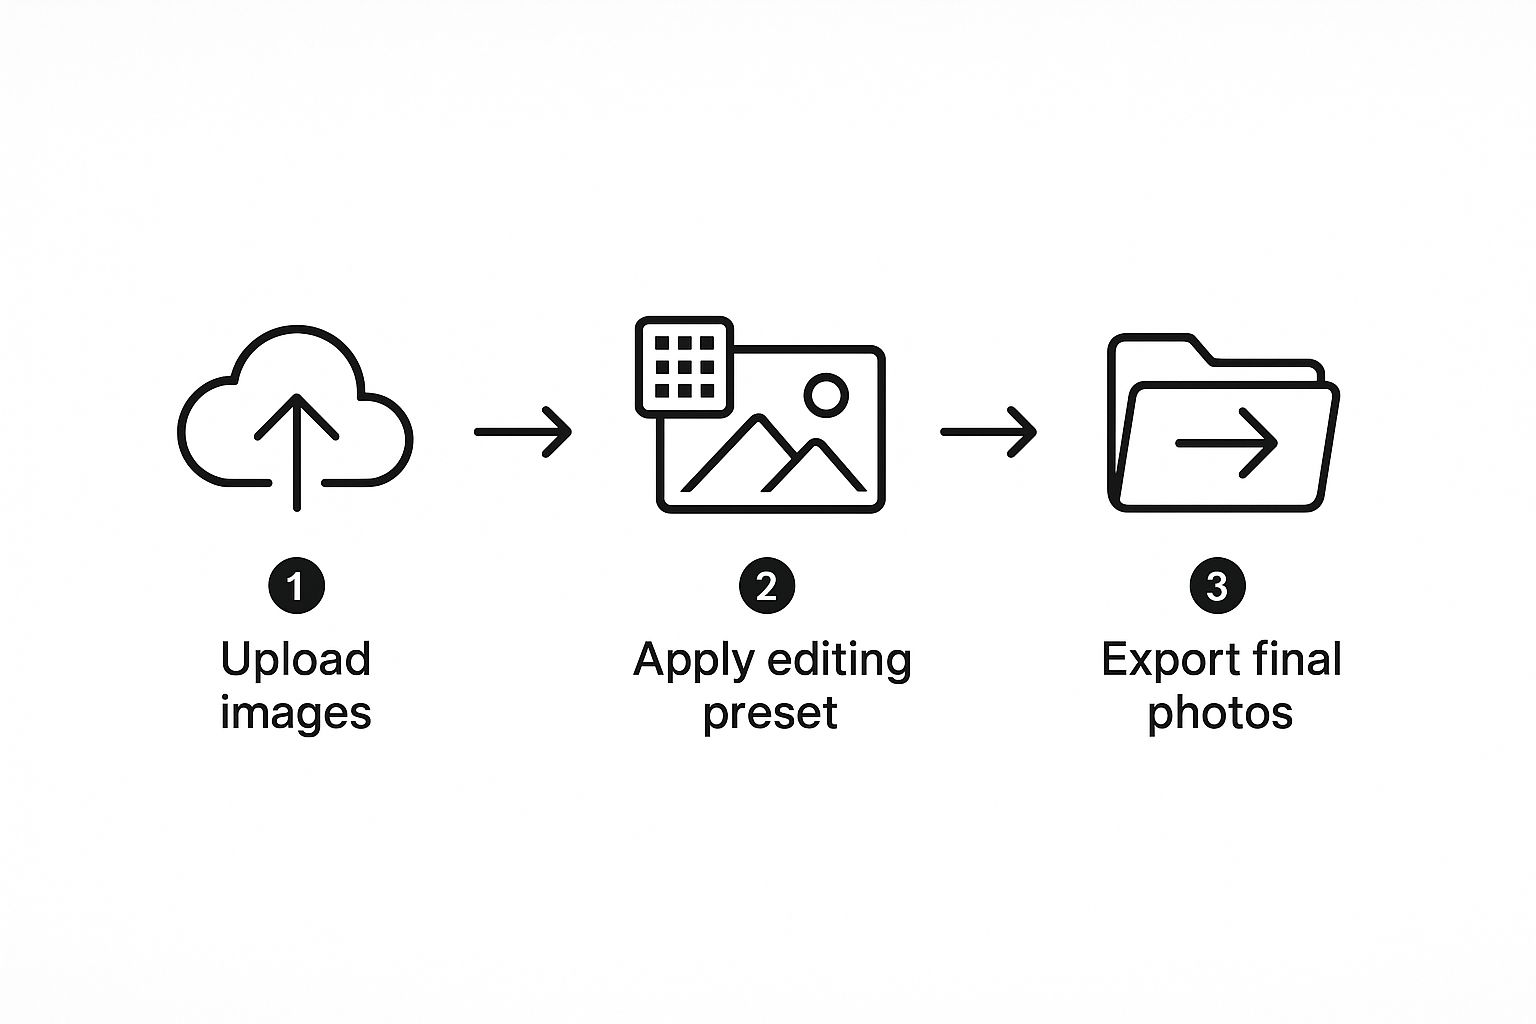
As you can see, creating a single editing preset and applying it to an entire batch of photos is a massive time-saver and a great way to maintain that all-important brand consistency.
Essential E-Commerce Editing Tasks and Their Impact
To wrap it all up, let's break down exactly what these key editing tasks do and why they matter so much for your bottom line.
| Editing Task | Objective | Impact on Sales |
|---|---|---|
| Cropping & Straightening | Create a uniform size and alignment across all product photos. | Builds a professional, trustworthy brand image and improves the browsing experience. |
| Color Correction | Ensure the on-screen color perfectly matches the physical product. | Reduces return rates by setting accurate customer expectations and builds trust. |
| Background Removal | Isolate the product on a clean, non-distracting background (usually white). | Makes the product the hero, enhances perceived value, and meets marketplace requirements. |
| Retouching | Remove minor imperfections like dust, scratches, or fingerprints. | Presents the product in perfect condition, increasing desirability. |
| Shadow Creation | Add a realistic shadow to ground the product and give it dimension. | Makes the product look more tangible and professional, preventing the "floating" effect. |
Ultimately, mastering these edits is about more than just making pretty pictures. It's about building a brand that customers trust and creating a shopping experience that feels polished and reliable from start to finish.
Using AI to Streamline Your Editing Workflow

While nothing beats the fine-tuned control of manual editing, AI tools can be a game-changer for your e-commerce photo workflow. It's not about some far-off future concept; artificial intelligence is here now, ready to take over the repetitive tasks that eat up your time, letting you focus on the creative side of your business.
At its core, AI's big advantage is its ability to learn from millions of images. It knows what a "good" product photo should look like and can apply those edits with incredible speed and surprising accuracy. For anyone managing a store with hundreds, or even thousands, of products, this is a massive win.
The global photo editing software market is booming, and a huge part of that growth comes from AI and machine learning. These technologies are making things like background removal and automatic retouching faster and more precise than ever, which is a lifesaver for e-commerce photography.
Where AI Truly Shines
Let's be real—AI isn't a magic bullet for every editing task. But it absolutely excels at the high-volume, repetitive jobs that would otherwise take hours of tedious clicking. Knowing where it works best is the key to using it effectively.
- One-Click Background Removal: This is easily the most popular AI feature for e-commerce. An algorithm can spot your product and cleanly cut out the background in seconds. Manually, that same task could take several minutes for just one picture.
- Automated Color Balancing: Consistency is everything. AI can analyze your photo and instantly adjust the exposure, contrast, and white balance to make colors pop and look true-to-life across your entire product line.
- Smart Object Enhancement: Some tools are smart enough to sharpen important details, clean up noise from photos taken in less-than-ideal lighting, and even increase the resolution of an image without making it look pixelated.
If you want to take things a step further and create entirely new scenes, you can even check out an AI product photo generator. These tools can place your product into unique lifestyle settings. For a broader look at how AI can help with all kinds of content, it's worth exploring other AI content creation tools as well.
Think of AI as your tireless assistant. It handles 80% of the grunt work in editing, freeing you up to add your human touch to the final 20%—the part that really defines your brand’s quality.
Knowing When to Step In
For all its power, AI is still just a tool. It’s a fantastic assistant, but it shouldn't be the final decision-maker. Understanding its limits is crucial for getting professional-looking results.
AI can sometimes get tripped up by really complex products. Think of a delicate necklace with a fine chain or a semi-transparent glass where the background shows through. In these cases, let the AI do the heavy lifting first—like removing the bulk of the background—then jump in yourself to handle the final, detailed cleanup.
This hybrid approach gives you the best of both worlds: the raw speed of automation paired with the precision of your own expert eye.
Ultimately, bringing AI into your photo editing process is about working smarter. It helps you scale up your photo production, keep your branding consistent, and get your products in front of customers faster than ever.
Optimizing Images for Speed and SEO
https://www.youtube.com/embed/q22Q9rOWDas
So, you’ve captured and edited the perfect product shot. That’s a huge win, but there’s one last hurdle to clear before it can start making you money. A gorgeous photo is worthless if it drags your page load speed into the ground or gets completely ignored by Google.
This final optimization stage is all about turning those beautiful images into hardworking assets for your store.
The big challenge here is finding that sweet spot between image quality and file size. You need your photos to look crisp and professional, but a massive, high-resolution file can make your site feel sluggish. And we all know that slow pages kill conversions. The goal is to shrink that file size down as much as you can without anyone noticing a drop in visual quality.
Choosing the Right File Format
The file format you save your image as makes a massive difference in both its quality and its weight. There isn’t a single “best” format for everything; the right choice really depends on the specific image you’re working with.
- JPEG (JPG): For most standard product photos, this is your workhorse. JPEGs are fantastic at compressing complex images with tons of colors and gradients, resulting in much smaller file sizes.
- PNG: Reach for a PNG when you absolutely need a transparent background. Think logos, or maybe a product shot you want to layer over a colored banner on your homepage. Just be aware that this transparency comes at the cost of a larger file size.
- WebP: This is a newer format from Google that often delivers even better compression than JPEG or PNG without sacrificing quality. Browser support is pretty much universal now, but it’s still a good idea to have a JPEG version as a fallback just in case.
Once you've got these optimized images live on your site, you want search engines to find them ASAP. Learning how to increase Google's crawl rate and get indexed faster can help you see the SEO benefits of your hard work much sooner.
Your product image isn't just a visual aid; it's a piece of data that search engines read. Properly optimizing this data can lead to more organic traffic directly from image search results.
Practical Steps for Image SEO
Beyond just slimming down the file size, you need to give search engines some context about what’s in the picture. This involves a few simple but powerful habits that can boost your search ranking and make your site more accessible for shoppers using screen readers.
First up, the file name itself is low-hanging fruit. Don't upload a photo called IMG_8475.jpg. That tells Google absolutely nothing. Instead, rename it with descriptive, relevant keywords before you upload. A file named blue-suede-ankle-boots.jpg is instantly more useful.
Next, you have to nail the alt text (or alternative text). This is a short, simple description of the image that shows up if the picture fails to load. More importantly, it's what screen readers announce to visually impaired users. A solid alt text might be, "A pair of royal blue suede ankle boots with a side zipper." It clearly describes the product for both people and search crawlers, giving your e-commerce photo editing SEO a direct boost.
Common E-Commerce Photo Editing Questions
When you're first diving into e-commerce, a lot of questions pop up around product photos. It's completely normal. You're trying to figure out the right tools, how much time to sink into editing, and what it's all going to cost. Let's tackle some of the most common things I hear from sellers.
A big one is always about the software. People see professionals using complex, expensive suites and think that's the only way. But honestly, many free and low-cost apps now deliver fantastic results for the most critical tasks. The trick is finding a tool that makes things like background removal and color correction easy, without needing a degree in graphic design to figure it out.
Can I Edit Photos on a Tight Budget?
Absolutely. You don’t need a massive budget to get professional-looking product photos. The real secret? It all starts with the quality of the picture you take in the first place.
A crisp, well-lit photo from your smartphone can easily become a polished, high-quality product shot with the help of free online tools or mobile apps.
These budget-friendly options are perfect for the essentials:
- Resizing and Cropping: This is non-negotiable for making sure your images fit platform specs, like the standard 1:1 square ratio on Instagram.
- Basic Adjustments: A little tweak to the brightness and contrast can make a world of difference, making your product details really stand out.
- AI-Powered Features: It's amazing what free tools can do now. Many have one-click background removal that's surprisingly accurate.
The key to great e-commerce photos on a budget isn't fancy software. It's starting with a great source image and knowing how to nail the basic edits that customers actually notice.
How Much Time Should I Spend Editing Each Photo?
Let's be realistic. When you're just starting, it might take you 10-15 minutes to edit a single photo while you're getting the hang of things. That's okay. But with a bit of practice and the right tools, you can get much, much faster.
Once you have a system, you can fly through edits. Many experienced sellers use batch-processing features to edit an entire photoshoot in less than an hour. The goal is to build a consistent workflow. Once you’ve defined your brand's look, you can save those settings and apply them to dozens of photos at once, dropping your edit time to just a minute or two per image.
For anyone dealing with a high volume of products, outsourcing can be a lifesaver. Exploring different photo editing services for ecommerce can free up a ton of your time.
Ready to see how fast you can transform your product photos? With ProdShot, you can turn simple snapshots into professional, conversion-driving images in seconds. Try ProdShot for free and see the difference.