

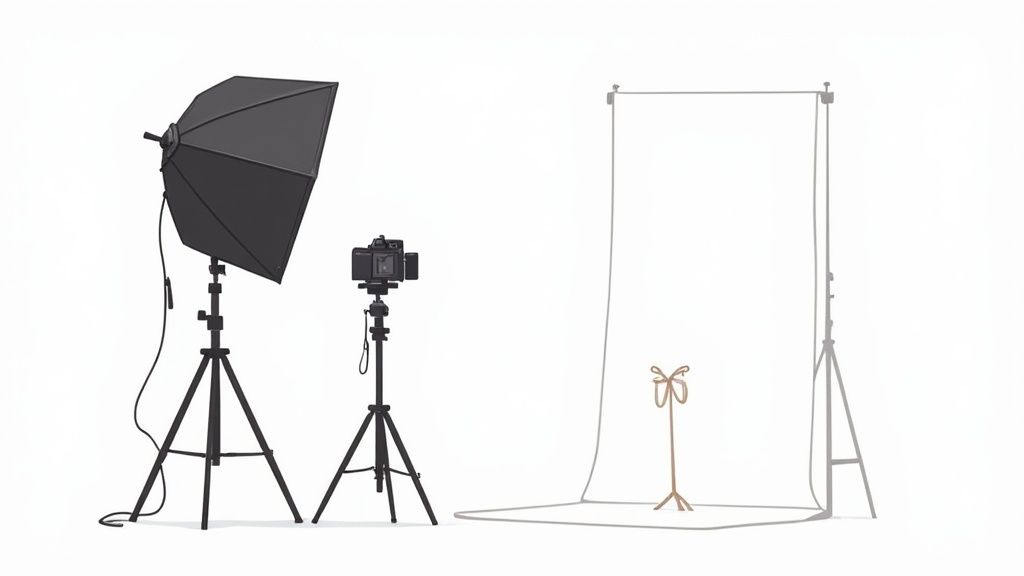
To truly capture professional-grade jewellery photos, your first move is to build a solid toolkit. This isn't about breaking the bank; it’s about getting the right tools for a very specific job. We’re talking about a macro lens to catch those tiny, intricate details, a tripod to keep everything razor-sharp, and a clean background to make your pieces the undeniable star of the show. Get these three things right, and you've built the foundation for every stunning shot that follows.
Building Your Jewellery Photography Toolkit
Before you even touch your camera settings or think about lighting, assembling the right gear is the most critical first step. Jewellery is a challenging subject—it's small, it's reflective, and its value lies in the tiny details that standard equipment just can't capture.
Your goal here is to produce images that don't just look professional, but also build trust and ultimately drive sales. This initial investment in your setup is what separates a quick, amateur snapshot from a high-converting product photo that does the selling for you.
To help you get started, here's a look at the essential gear that will make the biggest impact on your jewellery photography.
Essential Gear for Jewellery Photography
| Equipment | Why It's Important | Pro Tip |
|---|---|---|
| Macro Lens | Essential for capturing extreme close-ups and revealing fine details like engravings, gemstone facets, and metal textures. | Look for a lens with a 1:1 magnification ratio for true-to-life size. A focal length between 90mm and 105mm is perfect for jewellery. |
| Sturdy Tripod | Eliminates camera shake and motion blur, ensuring your photos are perfectly sharp. This is crucial for close-up shots. | Choose a tripod with an articulating center column. It will let you shoot from directly overhead, which is a fantastic angle for flat lays. |
| DSLR or Mirrorless Camera | Gives you manual control over settings like aperture, shutter speed, and ISO, which is vital for adapting to different lighting conditions. | You don't need the latest model. An entry-level DSLR or mirrorless camera with manual mode is more than enough to get started. |
| Remote Shutter or Timer | Prevents the tiny shake caused by pressing the shutter button, giving you an extra layer of sharpness. | A simple wired remote is inexpensive and incredibly effective. If you don't have one, just use your camera's built-in 2-second timer. |
| Clean Backgrounds | A non-distracting backdrop ensures the customer's full attention is on the jewellery itself. | Start with a simple roll of white paper or a piece of white acrylic. They're affordable, versatile, and create a classic, clean look. |
Investing in these core pieces will give you a versatile and professional setup that can handle almost any jewellery photography challenge you throw at it.
The Non-Negotiable Gear
Let's dive a little deeper. First up, you absolutely need a way to get those extreme close-ups with perfect clarity. A macro lens is, without a doubt, your most valuable player. It’s specifically designed to focus on tiny subjects from a very short distance, bringing out the delicate engravings and gemstone facets that customers zoom in to see. Trying to shoot jewellery without a macro lens is like trying to paint a masterpiece with a roller brush—you’ll lose all the detail that matters.
Just as critical is a sturdy tripod. The slightest handshake, one you wouldn't even notice yourself, creates motion blur in a close-up shot. A tripod locks your camera in place, guaranteeing tack-sharp images. This becomes especially important when you start using slower shutter speeds to let more light into the camera.
The secret to professional jewellery photography isn't a complex, expensive studio. It's mastering a few key pieces of equipment—a macro lens for detail, a tripod for sharpness, and a clean background for focus. Get these right, and you're 90% of the way there.
Choosing Your Backgrounds and Props
The background you choose sets the entire mood for your product. While you can get creative, the classic white background remains a champion for a reason. In fact, up to 38% of brands stick with clean white backdrops to boost conversions. It simply works—it removes all distractions and makes the jewellery the hero of the shot.
When you're ready to branch out for lifestyle shots or social media content, think about materials that add context without competing for attention.
- Marble Slabs: These add a touch of cool, modern luxury.
- Slate Tiles: Perfect for creating a dark, moody, and textured feel.
- Linen Fabric: Gives you a soft, organic, and rustic vibe.
Prepping the Jewellery for Its Close-Up
This might be the most overlooked step, but it’s one that can make or break your final image. Your high-resolution camera and macro lens will pick up everything—every fingerprint, every speck of dust, every tiny scratch.
Before you even think about shooting, always:
- Clean Every Piece: Grab a microfiber cloth and a good jewellery cleaner. Make it sparkle.
- Wear Cotton Gloves: This is a pro move. It stops you from leaving new smudges while you're positioning the item.
- Use Canned Air: Right before you click the shutter, a quick blast of canned air removes any last-minute dust that has settled.
Once your shoot is done, the next step is getting those images ready for your website. If you're wondering about the best way to do that, you can learn how to resize images without losing quality in our detailed guide.
Making Your Jewelry Sparkle with Light
When it comes to jewelry photography, lighting isn't just one piece of the puzzle—it's everything. How light interacts with a piece determines whether a diamond explodes with fire, gold gives off that irresistible warm glow, or silver just looks dull and flat. If you want to take images that truly do your products justice, mastering light is the secret sauce.
The great news? You don't need a fancy, high-end studio to get started. Your journey can begin with the most accessible light source there is: natural window light. Just set up next to a large window on an overcast day. The clouds act as a giant, natural diffuser, providing soft, even light that wraps beautifully around your jewelry. This is perfect for minimizing those harsh, amateurish shadows and creating a flattering, natural look.
This infographic breaks down a few common artificial lighting setups you can use to tame reflections and make every detail pop.

As you can see, strategically placing lights like softboxes or ring lights gives you incredible control, allowing you to build even, manageable illumination from multiple angles.
Controlling Reflections and Shadows
While natural light is fantastic, artificial light gives you total command. Highly polished metals and faceted gemstones are basically tiny, complex mirrors. They will reflect everything in the room, including you, your camera, and that weird poster on your wall. This is where diffusion becomes your best friend.
A simple, incredibly effective way to get that soft, scattered light is with a DIY light tent. You can rig one up using a translucent white storage box or even just by draping a white sheet over a simple frame. This setup surrounds your jewelry with soft light from all sides, effectively killing those distracting, image-ruining reflections.
The goal isn't to eliminate all shadows, but to control them. Soft, gentle shadows create depth and make your jewellery look three-dimensional. Harsh, dark shadows just look unprofessional.
Let's walk through a real-world scenario. Imagine you're shooting a delicate silver necklace with a single lamp positioned to the left. Sure, you get some nice, bright highlights, but now you've got dark, distracting shadows creeping in on the right side.
The fix is surprisingly simple. Grab a piece of white foam board and place it on the right side of the necklace, just out of the camera's frame. Now, angle it to catch the light from your lamp and bounce it right back into the shadowed areas. This technique, known as using a fill card, instantly brightens up the dark spots and reveals hidden detail—all without adding a second light source.
Small Adjustments Make a Big Impact
Now, let's take that shot from good to great. What happens if you move the lamp slightly higher? The highlights on the necklace will shift, maybe catching the edge of a specific link and making it really pop. Move the lamp a few inches closer, and the light becomes more intense and focused. Pull it further away, and the light softens and spreads out. It's all about experimentation.
Here are a few adjustments to play with on your next shoot:
- Change the Light's Height: A higher light source can often create a more dramatic, high-end feel.
- Adjust the Light's Distance: Moving the light closer or further away is a quick way to control its intensity and softness.
- Vary the Fill Card's Angle: Tweaking the angle of your foam board fine-tunes exactly how much light you bounce back.
Learning to see and shape light this way completely changes the game. And once you’ve nailed the shot, you can streamline the final touches by exploring how AI can perfect your jewelry product photos. By making these tiny tweaks on set, you gain immense control over the final image, ensuring every single piece looks its absolute best.
Composing Shots That Connect with Buyers
A technically perfect photo is great, but it's the composition that truly sells the piece. This is where you graduate from simply documenting your inventory to telling a story that grabs your customer's attention.
Let the jewelry guide your composition. The graceful curve of a chain can be a powerful tool, leading the viewer's eye right to the main event—the pendant. Or, instead of laying a pair of earrings side-by-side, try overlapping them just a bit. This simple move adds depth and makes the shot feel more dynamic and less like a police lineup.
Finding the Best Angles
The angle you choose can completely transform how a piece is perceived. A top-down, flat-lay shot is fantastic for showing off the full design of a necklace or a wide bracelet. But be warned—that same angle can make a brilliant diamond ring look dull and lifeless.
To really capture the fire and brilliance of a gemstone, you have to get lower. Shooting from about a 45-degree angle lets the light hit the stone’s facets just right, creating that sparkle customers are looking for. Don't be afraid to experiment with every single piece; you'll quickly discover which angles bring out its best features.
Styling with Purposeful Props
Props should always add to the story, never steal the show. The goal is to create a mood and provide context without creating clutter. The right prop complements the jewelry and reinforces your brand's feel.
A few ideas to get you started:
- For Minimalist Luxury: A simple gold band placed on a clean marble tile. The cool, veined stone against the warm metal is a classic for a reason.
- For Bohemian Charm: Try draping a beaded bracelet over a sprig of dried lavender or a swatch of raw linen. It immediately creates a soft, earthy vibe.
- For Edgy Modern: An industrial-style silver chain arranged on a dark slate background gives it a bold, high-contrast look that commands attention.
Always remember the golden rule of styling: less is more. Start with a single prop and ask yourself if it enhances the photo. If it pulls focus from the jewelry for even a second, get rid of it. Your product is always the hero.
Once you nail these stunning product shots, they become your most powerful online assets. To get the most out of your hard work, it's worth exploring broader strategies for creating compelling social media content.
Dialing in Your Camera Settings for Sharp Photos
If you want consistently sharp, professional-looking photos, you have to take control of your camera's manual settings. Leaving it on ‘Auto’ is basically letting a robot guess what’s important in your shot. With a detailed, reflective subject like jewellery, that guess is almost always wrong. It’s time to move beyond guesswork and start telling your camera exactly what to do.
The first step is a game-changer: switch your camera’s mode dial to Aperture Priority (A/Av). For product photography, this is your new best friend. It lets you control the single most important variable for sharpness—the depth of field. You simply set the aperture you want, and the camera calculates the perfect shutter speed to get the exposure right.
Prioritizing Aperture for Maximum Sharpness
Think about photographing a ring. You want everything from the front of the band to the tiny prongs holding the stone to be in crisp focus. If you use a wide-open aperture (like f/2.8), you’ll get a super shallow depth of field, which means only a tiny sliver of the ring will be sharp. It might look artsy, but it’s useless for a customer trying to see the details.
To get that all-over sharpness, you need a narrow aperture, which means dialing in a higher f-stop number.
A fantastic starting point for most jewellery is somewhere around f/11 or f/16. This creates a deep depth of field, ensuring the entire piece looks crisp and focused. And because you’re using a tripod, you don't have to worry one bit about the slower shutter speed the camera will choose.
Keeping Your Images Clean with a Low ISO
Next up is ISO, which is your camera sensor's sensitivity to light. A high ISO is great for a dark concert, but it's the absolute enemy of clean product photography. When you crank up the ISO to numbers like 1600 or 3200, you introduce digital “noise”—that ugly, grainy texture that instantly cheapens your images.
Since your jewellery isn’t going anywhere and your camera is locked down on a tripod, you have the luxury of using the lowest possible ISO setting.
For the cleanest, most professional-looking photos, always set your ISO to its base level, which is typically ISO 100 or 200. This is non-negotiable. It guarantees smooth, noise-free images that let the quality of your jewellery shine.
Getting these basic settings right is the foundation for every great shot. The table below offers some solid starting points for different types of jewellery to help you get started.
Recommended Camera Settings for Jewellery
Here are some starting points to help you capture sharp, well-exposed images of different types of jewellery. Remember to adjust based on your specific lighting and lens.
| Jewellery Type | Aperture (f-stop) | ISO | Focus Tip |
|---|---|---|---|
| Rings | f/11 – f/16 | 100 | Focus on the front-most part of the main stone or setting. |
| Earrings (Studs) | f/8 – f/11 | 100 | With a flatter subject, you can use a slightly wider aperture. |
| Pendants/Necklaces | f/11 – f/16 | 100 | Focus on the most detailed part of the pendant or the clasp. |
| Bracelets | f/16 | 100 | A higher f-stop helps keep the entire length of the bracelet in focus. |
With your aperture set for sharpness and your ISO locked in for quality, you can let the camera handle the shutter speed. Just make sure to use a remote shutter or your camera’s two-second timer to prevent any camera shake when you press the button.
These simple adjustments give you precise control and are the key to capturing stunning, high-quality images every single time.
Bringing Your Photos to Life with Smart Editing
That satisfying click of the camera's shutter isn't the end of the line—it's actually where the real magic begins. Post-production is your chance to take a good, solid image and transform it into a professional shot that truly sells. This is the final polish, where you make sure every detail, from the true color of the gold to the fiery sparkle of a diamond, is absolutely perfect.
The first few tweaks in editing are always about the fundamentals. White balance is absolutely non-negotiable. You have to get this right to ensure your silver actually looks like silver and your gold doesn't have a weird green or blue tint. Just a small adjustment here can make all the difference. After that, a little bit of sharpening can really make the intricate facets of a gemstone pop, giving it a crispness that just pulls the eye in.
The New Age of AI Retouching
While classic editing techniques are still incredibly powerful, modern AI tools have completely changed the game. They automate tasks that used to take me hours of painstaking, pixel-by-pixel work. For anyone selling jewelry, this is a massive win. These platforms can instantly knock out a background, clean up a fingerprint you didn't even notice, or add a realistic shine to metal, all in just a few clicks.
Here’s a perfect example. You can see how an AI-powered tool like ProdShot takes a decent raw photo and, almost instantly, spits out a flawless, e-commerce-ready image.
Look at the "after" shot on the right. The ring is perfectly isolated on a clean white background, the reflections are enhanced, and the whole thing is sharper. And it all happened in seconds. This kind of efficiency is quickly becoming the new standard.
Making Your Editing Workflow More Efficient
Using these new tools doesn't mean you throw out everything you know about good editing. Instead, you create a hybrid workflow that gives you the best of both worlds.
Here’s how I approach it:
- Always start with a great raw file. Get it sharp and well-lit in-camera using the settings we talked about earlier.
- Handle the basic corrections first. I'll pop the image into my preferred software to adjust the white balance, exposure, and contrast.
- Let AI do the heavy lifting. Then, I’ll upload that corrected image to a service like ProdShot for the instant background removal and initial shine enhancements.
- Add your final human touch. I’ll bring it back for any last-minute, subtle tweaks to sharpening or color that perfect the shot.
This approach is a massive time-saver. If you want to get into the nitty-gritty of this process, we have a whole guide on https://prodshot.net/product-photo-retouching.
Smart editing is about working smarter, not harder. Use AI to handle the repetitive, time-consuming tasks like background removal, freeing you up to focus on the creative final touches that make your brand unique.
Beyond just making things look pretty, smart editing also includes crucial technical steps. For example, it’s vital to optimize website images for faster load times to ensure your beautiful jewelry photos don't slow your site down for potential buyers. By blending foundational editing skills with the incredible speed of AI, you can produce a high volume of professional images that not only look amazing but also perform perfectly online.
Common Jewellery Photography Questions
Even with a solid guide, you're bound to run into a few snags once you start shooting. It happens to everyone. Knowing how to fix the most common problems on the fly is what separates a frustrating photoshoot from a successful one.
Let's walk through some of the questions I hear all the time from people learning the ropes of jewellery photography. Think of this as your troubleshooting cheat sheet.
How Do I Avoid My Own Reflection?
Ah, the classic problem. You've got a beautifully polished piece of silver or a flawless gemstone, and it's acting like a perfect, tiny mirror for you, your camera, and your entire room.
The secret weapon here is diffusion. By wrapping your subject in a soft, white, translucent material, you replace those distracting, sharp reflections with a clean, flattering white highlight. A pop-up light tent is the go-to tool for this, but you can easily rig one yourself. Just build a small "fort" with white foam boards around your setup and leave a little peephole for your camera lens.
Why Do My Gemstones Look Dull?
A gemstone that looks flat in a photo is a heartbreaker. That fire and sparkle you see in person comes from the way light hits its tiny facets. If your light source is too big and soft, it just washes everything out, and the stone looks lifeless.
Here’s a little trick the pros use:
- Get your main, soft lighting set up first. This will light the rest of the piece evenly.
- Then, grab a small, direct light source—a little penlight or a tiny LED works wonders.
- Move this small light around the gemstone, watching it closely. You'll see it hit a "sweet spot" where the facets just explode with light and color. That's the moment to take the shot.
The goal isn't to kill all reflections. It's to control them. A soft, clean white reflection actually helps define the shape of polished metal, giving it a sense of dimension and a high-end feel. You're just swapping ugly reflections for beautiful ones.
How Can I Keep a Chain or Necklace Posed Perfectly?
Fine chains and delicate necklaces can be a real pain. They just don't want to lie flat, and trying to force them into a perfect, stiff circle always looks unnatural. The key is to work with the piece, not against it.
A tiny bit of clear museum wax or putty is your best friend. You can use it to place a few invisible anchor points to hold a pendant at just the right angle or to create a graceful, natural-looking curve in the chain.
For hanging shots, try using a very thin wire or fishing line to suspend the necklace. It lets the piece hang the way it was designed to, giving it an elegant and professional look that's impossible to get when it's lying flat. The line can easily be edited out in post-production, leaving you with a perfect shot.
Ready to skip the tedious editing and get flawless jewellery photos in seconds? ProdShot uses AI to instantly remove backgrounds, enhance shine, and create professional, e-commerce-ready images from your simple snapshots. See how it works.