

Improving your images is all about starting with a decent photo and then using smart tools to make it shine. You're looking to refine the lighting, sharpness, and overall composition to create a visual that not only looks professional but actually helps you sell. For most e-commerce sellers, this means taking a simple smartphone picture and turning it into something that looks like it came from a high-end studio.
Why High-Quality Product Images Matter
In e-commerce, your photos do all the talking. They’re your digital storefront, your best salesperson, and your brand's first impression, all rolled into one. Grainy, poorly lit, or inconsistent pictures don't just look amateurish—they actively hurt your business. They create a poor first impression that sends potential customers clicking away.
Think about it: customers can't touch or feel your product online. They rely completely on what they can see to decide if they want to buy.
When your photos don't accurately show off your product, you create a gap between what the customer expects and what they actually get. This disconnect is one of the biggest reasons for returns and bad reviews. Learning how to improve image quality isn't just about making things look pretty; it's a direct investment in your sales, conversions, and customer trust.
The Shift from Manual Editing to AI Solutions
Not too long ago, getting professional-looking product shots meant two things: spending endless hours in complicated software like Photoshop or shelling out big bucks for a photoshoot. We break down the real cost of professional product photography in our guide, and it’s a real eye-opener. This reality put a major roadblock in front of small businesses and entrepreneurs working with tight budgets and even tighter schedules.
But things have changed. AI-powered tools like ProdShot now do the heavy lifting, automating the tedious tasks that used to require a specialist's touch. This isn't just a small trend; the global digital image processing market is on track to hit $21.73 billion by 2030. This boom is fueled by the simple need to manage and perfect the massive number of images we all create every day.
To see just how different the two approaches are, let's break it down.
Manual vs AI-Powered Image Enhancement
| Factor | Manual Editing (e.g., Photoshop) | AI-Powered Tools (e.g., ProdShot) |
|---|---|---|
| Time Investment | Hours per batch of images, requires focused work. | Seconds or minutes per image, runs automatically. |
| Cost | High. Expensive software subscriptions plus labor costs or agency fees. | Low. Affordable subscriptions, often pennies per image. |
| Skill Required | High. Requires expertise in lighting, color theory, and software. | Low. Minimal to no experience needed; the tool does the work. |
| Consistency | Varies. Can be difficult to maintain the same style across all photos. | High. Delivers a consistent, on-brand look every time. |
| Results | Can be excellent, but dependent on the editor's skill. | Professional, high-quality results accessible to anyone. |
The takeaway is clear: AI has leveled the playing field, making high-end results accessible without the traditional barriers of time, money, and skill.
The real game-changer with AI is its ability to deliver consistent, top-notch results at scale. It takes human error out of the equation and ensures every single product photo meets the same high standard, creating a brand that looks cohesive and trustworthy.
The image below gives you a sense of just how much more data AI has to work with as resolution increases.
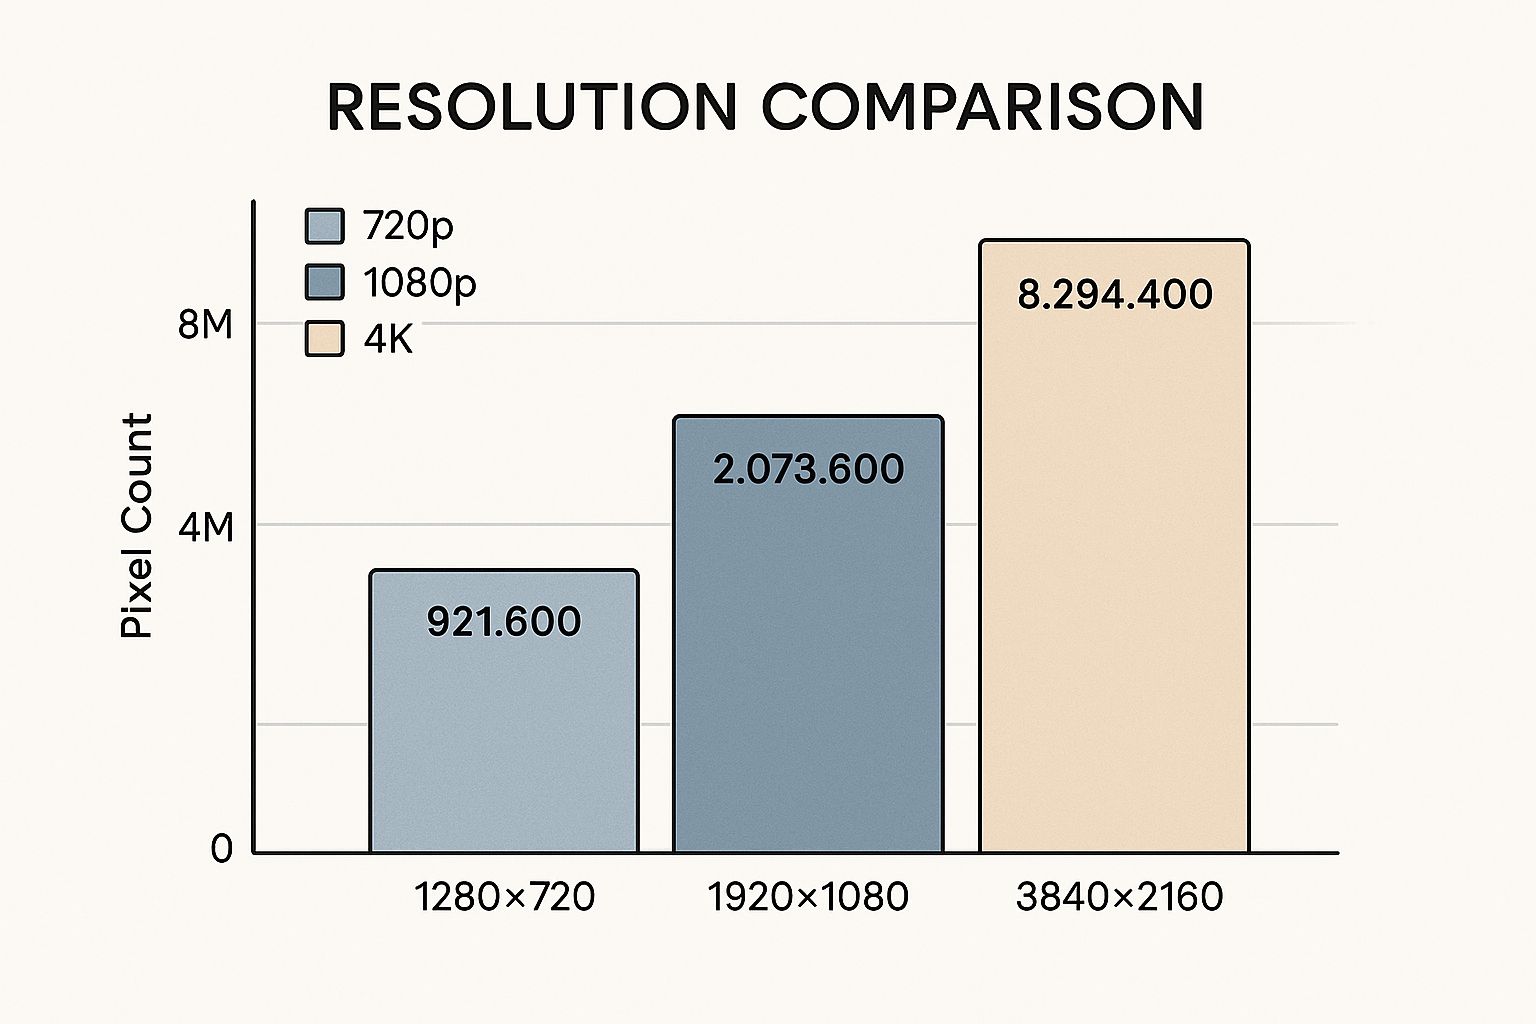
When you jump from standard HD to 4K, the amount of pixel data skyrockets. This extra detail gives AI tools more raw material to analyze and enhance, which is how they produce such crisp, sharp final images.
Capturing Better Source Images With Your Smartphone
The secret to amazing AI-enhanced photos isn't a thousand-dollar camera—it’s starting with a decent source image. Garbage in, garbage out, as they say. Even the smartest AI works best when it has good material to work with.
Fortunately, the high-powered camera sitting in your pocket is more than capable of giving you a solid foundation.
You can dramatically improve your results just by making a few small tweaks to how you take your pictures. Think of it as giving your AI tool a running head start. These simple adjustments will make the enhancement process much smoother and the final images significantly more impressive.
Master Your Lighting With Natural Light
Lighting is everything in photography. Seriously. And you don't need a complex studio setup to get it right. Your best and most powerful light source is often free: a window.
Natural, indirect sunlight creates soft, flattering light that minimizes harsh shadows and brings out the true colors of your product. You want to avoid direct, blaring sun, as it will just blow out parts of your image and create dark, ugly shadows.
For a super simple but effective setup, just place your product on a clean surface next to a large window. If you notice heavy shadows on one side of the product, you can easily soften them.
- The White Paper Trick: Grab a simple piece of white paper or poster board.
- Position It Carefully: Hold it opposite the window to bounce that beautiful light back onto the shadowed side of your product.
- Observe the Change: You'll see the dark areas instantly brighten up, creating a much more balanced and professional-looking shot.
This simple technique costs absolutely nothing but makes a huge difference in the quality of your photo right from the start.
Control Your Smartphone Camera Settings
Your phone's default camera app has powerful features that most people just ignore. Taking a moment to adjust them before you shoot is a key step in learning how to improve image quality at the source.
The most critical settings to get a handle on are focus and exposure. Instead of just pointing and shooting, tap and hold on your product on the screen. You'll likely see a yellow box appear, which means the focus and exposure are now locked on that exact point. This is huge—it stops the camera from randomly refocusing on the background or changing the brightness if your hand moves a little.
Once you've locked the focus, you can usually slide your finger up or down on the screen to manually tweak the exposure. Brighten the image just enough so you can see all the details clearly, but be careful not to wash out the colors.
Stage Your Product for Success
Your product should always be the hero of the shot. A cluttered or distracting background will pull the customer's attention away from what you're actually trying to sell. Simplicity is your best friend here.
Choose a clean, neutral background like a white poster board, a clean wooden table, or even a solid-colored piece of fabric. This makes your product pop and makes it incredibly easy for an AI tool like ProdShot to perfectly remove the background later on.
And it goes without saying: make sure your product is clean, free of dust or smudges, and positioned to show off its best features. These small staging details create a much cleaner source file for any enhancements you plan to do.
Let AI Do the Heavy Lifting with One-Click Enhancements
Okay, you’ve got a solid source photo. Now for the magic. This is where you can hand your image off to an AI tool like ProdShot and get studio-level results in seconds. The whole process is less about tedious manual edits and more about smart, one-click automation.
Think about it. You just snapped a decent picture of a handmade necklace on your kitchen table. The lighting is okay, but that background is unmistakably your kitchen. In the old days, you'd spend an hour in complicated software meticulously cutting out the necklace, fiddling with highlights on the silver, and dropping it onto a clean white background.
With a modern AI tool, you just upload the photo. That's it. The AI instantly identifies the product, strips away the background, balances the light to make the metal and gems pop, and even adds a subtle, realistic shadow for depth. What you get is a crisp, professional product shot ready for your store, all from a single click.
Turn Blurry into Brilliant with AI Upscaling
One of the most powerful tricks up an AI's sleeve is upscaling. This isn't just stretching an image and making it bigger; it’s a smart process that actually adds detail and sharpness. The AI analyzes the existing pixels and intelligently generates new ones that fit right in, basically rebuilding the image at a higher resolution.
Let's say a supplier sent you a low-res image of a new product. It's grainy and looks terrible when you try to feature it on your site. Instead of bugging them for a new photo (and waiting forever), you can just run it through an AI upscaler. In many cases, it can double or even quadruple the resolution. A blurry 800×800 pixel image can become a crystal-clear 3200×3200 shot that looks stunning on any screen.
For a busy entrepreneur, this is an absolute lifesaver. It makes previously unusable photos ready for prime time.
Get Perfect Colors and Lighting, Every Time
Another area where AI really shines is with smart color correction and lighting adjustments. We’ve all been there—you take a photo with your phone, and the colors just look… off. A vibrant red looks dull, or a pure white has a yellowish tint from the indoor lights.
AI algorithms analyze the photo and fix these imbalances automatically, making sure your product’s colors are true to life. This is huge for customer satisfaction because what they see online is exactly what shows up at their door.
The best part? AI doesn't just crank up the brightness. It intelligently adjusts highlights, shadows, and mid-tones to create a balanced, dynamic look that pulls the customer's eye right where you want it: on your product.
The growth in this space is just wild. The AI image enhancer market was valued at around US$2.6 billion in 2024 and is on track to hit a massive US$50.7 billion by 2034. That explosive growth is fueled by the exact kind of real-time, automated tools that platforms like ProdShot bring to the table for e-commerce sellers.
Tools like our AI product photo generator make this whole process ridiculously simple. Features like upscaling, background removal, and shadow generation are presented as simple toggles, completely removing the steep learning curve of traditional photo editing software.
Add Realistic Shadows for a Sense of Depth
An image without a shadow can look flat and fake, like it was just pasted onto the background. Shadows are what give a product a sense of place and dimension, making it feel real and tangible to the person looking at it. But creating them manually is a genuine art form that requires a deep understanding of light and perspective.
AI tools handle this instantly. After removing the background, they can generate different styles of shadows to fit your product:
- Drop Shadows: A soft, subtle shadow right under the product.
- Reflection Shadows: A sleek, mirror-like reflection that’s perfect for glossy items like electronics or cosmetics.
- Cast Shadows: A more natural shadow that looks like it's being cast from a specific light source.
This final touch adds a layer of professionalism that transforms your image from a simple cutout into a polished, three-dimensional product photo that’s ready to sell.
Creating Compelling Scenes with AI Backgrounds
A clean white background is safe, but let's be honest—it rarely tells a story. To get your products to truly connect with customers, you need to create a scene that resonates with them. This is where AI-generated backgrounds completely change the game for e-commerce sellers.
You can stop just showing your product and start showing it in its element. Think about a new pair of hiking boots. Which is more compelling: the boots floating in a white void, or the same pair planted firmly on a mossy rock in a sun-dappled forest? That kind of contextual storytelling is incredibly powerful. Until recently, it was only possible through expensive, logistically nightmarish photoshoots.
With tools like ProdShot, that massive barrier is gone. You can now spin up high-end lifestyle photos on demand, giving you the freedom to test different scenes and see what actually clicks with your audience. This makes premium, aspirational branding accessible to everyone, not just companies with huge marketing budgets.
Crafting the Perfect AI Prompt
The secret to getting the exact scene you're picturing is learning how to communicate with the AI. You do this through a text prompt, which is really just a description of the background you want to create. Vague prompts will always get you generic results. Specific, descriptive prompts are where the magic happens.
You have to think like a photographer directing a shoot. Don't just say "a desk." Instead, describe the type of desk and the environment around it.
- Vague Prompt: "A desk with a plant."
- Descriptive Prompt: "A sleek, modern oak desk with a small succulent in a white ceramic pot. Soft morning light streams in from a window on the left."
See the difference? The second prompt gives the AI so much more to work with, leading to a scene that feels intentional and high-quality. This is a crucial step in learning how to improve image quality that goes way beyond just technical fixes.
My personal tip is to always include details about lighting and texture. Words like "soft morning light," "warm afternoon glow," "rough wooden surface," or "polished marble" add a layer of realism that makes the final image far more believable and engaging.
Real-World Examples in Action
Let's put this into practice with a couple of different products to see how it works.
Product: A Luxury Watch
- Goal: Convey a feeling of elegance, precision, and success.
- Effective Prompt: "A minimalist dark wood tabletop with a leather-bound journal and a silver pen. The scene is shot from above with clean, professional lighting."
Product: A Ceramic Mug
- Goal: Create a cozy, comfortable, and warm vibe.
- Effective Prompt: "A rustic wooden kitchen table next to a window with a view of autumn leaves. A steamy cup of coffee sits on a knitted coaster beside the mug."
By getting good at writing descriptive prompts, you’re no longer just enhancing a photo—you're basically becoming a virtual art director. You can create an endless variety of on-brand lifestyle shots without ever leaving your desk. This doesn't just improve your images; it elevates your entire brand story.
Optimizing Your Images for SEO and Web Speed
You’ve captured a great shot and used AI to make it look incredible. That's a huge win. But if that beautiful, high-resolution image takes an eternity to load, it’s actually working against you.
Website speed isn't some technical jargon for your developer to worry about—it's a massive part of the customer experience. More importantly, it’s a major factor in how search engines like Google decide to rank your site.
Slow-loading pages are a one-way ticket to a high bounce rate. Think about it: customers today expect instant gratification. A delay of just a couple of seconds is more than enough to make them click away, leaving their cart behind. This is exactly why image optimization is non-negotiable for any serious e-commerce seller.
Start with the Right File Format
The first move in your optimization playbook is picking the right file format for the job. Each one has its own strengths, and choosing correctly can slash your file sizes without anyone noticing a drop in quality.
-
JPEG (or JPG): This is the workhorse for most product photos. It offers fantastic compression, letting you dramatically shrink the file size while keeping the image looking sharp. For most e-commerce visuals, this is your go-to.
-
PNG: Pull out the PNG format when you absolutely need a transparent background. It’s a "lossless" format, which means the quality is perfect, but that perfection comes at the cost of a much larger file. Save it for things like your brand logo or specific graphics where transparency is key.
-
WebP: Meet the modern champion of web images. Developed by Google, WebP delivers top-tier compression that beats both JPEG and PNG. It supports transparency and high quality but at a fraction of the file size. The great news is that many AI tools, including ProdShot, can export directly to WebP, giving you the best of both worlds.
Get Smart About Compression and Sizing
Once you've chosen your format, it’s time to compress the image. Compression works by stripping out unnecessary data to make the file smaller. The real art is finding that sweet spot where the file size is tiny, but the quality is still crisp and professional.
Fortunately, you don't have to guess. AI tools often handle this for you, applying intelligent compression algorithms that preserve critical details.
You can also dial in your dimensions perfectly before you even upload. Using a tool like our free online image resizer is a quick way to get your images sized just right for your product pages.
Don't Skip the SEO Basics
Search engines are smart, but they can't "see" your images like a human can. They rely on the text-based information you provide. This is where a little bit of image SEO makes a huge difference. For anyone serious about online retail, this is a crucial piece of the broader puzzle of implementing ecommerce SEO best practices.
Alt Text is Your Secret Weapon: Alt text is simply a short, descriptive sentence that tells search engines (and visually impaired users) what's in the picture. Instead of letting your site default to "IMG_8871.jpg," your alt text should be something like, "Men's brown leather hiking boot on a rocky trail." This gives Google powerful context.
Use Descriptive File Names: Before you even hit the "upload" button, rename your files. A name like brown-leather-hiking-boot.webp tells a much better story to search engines than a generic camera name. This simple step can help your products pop up in Google Image Search, driving a surprising amount of traffic directly to your store.
Common Questions About Improving Image Quality
Jumping into AI-powered image editing for the first time usually brings up a few questions. Even after seeing the impressive results, it's totally normal to have some "what ifs" or "how does that really work" moments.
Let's walk through some of the most common questions I hear from online sellers. My goal here is to clear up any lingering doubts so you can feel confident adding these powerful tools to your arsenal.
Can AI Actually Fix a Blurry Photo?
Yes, and honestly, the results can be pretty shocking. AI upscalers aren't just stretching your image bigger; they use complex machine learning models to intelligently guess and generate brand-new pixel data. The software looks at the context of the blurry spots and fills in the missing details with surprising accuracy.
Think about that one shot you took that was almost perfect, but just a little out of focus. An AI tool can sharpen the edges, bring out the texture, and essentially rebuild the image at a higher resolution. While you'll always get the best results from a clear source photo, AI can often rescue an otherwise unusable shot, turning it into a fantastic asset for your product page.
It's good to keep expectations in check—an extremely blurry, low-quality image can only be improved so much. But for that common problem of a slightly soft or low-res photo, AI enhancement is an absolute game-changer.
Do I Still Need to Buy Professional Gear?
For the vast majority of e-commerce sellers, the answer is a firm no. The combination of a modern smartphone and a solid AI tool has pretty much eliminated the need for expensive DSLRs, lenses, and lighting setups for everyday product photos.
Your phone's camera is more than powerful enough to capture the raw detail you need. The AI then swoops in to handle all the tricky post-production work that used to require a pro's touch and gear.
- Background Removal: AI can perfectly cut out your product, a task that used to take ages to do by hand in Photoshop.
- Lighting Correction: It can balance out harsh highlights and dark shadows, making it look like you shot in a professional studio.
- Shadow Generation: AI adds realistic shadows that give your product a sense of weight and make it pop off the page.
This duo—your phone and an AI tool—isn't just a budget-friendly option. It's a faster, more streamlined way to create a polished and professional-looking store.
How Can I Keep My Product Images Consistent?
This is where AI-powered tools really leave manual editing in the dust. Trying to get the exact same look and feel across dozens, or even hundreds, of product photos by hand is a nightmare. It’s tedious and tiny inconsistencies are bound to creep in. AI completely solves this with templates and batch processing.
Most platforms, like ProdShot, let you set up a specific "look" for your brand. You can choose your go-to background style, lighting effects, shadow type, and even the image dimensions. Once you save this as a template, you can apply it to your entire product catalog in one click.
This guarantees that every single image on your site—from your top sellers to your brand-new arrivals—shares a cohesive, professional look that builds trust with your customers.
Ready to see what this looks like for your own products? ProdShot takes your simple smartphone photos and transforms them into studio-quality product images in seconds. Stop fighting with complicated software and start creating stunning visuals that actually sell. Try ProdShot for free today!