

When a shopper lands on your Amazon page, what's the very first thing that grabs their attention? It's not the title or the price—it's the main image. Your photography for amazon products is your digital handshake, your storefront window, and your most persuasive salesperson all rolled into one. Great photos don't just show an item; they build immediate trust and convince a customer to click "Add to Cart."
Why Better Photos Mean More Amazon Sales
Think about it from your own experience as a shopper. A blurry, poorly lit photo instantly makes you question the product's quality, right? It feels unprofessional and untrustworthy. On the flip side, a crisp, well-composed image communicates value and builds confidence before you've even read a single bullet point.
This isn't just a feeling; it has a real, measurable impact on your bottom line. Data consistently shows that high-resolution, professionally styled images can boost conversion rates by as much as 30% compared to listings with subpar photos. It's about giving shoppers the visual information they need to feel secure in their decision.
Build Trust and Set Expectations
Excellent photography closes the gap between the screen and reality. When a customer can zoom in and see the fine stitching on a leather wallet or the precise texture of a cosmetic cream, their hesitation melts away.
This level of detail accomplishes two critical things for your business:
- Slashes Return Rates: When the product that arrives looks exactly like the photos, customer expectations are met. This drastically reduces returns for "not as described" reasons, which can be a silent killer of profits.
- Boosts Perceived Value: A product that is presented beautifully simply feels more premium. This allows you to stand out based on quality, not just by being the cheapest option on the page.
The best visuals do more than just display your product. They tell a story about its quality, how it fits into the customer's life, and the problems it solves. This visual narrative is what separates the top-sellers from everyone else.
To understand this better, let's break down how different photos influence a shopper's journey.
How Key Photo Elements Drive Customer Actions
| Visual Element | Impact on Shopper | Potential Sales Outcome |
|---|---|---|
| Main "On-White" Image | Grabs attention in search results, establishes professionalism. | Higher click-through rate (CTR) from search. |
| Lifestyle "In-Use" Photo | Helps them visualize the product in their own life, creates an emotional connection. | Increases desire and "add to cart" actions. |
| Infographic/Feature Callout | Highlights key benefits and technical specs, answers questions quickly. | Reduces purchase friction and builds confidence. |
| Size/Scale Comparison | Sets clear expectations about dimensions, avoids sizing surprises. | Lowers return rates and improves reviews. |
| Product Detail/Texture Shot | Showcases material quality and craftsmanship. | Justifies a higher price point and builds trust in quality. |
By strategically using each of these photo types, you guide the customer from initial interest to a confident purchase.
Improve Your Amazon Search Ranking
Great photos aren't just for human eyes—Amazon's A9 search algorithm is watching, too. Listings with high-quality, compliant images naturally earn higher click-through rates and better conversion rates. The algorithm sees these positive signals and rewards your listing with better visibility. It's a powerful feedback loop.
Of course, stunning visuals are just one piece of the puzzle. To create a truly unstoppable listing, you also need to focus on crafting compelling product descriptions that work hand-in-hand with your images to tell a complete story and close the sale.
Building Your Own Smartphone Photo Setup
You don't need a high-end studio to get professional-looking photography for Amazon products. Honestly, you can pull together a seriously effective setup with things you probably already own, plus a couple of cheap tools that will make a world of difference. The real goal here is to build a little controlled world for your products, so you can get consistent, top-notch results every single time.
The most important element? It's completely free: light. Just forget your phone's built-in flash exists. It creates harsh, ugly shadows and makes products look flat. Instead, find a spot near a large window that gets a lot of bright, indirect sunlight. A slightly overcast day is your secret weapon, believe it or not. The clouds act like a massive softbox, diffusing the light and getting rid of those nasty shadows for you.
Crafting the Perfect Background
Your background has one job: to be clean, simple, and not steal the show. For that main Amazon hero image, a pure white background isn't just a suggestion—it's a hard rule.
This is where a big sheet of white poster board or a roll of seamless paper from a craft store becomes your best friend. Create what we call a "sweep" by taping the top edge of the paper to a wall and letting it curve down onto a table or the floor. This simple trick gets rid of that distracting horizontal line where the wall meets the surface, giving you that slick, "infinity" background you see in professional shots.
Pro Tip: Whatever you do, don't shove your product right up against the background. Pull it forward a few inches. This tiny adjustment creates a bit of depth, makes lighting way easier, and helps your product really "pop" off the page.
Essential Gear for Sharp, Stable Shots
Even if you think you have the steadiest hands on the planet, you're going to get some motion blur. It’s the arch-nemesis of a crisp product photo. Luckily, two super affordable gadgets can eliminate this problem entirely.
- A Smartphone Tripod: This is the single best investment you can make, and you can find a good one for less than $20. A tripod ensures your phone is rock-solid, which is the key to getting consistently sharp images.
- A Bluetooth Remote Shutter: This little clicker lets you snap the photo without ever touching your phone. It completely removes that tiny jiggle that happens when you tap the shutter button.
This image below gives you a great visual for a basic lighting setup that mimics what the pros do.
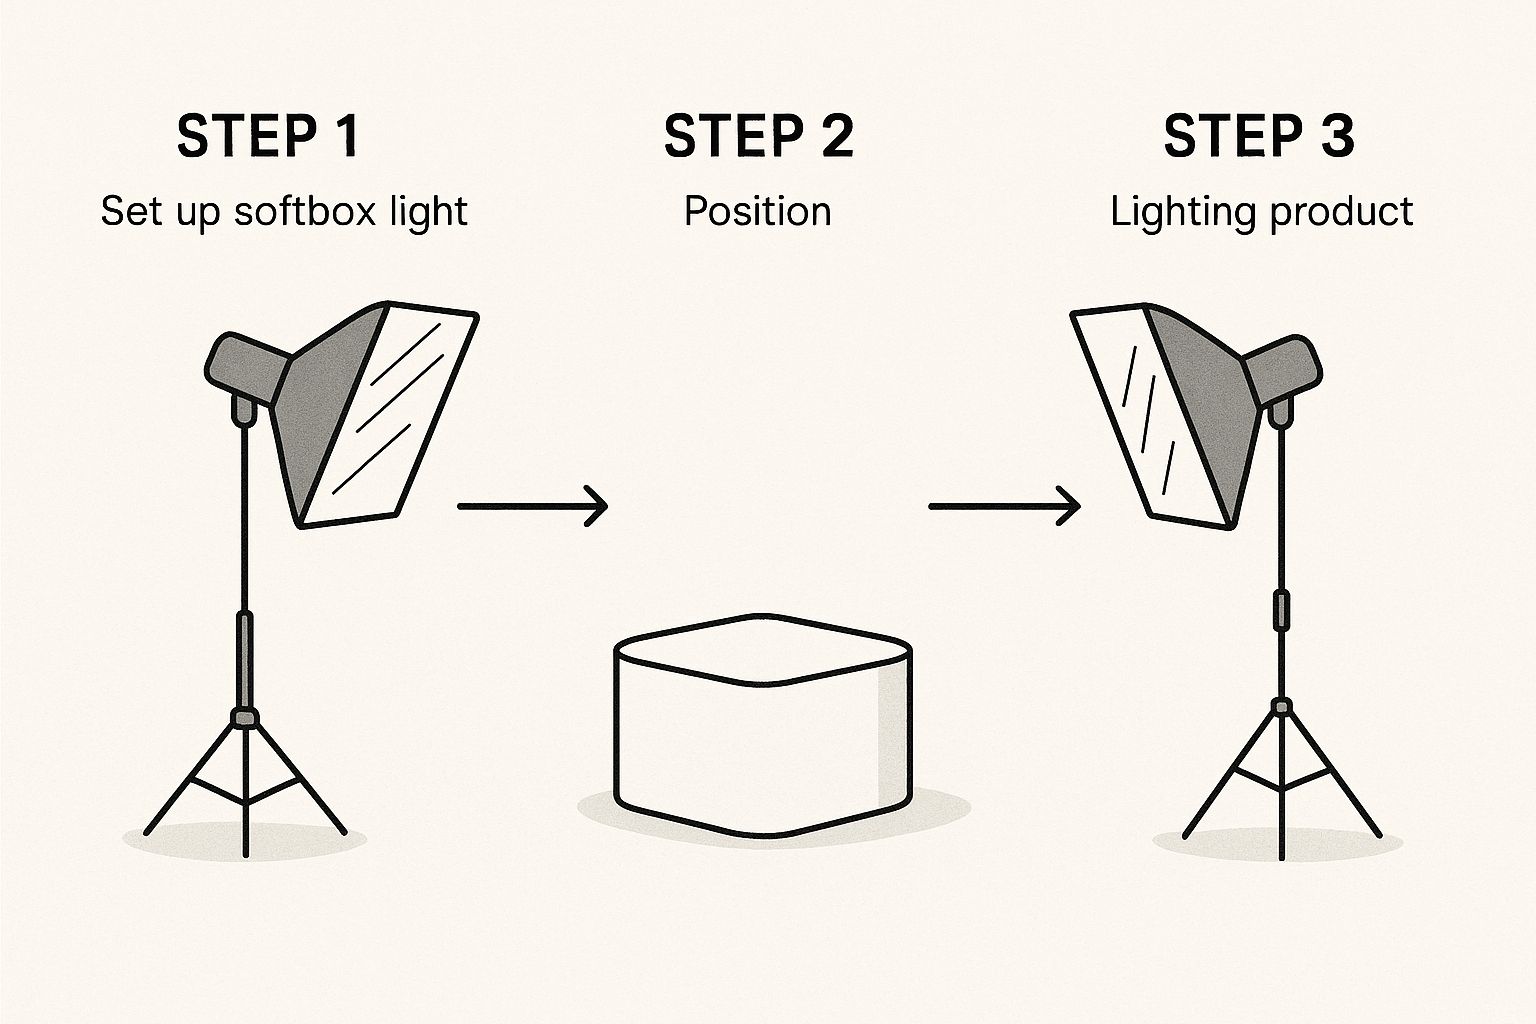
As you can see, angling your lights is crucial for softening shadows and lighting the product evenly. It's a fundamental principle of good product photography. Once you've got your lighting down, you can start thinking about props. The demand for great visuals is exploding, and more and more sellers are investing in props and unique backdrops to make their listings stand out from the crowd.
At the end of the day, putting together your own setup can save you a ton of money. If you want to see just how much, take a look at our breakdown of the cost of professional product photography and see how it stacks up against this DIY method. By getting a handle on these basics, you take complete control of how your brand looks on Amazon.
Nailing Amazon's Strict Image Guidelines

Getting a great shot of your product is a solid first step, but it’s really only half the battle. To actually sell on Amazon, your images have to clear the platform's notoriously high technical hurdles. It’s best to think of these guidelines not as annoying rules, but as the price of admission to a marketplace with millions of shoppers ready to buy.
Amazon's whole game is about creating a consistent, clean, and trustworthy shopping experience. That's why your main "hero" image—the very first one customers see in search results—has the most rigid requirements. If you get this one wrong, your listing can get suppressed, which basically makes it invisible.
The Main Image Rules You Can't Ignore
Your main image needs to be a crystal-clear photo of what you're selling, with absolutely zero distractions. It’s just your product, plain and simple.
Here’s a quick rundown of what they demand:
- Pure White Background: We're not talking "off-white" or "light gray." Amazon's system is looking for a perfect digital white, which is RGB (255, 255, 255).
- The 85% Rule: The product itself has to take up at least 85% of the space in the frame. This makes sure your product looks big and clear, even as a tiny thumbnail in search results.
- No Extras Allowed: You can't have any text, logos, watermarks, or props in the main image. It has to be just the product on its own.
Meeting these demands is absolutely critical. After all, a whopping 75% of Amazon shoppers say they've bailed on a purchase because of blurry or low-quality images. You can find a deeper dive into these rules in Amazon's official image requirements and best practices.
Understanding Pixels and the Zoom Feature
You know how you can hover over an Amazon image and it magnifies the details? That’s the zoom function, and it’s a massive conversion driver. But it only works if your images are big enough.
To get that coveted zoom, your photos must be at least 1,000 pixels on their longest side. For a standard square image, that means a minimum of 1000×1000 pixels. Honestly, I always aim higher—something closer to 2000×2000 gives customers an even better, more detailed look.
If your shot comes out a bit too small, you can sometimes use a tool to https://prodshot.net/image-resizer without it looking terrible, but you're always better off shooting in high resolution from the get-go.
Pro Tip: Your secondary images are where you get to break the rules and really sell. This is your chance to tell a story, show the product in action, highlight features with text, and give customers a sense of scale.
Getting Creative With Your Secondary Images
While the main image is all about following the rules, your other image slots are for persuasion. Amazon gives you several spots for photos, and you should use every single one of them. These secondary images don't need a pure white background, which frees you up to show your product in a real-world context.
Think about the questions a customer might have and answer them visually:
- How big is it? Put it next to a familiar object for scale.
- How does it work? Use an infographic or a photo with callouts.
- What does it feel like to own it? Show it in a lifestyle setting, maybe with a person.
By following these rules, you don't just avoid getting your listing buried—you create a more compelling page that actually converts browsers into buyers.
Capturing Compelling Shots with Your Smartphone
That powerful camera you carry around every day is more than good enough to create stunning photography for Amazon products. The real secret isn't spending a fortune on a new lens; it's about mastering a few fundamental techniques that professional photographers rely on. You'd be surprised how small tweaks in your process can completely change your final images.
One of the biggest mistakes I see people make is just letting their phone's automatic settings run the show. Take back control. Tap your product on the screen to set the focus point. Once it’s tack-sharp, press and hold to lock both the focus and the exposure. This simple trick stops the camera from shifting and refocusing while you shoot, keeping your product perfectly crisp and consistently lit.
Master Your Camera's Built-In Tools
Your smartphone's camera app has some incredibly useful, and often overlooked, features built right in. Turning on the gridlines, for example, is a game-changer for composition. It makes applying the rule of thirds effortless, helping you place your product slightly off-center for a more engaging and professional-looking shot. This is especially effective for your secondary and lifestyle images.
Here’s another critical piece of advice: never, ever use the digital zoom. When you pinch to zoom, you aren't actually zooming in—you're just cropping the sensor's image and throwing away valuable pixels. This leads to grainy, low-quality photos that will look terrible on a product listing. If you need to get closer, physically move the phone.
Resist the urge to zoom with your fingers. Always move your feet (or your tripod) to get a tighter shot. This preserves the maximum image quality, which is essential for Amazon's zoom feature.
By getting comfortable with these basic functions, you're setting yourself up to produce high-quality images without needing a bag full of expensive gear.
Plan Your Shot List for a Complete Story
Don’t just start snapping photos from random angles. A good shot list is your roadmap to a complete and persuasive product gallery. Think of it as building a visual argument for why a customer should buy your product.
A solid shot list should always cover these bases:
- The Hero Shot: Your main image. This has to be the product, crystal clear, on a pure white background. No exceptions.
- Detailed Close-Ups: Get in tight on the unique features. Show the quality of the stitching on a wallet, the texture of a fabric, or the precision of a logo.
- In-Context Photos: Help your customer imagine the product in their life. A picture of your water bottle on a hiking trail or your lamp on a nightstand instantly builds a connection.
- Scale and Packaging Shots: Give a clear sense of size by placing your product next to a universally recognized object, like a hand or a coffee mug. Including a shot of the packaging is also smart—it manages expectations and adds a touch of professionalism.
When you plan your shots like this, you create a comprehensive set of images that anticipates and answers customer questions, making that "Add to Cart" button much more inviting.
Using AI to Edit Your Photos Like a Pro
Alright, you’ve got your raw photos. Now for the fun part. This is where we take those solid smartphone shots and turn them into professional, Amazon-ready images. And no, you don't need to be a Photoshop wizard or spend a fortune on software.
Modern AI tools are built for sellers like us. They get the game. They understand Amazon's strict image rules and take care of the most mind-numbing editing tasks automatically. Seriously, what used to eat up an entire afternoon can now be done in minutes.
From Raw Photo to a Perfect Main Image
Getting from your camera roll to a listing-ready main image is faster than you'd think. The number one job here is nailing that pure white background. Anyone who's tried to manually cut out a product in Photoshop knows the pain. AI makes it a non-issue.
You just upload your photo, and the software’s algorithm instantly finds the edges of your product and cleanly slices it from the background. The result is that perfect RGB (255, 255, 255) white canvas Amazon demands for your hero shot. It's clean, compliant, and looks sharp.
But it's not just about removing the background. These platforms are smart enough to look for other ways to improve your shot.
- Color Correction: The AI will automatically fix the white balance and saturation, so the colors in the photo match the real-life product. No more washed-out or weirdly tinted items.
- Lighting Enhancement: It intelligently brightens the image, gets rid of harsh shadows, and adds subtle highlights that make the product details stand out.
- Smart Cropping and Resizing: It can even frame your product to fill at least 85% of the image and resize it to the ideal dimensions for Amazon's zoom feature.
This is a peek at the ProdShot interface. It’s incredibly straightforward—you can generate entire scenes for your product with just a few clicks.
This is the kind of tool that lets you take a basic photo and drop it into a setting that would have otherwise cost a small fortune to stage and shoot.
Remember, the point of AI editing isn’t to make your product look fake. It’s to enhance the photo you already have, making sure it’s a clean, professional, and accurate representation of what the customer is actually buying.
Creating Lifestyle Scenes Without a Studio
Your other images—the lifestyle shots—are where you connect with shoppers and show your product in action. In the past, this meant booking locations, hiring models, and sourcing props. It was a whole production. Now, you can dream up a scene and let AI build it for you.
Want your product "on a marble countertop next to a plant"? Or maybe "on a wooden table in a cozy cafe"? You just type it out. The AI generates a photorealistic background and seamlessly places your product right into it.
This opens up a world of possibilities for creating a variety of high-quality lifestyle photos without the logistical nightmare. If you want to see just how powerful this is, check out an AI product photo generator and play around with it.
This approach gives you two huge wins for your photography for Amazon products: speed and consistency. You can knock out a full gallery of on-brand, cohesive images in minutes, giving your listing a polished look that builds trust and helps you stand out. It’s like having a full-blown photo studio at your fingertips.
Your Questions on Amazon Photography Answered
Even with the best plan, you’re bound to hit a snag or have a question pop up when you're in the middle of a product shoot. Let's walk through some of the most common hurdles I see sellers face and get you some clear, direct answers so you can keep moving.
Can I Really Use an iPhone for All My Amazon Photos?
Yes, you absolutely can. The cameras on modern smartphones are incredible, and an iPhone is more than capable of meeting Amazon's strict technical requirements for image quality. Honestly, the brand of the phone isn’t what matters.
What really separates a professional shot from an amateur one is how you use the tool. It's all about controlling your lighting, keeping the phone perfectly still with a tripod, and getting comfortable with the camera settings. When you combine a simple DIY setup with a smart editing tool, your phone is all you need.
How Many Photos Should I Actually Upload?
Amazon gives you space for a main image, a video, and up to seven secondary images. My advice? Use every single slot. It’s not just about filling space; listings with a full set of images almost always see higher engagement and better sales.
Every empty image slot is a missed chance to show a feature or answer a customer's question before they even ask it. A complete photo gallery gives shoppers the confidence they need to click "Add to Cart" and can even lead to fewer returns down the line.
Think of your image gallery as a visual story that leaves no stone unturned. You want to show every angle, zoom in on key features, demonstrate the product in use, and give a crystal-clear idea of its size and scale.
What's the Single Biggest Mistake Sellers Make?
Hands down, the most common mistake is dropping the ball on the secondary images. So many sellers put all their energy into that perfect main image on a pure white background and then just toss in a few extra, nearly identical shots to fill the other slots. This is a massive misstep.
Your secondary images are your secret sales weapon. This is where you show the product in the real world, add text overlays to point out benefits, and build a genuine connection with your customer.
I like to think of it this way:
- The Main Image: Its job is to grab the shopper's attention and earn the click from a crowded search results page.
- The Secondary Images: Their job is to seal the deal once the shopper is on your product page.
Another classic error is inconsistent lighting. When your photos jump from bright and cool to dark and warm, it just looks unprofessional and can make buyers hesitant. This is precisely why having a consistent shooting setup and a reliable editing process is non-negotiable for a polished, trustworthy listing.
Ready to stop wrestling with complicated software and expensive photoshoots? ProdShot is an AI tool designed to turn your simple smartphone pictures into stunning, Amazon-ready product photos in just a few seconds.
Try ProdShot for free and see for yourself how easy it is to create a listing that truly sells.