

Using a green screen isn't just about swapping out backgrounds for fun; it’s a killer technique for taking total control over your brand's visual identity. It’s how you get that pixel-perfect consistency across your entire product line, which is a massive factor in building customer trust and recognition. Honestly, it's the secret to cranking out professional, marketplace-ready images without all the usual fuss.
Why Green Screen Editing Is an E-Commerce Superpower
Forget about shelling out for expensive studio rentals or spending days on location shoots. The real magic of using a green screen photo editor is how it streamlines your entire content creation process while seriously bumping up the quality. At its heart, the process relies on chroma keying—a fancy term for isolating and removing a specific color (usually that bright, unmistakable green) to create a transparent background. This little trick opens up a huge world of creative and commercial possibilities.
For e-commerce brands, the payoff is immediate and pretty substantial. You can lock in a uniform look for all your product listings on platforms like Shopify or Amazon, which instantly makes your brand look more professional. Imagine you're dropping a new seasonal collection. Instead of reshooting every single product, you can just swap in new backgrounds that match the campaign's vibe. That kind of agility is a huge competitive edge.
Driving Efficiency and Consistency
The impact on your workflow is a game-changer. When you standardize your photography against a green screen, you get rid of all those annoying variables like inconsistent lighting or distracting junk in the background of a real-world setting. This makes the whole process repeatable, saving you a ton of time and money.
Plus, modern AI-powered tools have made this technique more accessible than ever. You don't need to be a Photoshop wizard anymore to get incredible results. Our guide on photo editing services for e-commerce dives deeper into how this efficiency leads to better business outcomes.
The market trends tell the same story. The global green screen production kit market was valued at around USD 1.2 billion in 2023 and is expected to hit nearly USD 2.8 billion by 2032.
The big takeaway for online sellers is this: professional-grade visuals are no longer a luxury reserved for the big-shot brands. It's a tool that's on the table for anyone who wants to compete in a marketplace driven by visuals.
At the end of the day, mastering green screen editing is about making your products look their absolute best, every single time. It's a foundational skill that supports your bigger business goals and ties directly into broader strategies to increase online sales.
How to Set Up Your Shoot for a Flawless Edit
Your best work with a green screen photo editor happens long before you even touch the software. Seriously. A successful, clean background removal is almost entirely decided by the quality of your initial photoshoot.
Getting this right is the difference between a quick, painless edit and a frustrating hour spent trying to fix mistakes that were totally avoidable.
Nail Your Lighting, Nail Your Edit
The absolute most critical element is lighting. Your goal is to illuminate the green screen itself so evenly that it becomes a flat, shadow-free canvas of pure, consistent color.
Any hotspots (bright areas) or shadows will completely confuse the editing software, leading to patchy, uneven background removal. You’ll want to use at least two separate, diffused lights aimed exclusively at the backdrop to get that perfectly flat look.
Light Your Product Separately
Once the screen is evenly lit, you need to light your product with its own dedicated lights. This is non-negotiable. If you try to use the same lights for both your product and the screen, the green from the backdrop will bounce and reflect onto your product.
This creates that dreaded green "spill" or halo around your subject. Trust me, that green fringe is a nightmare to remove and instantly makes an image look amateurish. By lighting the subject independently, you create crisp, clean separation and sharp edges, which is exactly what the chroma key process needs to work its magic.
This level of detail during the shoot is what separates the pros from the hobbyists. The demand for high-quality editing tools that can handle well-shot footage reflects this. In fact, the global photo editing software market is projected to grow from USD 2.37 billion in 2025 to USD 3.29 billion by 2032. A huge chunk of that market (44.6%) is driven by prosumers who need professional results without a Hollywood-sized budget.
To give yourself the best shot at a clean edit, it’s worth taking a moment to double-check your setup. Here's a quick checklist I run through before every shoot.
Essential Photoshoot Prep Checklist
This quick-reference guide helps ensure every element is perfect before you start shooting.
| Element | Best Practice | Why It Matters |
|---|---|---|
| Backdrop Lighting | Use 2+ dedicated, diffused lights aimed only at the screen. | Prevents hotspots and shadows that confuse editing software. |
| Subject Lighting | Light the product with separate, independent lights. | Creates clean edges and prevents green spill/halo effect. |
| Subject Distance | Place the product at least 3-5 feet from the green screen. | Minimizes the amount of green light reflecting onto the subject. |
| Product Prep | Clean, dust, and polish the item until it’s spotless. | Zooming in during editing reveals every speck of dust and fingerprint. |
| Camera Stability | Use a sturdy tripod. | Ensures sharp, crisp images with no motion blur. |
Running through these steps might seem tedious, but it saves an incredible amount of time and frustration on the back end.
Dialing In Your Camera Settings
Your camera settings also play a huge role. To give your green screen photo editor the cleanest possible file to work with, lock in these settings:
- Low ISO: Keep your ISO as low as your camera will allow, usually 100 or 200. This minimizes digital noise or grain, which can interfere with the software's ability to distinguish the green color accurately.
- Faster Shutter Speed: Use a shutter speed that's fast enough to eliminate any potential for motion blur. Even the slightest movement can soften your edges, making the subject much harder to isolate.
- Aperture for Sharpness: Set your aperture (f-stop) to get your entire product in sharp focus from front to back. A good starting point for most product photography is around f/8 or f/11.
The infographic below really brings it all together, showing how control, efficiency, and quality intersect in a modern e-commerce workflow.

As you can see, controlling the shoot environment directly fuels the efficiency and quality of the final AI-powered edit.
Pro Tip: Always leave plenty of space between your product and the green screen—at least three to five feet, if you can. The further away your subject is, the less chance there is for that green light to bounce onto it.
While a green screen is a powerful tool, it works best when paired with a strong foundation in general photography principles. For more great advice on improving your shoots, check out these effective e-commerce photography tips. Combining these best practices ensures your raw photos are primed for a perfect edit, every single time.
Mastering Chroma Key Settings for Clean Cutouts
This is where the real magic happens. Once you've got your shots and imported them into a green screen photo editor, it's time to tell the software exactly what to remove. This process, known as chroma keying, comes down to a few core settings that give you surgical control over the final cutout.
Getting these controls right is what separates a clean, professional cutout from one that looks jagged and amateurish. Let's break down the essential sliders and toggles you'll run into and how to actually use them.
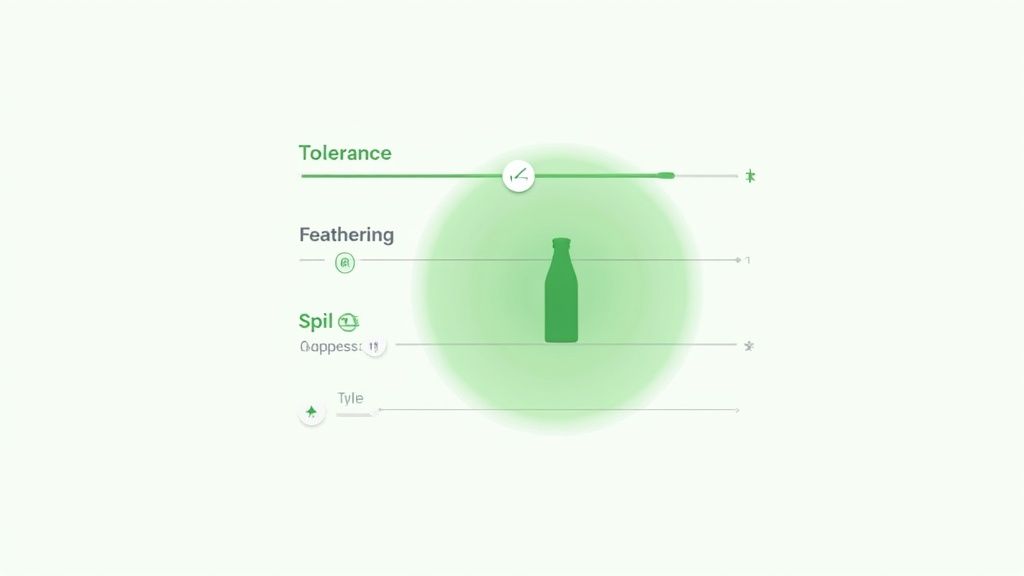
Finding the Right Tolerance Level
The first and most important setting you'll touch is usually called Tolerance or Similarity. Think of it as the software's sensitivity.
A low tolerance setting tells the editor to only remove a very specific shade of green. A high tolerance, on the other hand, tells it to be more aggressive and remove a wider range of green-ish colors.
Your job is to find the sweet spot. Too low, and you'll have ugly green splotches and pixels hanging around your product, especially where the lighting wasn't perfect. Too high, and the editor will start chewing into your actual product, making parts of it look transparent or creating jagged edges. A good rule of thumb is to start in the middle and slowly dial it up until the background vanishes without eating into your subject.
Smoothing Edges with Feathering
After the background is gone, you might notice the edges of your product look a little too sharp—almost pixelated. This is exactly what Feathering (or Edge Softness) is for. It creates a very subtle, soft transition between your product's edge and whatever new background you place behind it.
A little goes a very long way here. You just want enough to make the edge look natural, usually just a pixel or two. If you overdo it, you'll end up with a blurry, hazy halo around your product that screams "bad Photoshop." The goal is simply to knock down any harshness without sacrificing sharp details.
For really tricky subjects—think bicycle spokes or a model's hair—it's all about finding that delicate balance between a precise tolerance setting and just a whisper of feathering. This lets you preserve those fine, intricate details while still getting a clean break from the background.
Eliminating the Green Halo
Even with a perfect cutout, you might see a faint green glow reflecting onto the edges of your product. This annoying little artifact is called "spill," and Spill Suppression (or Despill) is your best friend for fixing it. This tool is built specifically to find and neutralize those leftover green color casts.
Most modern green screen editors are pretty smart about handling this automatically, but some give you manual control. Just be careful not to push this setting too far. Overly aggressive spill suppression can suck the life out of your product's natural colors, especially if it has yellow or cyan tones. Apply just enough to kill the green halo while keeping your product's colors true.
By getting a feel for these three key settings—Tolerance, Feathering, and Spill Suppression—you can troubleshoot just about any green screen photo and pull off a flawless, professional-looking cutout every single time.
Refining Your Image After the Background Is Gone
Getting a clean, automatic cutout feels like a huge win, but the work isn't quite done yet. This next part is where the real artistry comes in—it’s what separates a professional, marketplace-ready image from an obvious, amateur edit. You're about to transform a simple cutout into a believable, polished final shot.
The initial chroma key process does the heavy lifting, but it’s rarely perfect, especially if your product has tricky features. Reflective surfaces, transparent bits, or complex shadows can sometimes fool the software, causing it to erase parts of your product along with the green.
This is where layer masks become your best friend. Instead of permanently deleting pixels, a good green screen editor uses a mask to simply hide the background. This non-destructive approach means you can easily go back and "paint" back in any product details that were accidentally removed. It’s your safety net for getting the perfect selection.
Cleaning Up and Retouching for a Flawless Finish
Even the most carefully prepped product can have tiny imperfections. A stray speck of dust, a microscopic scratch, or a fingerprint can suddenly become a massive distraction once the product is floating on a clean new background. Now is the time for meticulous cleanup.
Zoom in close and use tools like the spot healing brush or clone stamp to carefully remove these blemishes. A soft-edged brush is key here, as it helps make your edits completely invisible. The goal is to present an idealized version of your product without it looking sterile or fake. Think of it as digital housekeeping that lets your item put its best foot forward.
A clean cutout is only half the battle. The final image's success hinges on how believably the product integrates with its new environment. If the lighting, shadows, and color don't match, the entire illusion falls apart.
Creating Cohesion Between Subject and Background
This is arguably the most critical step in the entire process. Just slapping your product onto a new background will almost always look jarring and unnatural. To make the composition feel real, you have to harmonize the lighting and color.
Take a good, long look at the light source in your chosen background image.
- Direction of Light: Where is the light coming from in the new scene? Your product's highlights and shadows absolutely must align with this direction. If they don’t, it will look like a sticker on a postcard.
- Color Temperature: Does the background have a warm, golden-hour glow or a cool, overcast vibe? You need to adjust your product’s color balance to match this temperature, making it feel like it was actually shot there.
- Shadow Casting: A product floating in space is an instant giveaway of a bad edit. Adding a soft, realistic drop shadow is what grounds the object in its new environment, giving it weight and presence. The shadow’s direction, softness, and opacity should all be dictated by the background’s light source.
These refinement steps are non-negotiable for creating professional-grade visuals. For sellers on platforms like Shopify, getting this right is essential. If you're looking for more ways to speed up your image editing, our guide on how to remove the background for Shopify product images offers more platform-specific tips.
Ultimately, a well-integrated image builds trust and helps customers truly visualize the product in their own lives.
Automating Your Workflow for Speed and Scale
Walking through the manual steps of chroma keying, cleanup, and color correction makes one thing painfully clear: it takes a lot of time. While that hands-on control is great for a one-off project, it’s just not built for the demands of a growing e-commerce brand that needs to shoot dozens or even hundreds of products.
This is where a dedicated, automated workflow changes the entire game.
Imagine uploading your product shot and having a smart system handle the entire process in seconds. This isn’t some far-off concept; it’s exactly how tools like ProdShot operate. Instead of you fiddling with tolerance sliders and painting masks, the AI instantly spots the green screen, pulls off a perfect cutout, and erases any trace of that nasty color spill.
All those technical hurdles just vanish.
The Power of One-Click Professional Imagery
This kind of automation goes way beyond just saving you a few hours. It brings a new level of consistency to your brand. When every single image is processed by the same intelligent algorithm, you get a uniform look across your entire product catalog. That’s a massive factor in building a strong, trustworthy brand identity.
Suddenly, you don't need an in-house editing team or pricey freelance contracts to manage high volumes of product photos. This has become the go-to strategy for brands that need to operate at scale. The process couldn't be simpler:
- Upload Your Photo: Just start with the image you shot against the green screen.
- AI Works Instantly: The system automatically removes the background and cleans up the edges.
- Choose Your Scene: Drop your perfectly isolated product onto thousands of high-quality, professional backgrounds.
This screenshot gives you a peek at just how simple and intuitive it is to generate new product scenes.
The clean layout shows how a single product photo can be transformed into countless lifestyle or studio settings with just a couple of clicks.
For anyone selling online, speed-to-market is a huge competitive advantage. Automating your image production means you can get new product listings live faster, react to market trends quicker, and pour your energy into marketing and sales instead of getting bogged down in post-production.
By removing all that manual friction, you unlock the ability to create endless variations of your product shots. Think A/B testing, social media campaigns, and seasonal promotions—all without ever needing to go back for a reshoot.
To see this in action for yourself, you can explore the powerful AI product image generator and watch how it turns simple shots into compelling, marketplace-ready visuals.
Alright, even with the best intentions and a solid workflow, things can get a little tricky when you're deep in a green screen edit. A few common questions always seem to pop up, and getting straight answers can save you a world of headaches.
Think of this as your back-pocket guide for when you hit those inevitable snags. These are the real-world issues editors run into all the time, so let's get them sorted.
Can I Use a Blue Screen Instead of Green?
You absolutely can. The choice between green and blue really boils down to one thing: the color of your product. There's a reason green is the go-to for most shoots. Digital camera sensors are actually most sensitive to green, which means they capture more detail in that channel, often giving you a cleaner, crisper cutout.
But what if your product is green? A vibrant houseplant, a lime-colored t-shirt, a bottle of olive oil—shooting these against a green screen is asking for trouble. The software will get confused and try to remove parts of your actual product. That's when you bring in the blue screen. It's the perfect substitute, and the chroma key process works exactly the same way.
What Is the Best Software for Green Screen Photo Editing?
This is one of those "it depends" answers, but for good reason. If you're a professional retoucher who needs absolute, granular control over every single pixel, then Adobe Photoshop is still the king. The toolset is incredibly deep and powerful, but it comes with a steep learning curve and demands a lot of hands-on time for every single image.
For most e-commerce sellers, however, speed and consistency are the name of the game. This is where AI-driven tools have really changed everything. They’re built from the ground up for product photography, automating the entire process from removing the background to generating a brand new scene. The "best" software is simply the one that fits your workflow, your technical comfort level, and your business goals.
How Do I Fix Green Spill on My Product?
Ah, the dreaded green halo. That faint glow, known as "spill," happens when light from the green screen bounces back and reflects onto the edges of your product. It's super common, but thankfully, it's also fixable.
Nearly any decent green screen editor will have a feature called Spill Suppression or Despill. This tool is specifically designed to hunt down and neutralize that green fringe without messing with the other colors in your shot.
A quick word of caution: Go easy on the spill suppression. If you crank it up too high, you can end up desaturating some of your product's natural colors. The best fix is always prevention—try to leave as much space as you can between your product and the green screen during the photoshoot itself.
Ready to skip the manual edits and create stunning product shots in seconds? ProdShot uses AI to automate the entire green screen workflow, giving you perfect, marketplace-ready images every time. Get your free trial and transform your product photos today!