
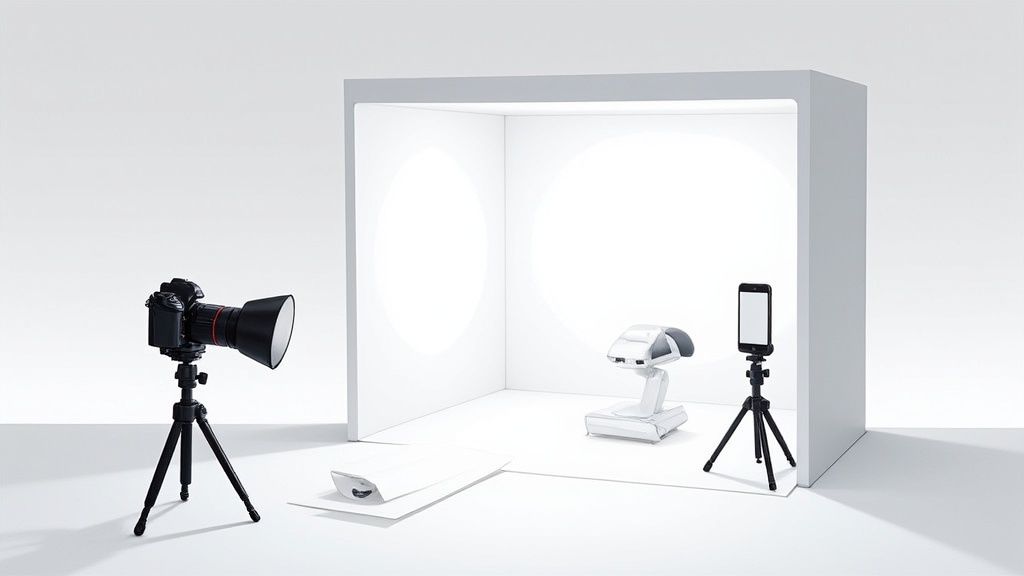
When you're running an e-commerce shop, your product photos are your storefront. Nothing gets you professional, consistent images faster than a product photography box.
You might know it as a light box or a photo tent, but whatever you call it, it's basically a mini-studio in a box. It's designed to give you soft, even lighting that kills harsh shadows and annoying reflections, making your products look clean, polished, and ready to sell.
Why a Light Box Is Your E-Commerce Secret Weapon
Think about the last time you bought something online. What made you click “add to cart”? I’m willing to bet that high-quality, crystal-clear photos played a huge role in building your trust. A product photography box is built to deliver exactly that, transforming your quick snapshots into professional-grade visuals that don't just look good—they drive sales and cut down on returns.
By giving you total control over the lighting, you can make sure every single item you list looks its absolute best.

Nail Your Consistency and Professionalism
The real magic of a light box is control. Forget about wrestling with unpredictable window light or dealing with the weird color cast from your overhead lamps. Inside the box, you get a perfectly diffused, shadow-free environment every single time. That consistency is gold for building a cohesive brand look on Shopify, Etsy, or Amazon.
Here’s a quick rundown of what makes them so effective:
- No More Harsh Shadows: The fabric walls soften light from every direction, wrapping it around your product for that clean, high-end finish.
- A Perfect, Seamless Background: Most boxes come with what’s called an "infinity sweep" backdrop. It creates a smooth, clutter-free void that puts all the focus right where it belongs—on your product.
- Get Your Colors Right: Controlled lighting is the key to capturing true-to-life colors. This is a big deal for reducing returns from customers who say, "it didn't look like that online."
The best thing about a product photography box is how it levels the playing field. It gives small sellers the power to produce images that can go head-to-head with the big retailers, all without blowing the budget on a photo studio.
Here’s a quick look at the direct impact a light box has on your product photos and business metrics.
| Immediate Benefits of Using a Product Photography Box |
| :— | :— |
| Benefit | How It Boosts Your Business |
| Increased Sales | Professional images build trust and can directly lift conversion rates. |
| Reduced Returns | Accurate colors and clear details mean fewer surprises for your customers. |
| Stronger Brand Image | A consistent look across all your products makes your entire store feel more credible. |
| Faster Workflow | No more waiting for the "right light." Shoot high-quality photos anytime, day or night. |
Simply put, it’s a small investment that delivers a huge return by making your entire operation look more professional.
The Unstoppable Demand for Quality Visuals
The e-commerce world runs on great visuals—it’s no longer a nice-to-have, it’s a must. The market for these tools proves it. The global photography light box market was already valued at around $150 million in 2023 and is expected to double by 2032. That growth is fueled by sellers like you needing better and better online imagery.
Great photos are the backbone of any online business, especially when it comes to creating effective ad creatives that actually stop the scroll. While a light box is a smart, affordable starting point, it's also worth understanding the full cost of professional product photography to see just how much money you're saving by taking stunning shots yourself.
Choosing and Preparing Your Photography Light Box
Jumping into the world of product photography boxes can feel like choosing between a dozen different shades of white. At first glance, they all seem pretty similar, but the right choice really boils down to your products, your workspace, and how often you'll be setting up and tearing down.
Getting this decision right from the start saves a ton of headaches later and helps you crank out better images, faster.
The two main players you’ll see are the pop-up "tent" style and the more structured, rigid foldable models. Each has its own strengths.
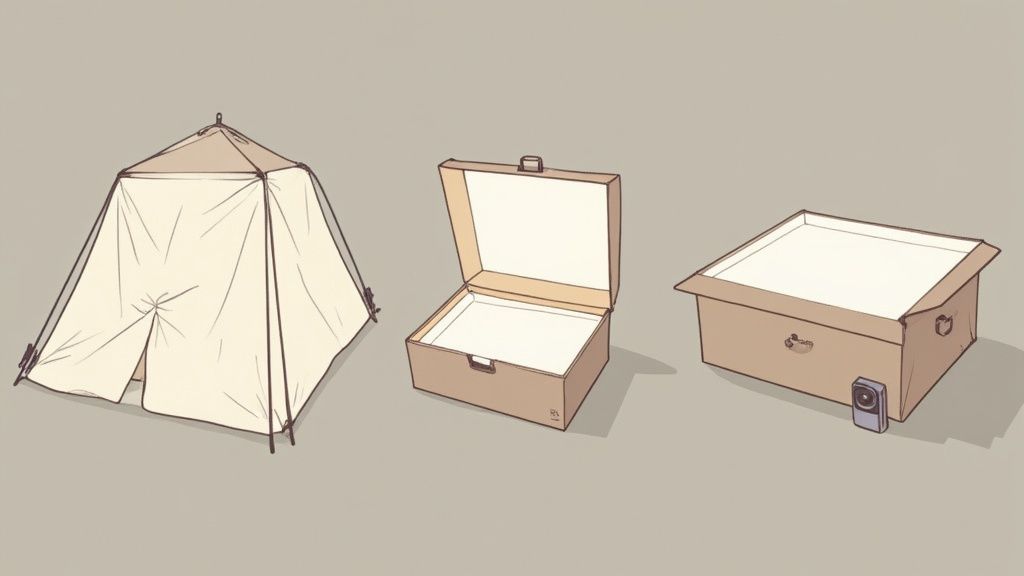
Pop-Up Tents vs Rigid Foldable Boxes
Pop-up tents are the ultimate in portability. They collapse into a small circular bag in seconds, which is a lifesaver for sellers with limited space or anyone who needs to pack their "studio" away after a shoot. The only real catch is that the fabric can arrive wrinkled, and you might have to spend a little time with a steamer or some careful stretching to avoid unwanted creases in your backdrop.
On the other hand, rigid foldable boxes, usually made from plastic or PVC panels, offer more durability and structure. They snap together to create a sturdy frame that's less likely to sag. While they are a bit bulkier, many come with built-in LED light strips, which simplifies your lighting setup tremendously.
Pro Tip: When picking a size, find your largest product and then add about 25% more space around it. You need room not just for the item itself, but for light to bounce and wrap around it properly. Cramming a product into a box that’s too small is a classic mistake that just creates harsh, uneven shadows.
Getting Your Box Ready for a Shoot
Once you've got your box, a few minutes of prep work can make all the difference. The whole point is to create a flawless, distraction-free stage for your product.
First up is the backdrop. Most light boxes include an "infinity sweep"—a piece of fabric or plastic that curves from the back wall down to the floor, creating that seamless look.
- Smooth It Out: If it’s creased, a handheld steamer or a low-heat iron (with a cloth over it) will get it perfectly smooth. Trust me, every single wrinkle will show up in your final photo.
- Secure It: Use the clips or tape that came with the box to hold the sweep in place. You're aiming for a gentle, seamless curve, not a sharp bend that will create a hard line.
Next, let's talk lighting. If your box has built-in LEDs, try positioning the strips along the top front edge, pointing down and slightly back at your product. This is a go-to placement that provides flattering, even light for a huge range of items.
If you're using external lights with a pop-up tent, place one on each side at a 45-degree angle to your product. This classic setup gives you balanced coverage and is a fantastic starting point for professional Amazon product photography. It just works.
The DIY Product Photography Box
Don't have the budget for a commercial light box? You can build a surprisingly good one for under $20. All you need is a decent-sized cardboard box, some white tissue paper, a sheet of white poster board, and tape.
- Cut out big windows on three sides of the box, but leave a 2-inch border around the edges.
- Tape white tissue paper over these windows. This paper will act as a light diffuser, softening the light beautifully.
- Cut the white poster board to fit inside, creating your own infinity sweep. Just curve it from the back down along the bottom.
Position a couple of lamps on either side of the box so they shine right through the tissue paper windows. The result is a soft, diffused light source that does a great job of mimicking a professional setup. This little DIY project proves that great results often come from solid technique, not just expensive gear.
Getting Your Camera and Smartphone Settings Just Right
You don’t need a fancy, thousand-dollar camera to get incredible shots in your product photography box. Seriously. The smartphone in your pocket is more than powerful enough to capture crisp, professional images. The real secret isn't the gear; it's learning how to take control of the settings.
Whether you're using a DSLR or your phone, the mission is the same: tell the camera exactly what you want it to do. Leaving it on "Auto" mode inside a perfectly controlled light box is asking for trouble. One shot might look bright and sharp, but the next could be a little darker or have a weird color cast.
Taking a few seconds to dial in your settings manually is the difference-maker. It’s how you get every photo to be consistent, clear, and true to what you see.
Taming Your DSLR or Mirrorless Camera
If you're using a dedicated camera, switching to Manual Mode (M) is the single most important thing you can do for your product shots. I know it can feel a bit intimidating at first, but it puts you in complete command of the three pillars of photography.
Here are the go-to settings I use for almost everything in a light box:
- Aperture (f-stop): Set this somewhere between f/8 and f/11. This range gives you a deep depth of field, which is just a fancy way of saying your entire product will be sharp from front to back. A lower f-stop (like f/2.8) might look arty, but it’ll leave parts of your product frustratingly out of focus.
- ISO: Always, and I mean always, keep this at your camera's lowest native setting. For most, that’s ISO 100 or 200. A low ISO gets rid of digital noise or "grain," giving you the cleanest image possible. Your light box is flooding the scene with light, so there's absolutely no reason to crank it up.
- Shutter Speed: This is the one you'll play with to get the brightness perfect. Since your camera is on a tripod, you don’t have to worry about a little motion blur from a slower shutter. I usually start around 1/60s and then adjust it up or down until the image on my screen looks just right.
A tripod and a remote shutter release (or just using your camera’s 2-second timer) are non-negotiable. Even the slightest handshake can add blur, especially with those slower shutter speeds. Lock that camera down for maximum sharpness, every single time.
Unlocking Your Smartphone’s Hidden Power
Your smartphone camera is a little beast, but its default app is built for quick-and-dirty snapshots, not controlled studio work. To get professional results, you have to dig into its "Pro" or "Manual" mode. Some phones have this built-in; for others, you might need a great third-party app like Lightroom Mobile.
Once you're in Pro mode, here's what to focus on:
- Lock Exposure and Focus: This is a game-changer. Just tap and hold on your product right on the screen. You'll see a little lock icon appear. This stops the camera from constantly readjusting the focus and brightness as you move your hands around.
- Set Your White Balance (WB): Auto white balance often gets confused by the bright white walls of a light box and can add an ugly blue or yellow tint to your shots. Manually set it using a preset (like "Daylight" if you're using 5500K LEDs) or, for perfect color, use a cheap white or grey card to set a custom balance.
- Never, Ever Use Digital Zoom: Digital zoom isn't real zoom. It's just cropping into the image and throwing away quality. If you need a tighter shot, physically move your phone closer. This one simple habit will make a massive difference in the sharpness and professional look of your final images.
Creative Lighting and Product Styling Techniques
Okay, you've got the technical camera settings nailed down. Now for the fun part—adding some artistry. A product photography box gives you a clean, controlled canvas, but it's the creative lighting and styling that will make your product jump off the screen. This is where you stop just showing your product and start selling it.
Think of it this way: good lighting isn't just about brightness. It's about shaping light to reveal texture, create depth, and tell the viewer exactly where to look. Even tiny adjustments can completely change the mood of a photo.
Shaping Light to Create Depth and Mood
The LED strips in your light box are great for clean, even light, but don't just set them and forget them. You can easily tweak them to create softer, more interesting effects.
- Make Texture Pop: Trying to show off the beautiful texture of a fabric or the grain of a wooden product? Move your main light source off to the side. This is called side-lighting, and it creates tiny shadows that define all those surface details you want customers to see.
- Create Softer Shadows: For a gentler sense of depth without any harsh lines, try taping a thin sheet of white paper or a piece of white fabric in front of one of your LED strips. This diffuses the light even more, softening the shadows and giving your product a more natural, high-end feel.
One of the biggest headaches in a product photography box is shooting anything shiny or reflective, like jewelry or glassware. The trick is to stop trying to light the object itself. Instead, light the white walls around it. This simple shift creates soft, clean reflections instead of a distracting, amateur-looking glare.
Strategic Product Styling and Composition
How you place your product in the frame is every bit as important as how you light it. Smart styling adds context, shows the product's scale, and just makes it feel more desirable. The goal is a scene that looks effortlessly professional.
If you're selling apparel, for instance, learning the ropes of dressing a mannequin for product styling can be a game-changer for getting a professional, true-to-life look. That same principle of careful, deliberate presentation applies to every kind of product.
- The "Floating" Look: A classic pro-tip is to use clear acrylic blocks or stands to lift your product slightly off the floor of the box. This creates a subtle shadow underneath, making the item appear to float and giving the whole shot a polished, gallery-like vibe.
- The Rule of Thirds: This is a classic composition trick for a reason. Imagine a tic-tac-toe grid over your screen. Instead of plunking your product right in the center square, try placing it along one of the lines or at a point where two lines cross. It's a simple move that instantly makes a photo feel more dynamic and visually engaging.
The image below breaks down how your three core camera settings work together to control the exposure in your shots.
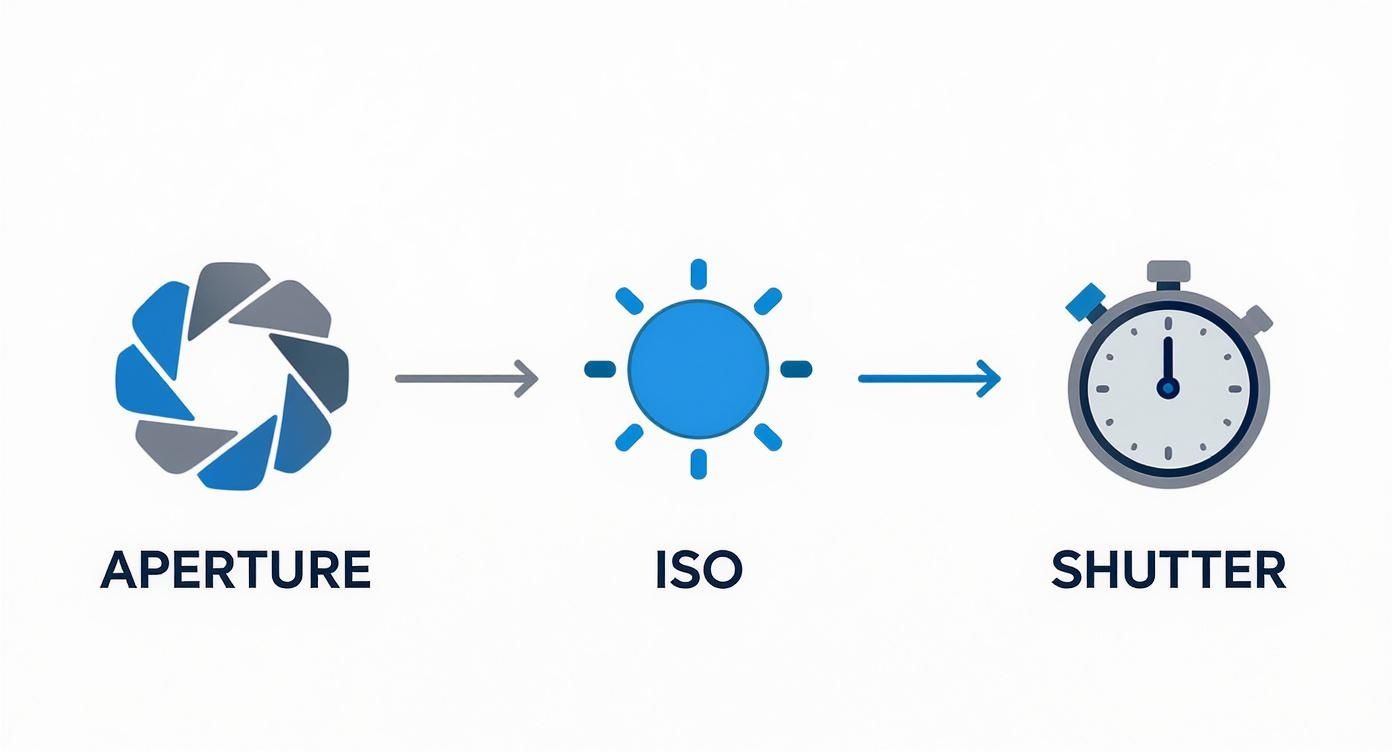
Getting these three—aperture, ISO, and shutter speed—to play nicely together is the technical foundation that makes all your creative lighting and styling decisions possible.
Working Through Common Light Box Problems
Even with a perfect setup, you're going to hit a few snags. It just happens. The great thing is, most of the usual headaches are easy to fix on the fly without having to buy a bunch of new gear. Think of this as your quick-reference troubleshooting guide.
One of the most common complaints I hear is about those faint but stubborn shadows, especially on taller products or items with weird shapes. Even in a bright light box, the light might not sneak into every single nook and cranny. The simplest fix? A reflector. Seriously, a cheap piece of white foam board or even cardboard wrapped in aluminum foil works wonders.
Just place the reflector opposite your main light source. It will catch that light and bounce it right back into the shadowed areas, filling them in. This little trick gives you a much cleaner, more professional image without making your setup a nightmare.
Nailing Your Colors and Reflections
Another classic problem is getting the colors wrong. You snap a picture of a pure white T-shirt, but when you look at it on your computer, it has this weird yellow or blue tint. That's a white balance issue, plain and simple. Your camera’s "Auto" setting does its best, but the super-bright, consistent light inside a box can throw it for a loop.
To fix it, you’ll need to jump into your camera or smartphone's manual settings. Look for the white balance option and set it to match your light source. Most LED lights are "Daylight" balanced, which is usually around 5500K. For dead-on accuracy, grab a grey card. It's a cheap little tool that lets you set a custom white balance, guaranteeing your colors are true to life every single time.
Then there are reflections. They can absolutely kill an otherwise great shot of anything glossy—jewelry, glass, polished metal, you name it. The trick isn't to get rid of reflections completely but to control what they're showing.
- Move Your Camera: Sometimes, just shifting your position a few inches left or right is all it takes to make a distracting reflection vanish.
- Use a Black Card: For super shiny stuff, try taping a small piece of black cardstock inside the box, just out of the frame. This can create a crisp, defined black line in the reflection instead of a hazy, washed-out glare.
- Try a Polarizer: A circular polarizing filter (CPL) is a filter that screws onto the front of your lens and is a lifesaver for cutting down glare. If you shoot reflective products often, it's an incredibly valuable piece of kit.
Look, troubleshooting is just part of the game. Running into shadows, color casts, or reflections rarely means your gear is bad. It's usually just the photo's way of telling you to make a small, smart adjustment to your lighting or camera angle.
Editing Your Photos with AI and Modern Tools
Getting the shot is only half the battle. The real magic—and where you turn good photos into great product listings—happens in post-production. While your product photography box gives you a clean starting point, a few quick edits are what create that polished, professional look across your entire store.
We’re not talking about drastic overhauls. Think subtle refinements. Consistent cropping is a must, so every thumbnail on your category pages looks uniform and tidy. A little tweak to exposure and contrast can make your whites really pop and your colors feel rich and true-to-life. And a touch of sharpening helps bring out those fine details customers love to zoom in on.
The Rise of AI in Product Photography
This is where things get really interesting for sellers. Editing photos manually, one by one, is a massive time sink, especially when you have a batch of new products to list. Thankfully, modern AI-powered editing tools were built to handle these repetitive jobs, freeing you up to run your business instead of being glued to an editing program.
These tools can do things that used to take ages. Need to remove a background? It’s done instantly and perfectly. They can also intelligently fix weird color casts, get rid of distracting reflections, and even generate brand new, photorealistic lifestyle scenes from a single shot you took in your light box. That means you can show your product on a marble countertop, in a bright kitchen, or sitting in a cozy, sunlit room, all without ever leaving your desk.
This technology is quickly becoming a game-changer. The professional photography services market is set to blast past $60 billion by 2032, and AI is a huge reason why. As you can see from these professional photography industry insights, high-end results are no longer just for brands with deep pockets.
Building an Efficient Workflow
The goal here is a simple, repeatable process that gives you consistently great images without all the headache. An AI photo generator can easily become the core of this modern workflow.
Think about it: you spend an hour shooting 50 products in your light box. You upload the raw images to an AI tool, and a few minutes later, you have perfectly edited, background-removed, and even styled photos ready for every marketplace you sell on. That's the power we're talking about.
This approach doesn't just save you a ton of time; it also ensures every image fits your brand's aesthetic. For any seller looking to level up their store, exploring an AI product photo generator is a smart move. It's the modern way to get polished, high-converting images for places like Amazon or Shopify, without the steep learning curve or high costs of the old-school methods.
Ready to transform your product photos in seconds? ProdShot uses advanced AI to turn your simple snapshots into stunning, marketplace-ready images. Try it for free today!