
When it comes to e-commerce, the white background photo is the undisputed king. It’s a clean, simple, distraction-free canvas that puts your product center stage, making it the hero of the shot. This isn't just a trend or a stylistic choice; it's a strategic move designed to build buyer trust, show off product details, and ultimately, get you more sales.
Why a White Background Is Your Most Important Asset
Before we get into camera settings and lighting tricks, you need to understand why this is the universal standard. A clean white background isn't just about following the rules—it’s about using a proven visual tactic that directly impacts your bottom line. Think of it as your silent salesperson, working 24/7 on every single product page.
The whole idea is to eliminate visual noise. When a shopper lands on your listing, you want their eyes to lock onto your product instantly. Any competing colors, textures, or random objects in the background create a tiny bit of mental friction. That small moment of confusion might be all it takes for them to click away.
The Psychology of Simplicity
A white background does more than just show off your product; it frames the entire shopping experience. Imagine the difference between a cluttered, chaotic market stall and a minimalist, high-end boutique. The boutique feels more professional, trustworthy, and focused—and that’s the exact vibe you want for your online store.
This simple approach packs a serious punch:
- Makes Your Product Shine: With no distractions, customers can easily see the item's true color, texture, shape, and key features.
- Builds Instant Trust: A consistent, professional look across all your listings tells shoppers you’re a serious and reliable seller.
- Boosts Perceived Value: Clean presentation just feels more premium, which can help you command better prices.
- Drives More Conversions: By making the decision easier for the customer, you smooth the path to that "add to cart" button.
Understanding the importance of good product pictures and visuals for online sales is key to appreciating why the white background is so non-negotiable.
Meeting Marketplace Expectations
This isn't just a friendly suggestion; on the world's biggest e-commerce platforms, it's a hard rule. Marketplaces like Amazon, eBay, and Walmart made the white background a requirement for main product images years ago. They did it to create a uniform, seamless shopping experience for their millions of customers.
A white background creates a level playing field. It ensures that the product—not the seller’s photography budget or styling prowess—is the primary focus, leading to a fairer and more consistent customer experience.
This policy became the gold standard in the 2010s and is still going strong. By 2024, these retail giants still demand pure white backgrounds for primary images, a rule that affects over 2.5 million active sellers on Amazon alone.
And it’s all backed by data. Study after study on conversion rate optimization shows that clean backgrounds reduce distraction, improve product clarity, and can increase engagement by 5% to 20% compared to busy or lifestyle shots. By sticking to this standard, you're not just following rules—you're aligning your store with a proven recipe for success.
Preparing Your Product for a Flawless Photoshoot

Here’s a secret that experienced sellers know: a stunning white background photo has very little to do with your camera. It has everything to do with what happens before you even think about pressing the shutter.
Meticulous preparation is the single most effective way to save yourself hours in post-production and avoid the nightmare of reshooting an entire product line.
Think of it this way—every minute you spend prepping your product is ten minutes saved in editing. A single fingerprint, a stray thread, or a speck of dust that’s barely visible to the naked eye can become a glaring distraction in a high-resolution image. And on a clean white background, there’s simply nowhere for those imperfections to hide.
The Art of Product Cleaning
Before your product gets its moment in the spotlight, it needs to be absolutely spotless. The cleaning method you use will depend entirely on the material, as a one-size-fits-all approach can easily cause damage.
- For Glossy Surfaces (Glass, Plastic, Metal): Grab a microfiber cloth to wipe away fingerprints and smudges. For stubborn marks, a small amount of isopropyl alcohol on the cloth works wonders. I always recommend wearing soft cotton gloves when handling these items to prevent leaving new smudges.
- For Apparel and Textiles: Wrinkles are your enemy. A handheld steamer is your best friend for gently releasing any creases from clothing or fabrics. A lint roller is also non-negotiable for getting rid of dust, pet hair, and tiny fibers that inevitably cling to the material.
- For Jewelry and Reflective Items: These are notoriously tricky. Polishing cloths are essential for bringing out the shine without leaving behind any residue. A can of compressed air is also perfect for blowing dust out of intricate crevices without having to touch the piece. You can find more detailed tips in our guide to creating professional jewelry product photos.
A flawless product photo is 90% preparation and 10% execution. Don't rush the cleaning process; it's where the real magic happens. Taking the time to get every detail right on set will elevate your final image from good to truly exceptional.
Create a Strategic Shot List
Once your product is pristine, it's time to plan exactly what you need to capture. Walking into a shoot without a plan is a surefire recipe for inconsistent images and missed opportunities.
A simple shot list acts as your roadmap. It ensures you get every single angle your customer needs to see to feel confident enough to make a purchase. Your goal is to tell a complete visual story of the product, building trust and answering questions before the customer even thinks to ask them. A comprehensive list is the best tool for this.
Your Essential Angle Checklist
For most products, a standard set of angles will cover all the critical details. Think of this list as your minimum baseline for every item you photograph.
- The Hero Shot (Front Angle): This is your main product image, taken straight-on at eye level. It should clearly and accurately represent the product as someone would first see it.
- The Profile Shot (Side Angle): This view reveals the product's depth and silhouette. For items like shoes or electronics, capturing both the left and right sides is often a good idea.
- The Back Shot: Don't neglect the back! Customers want to see details like clasps, connectors, or sizing information that might be located there.
- The 45-Degree Angle: This shot provides a sense of the product's three-dimensional form, showing the front and side at the same time. It adds depth and context that a flat, front-on shot can miss.
- The Top-Down View: This is especially useful for products in packaging (like cosmetics) or items where the top detail is important (like a decorated cake or a watch face).
- The Detail Shot (Macro): Get in close. Zoom in on unique textures, logos, intricate stitching, or important features. These shots scream quality craftsmanship and build perceived value.
By following a checklist, you create a repeatable, efficient workflow. This systematic approach guarantees you walk away with a complete set of high-quality images for every single product, making your white background photo production a smooth and predictable process.
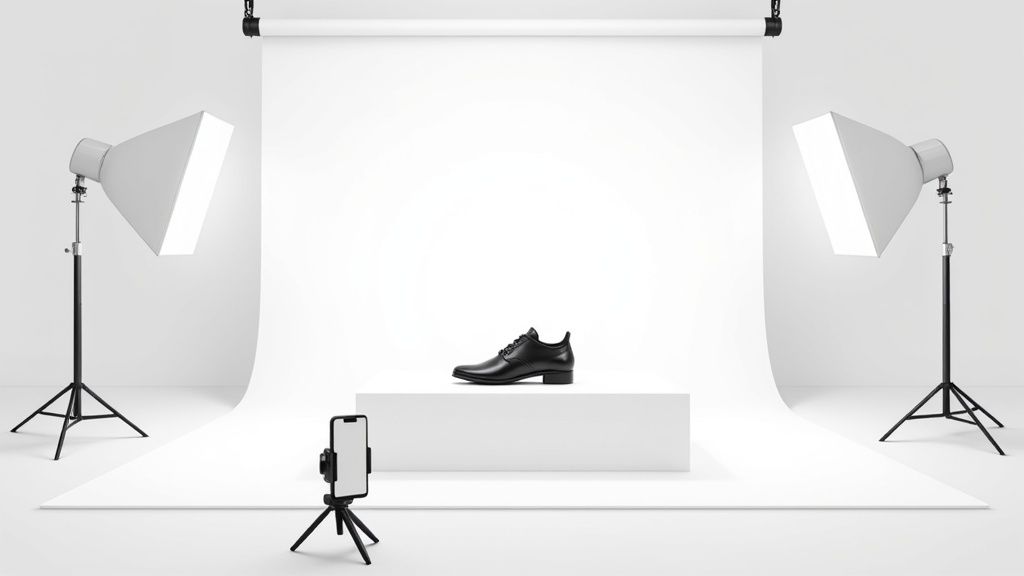
Building Your DIY Home Photo Studio
You don't need to rent a professional space or sink thousands into equipment to get a stunning white background photo. The secret isn't expensive gear; it's learning how to control and shape light. With a few smart purchases and a bit of creativity, you can build an incredibly effective DIY studio right in your own home.
This approach saves a ton of money and puts you in complete control of your shooting schedule. You can set up shop in a spare room, on the dining table, or even on the floor next to a big window.
Let's break down two simple yet powerful setups you can build using just your smartphone and some basic supplies.
The Natural Light Setup: One Light Wonder
The easiest and cheapest way to get started is to use the best light source out there: the sun. A large window on an overcast day provides a giant, soft light source that’s perfect for product photography. It creates gentle shadows and a clean, high-end look without any fuss.
Here’s what you’ll need to pull this off:
- A large window: This is your primary light source. You want to avoid direct, harsh sunlight, as it creates ugly, hard shadows. North-facing windows are the holy grail because they provide consistent, soft light all day.
- A white sweep: This creates your seamless white background. A big roll of white paper or even a poster board that you can curve from the table up the wall works perfectly. That curve, or "sweep," gets rid of the hard line where the table meets the wall.
- A white foam board: This is your secret weapon, and you can get it from any craft store. It acts as a reflector, bouncing light back onto your product to fill in and soften any shadows.
Set up your table right next to the window and place your product in the center of the white sweep. The window will light up one side of your product. Now, grab that white foam board and hold it on the opposite side, just out of the camera's view. You'll immediately see the shadows on that side lighten up, revealing more detail. It’s a simple trick that makes your product look professionally lit.
The Artificial Light Setup: Two Light Control
When natural light isn't an option, a simple two-light setup gives you total control. You don't need fancy studio strobes—two affordable, adjustable LED lamps will do the trick. The whole game here is making the light soft and even.
Your shopping list is just as simple:
- Two identical LED lamps: Look for lamps you can easily position. Clamp lights or small tabletop LEDs are great, affordable options.
- Diffusion material: This is what turns harsh light into soft light. A thin white bedsheet, some parchment paper, or a dedicated photography diffuser will work.
- White sweep and foam board: Just like the natural light setup, these are your essentials for the background and for bouncing light.
The goal of any lighting setup is to create soft, wraparound light. Harsh, direct light creates distracting reflections and deep shadows that hide product details. Diffusion is the technique that transforms a small, harsh light source into a large, soft one.
First, set up your white sweep and product. Position one lamp at a 45-degree angle to the product—this is your key light. Then, place your diffusion material (like that white sheet) between the lamp and the product to soften its glow.
Next, place the second lamp on the opposite side, also at a 45-degree angle. This is your fill light. It should be set to a lower brightness than your key light. Its only job is to soften the shadows created by the main light, not get rid of them completely. A little shadow is good; it gives your product shape and dimension.
For a deeper dive into studio setups, including professional lighting and camera settings, check out guides on achieving a flawless video white background—you'll find that many of the principles apply directly to still product photography.
Essential Smartphone Camera Settings
Your smartphone is a beast of a camera, but its automatic settings can be your worst enemy. The default camera app loves to change focus and exposure with the slightest movement, which will give you a gallery of inconsistent photos.
Before you snap a single picture, you need to master these two functions:
- Lock Exposure (AE Lock): Tap and hold on the part of your product you want perfectly exposed. You'll see a sun icon or "AE/AF Lock" pop up. This stops the camera from automatically brightening or darkening the shot, so every photo has the same brightness.
- Lock Focus (AF Lock): That same tap-and-hold trick also locks the focus. This is absolutely critical for keeping your product perfectly sharp, even if your hands move a bit.
By building a simple DIY studio and taking manual control of your smartphone's camera, you're setting yourself up for success. This foundation of good lighting and consistent settings is what separates amateur snapshots from professional-grade product images that actually drive sales.
Your Modern Post-Production Workflow
Taking a well-lit photo is just the first half of the job. The real magic—the part that turns a good shot into a perfect, marketplace-ready picture—happens in post-production. But this doesn’t mean you need to spend hours meticulously tracing product outlines in complicated software anymore. A modern workflow is all about speed and using smart tools to do the heavy lifting for you.
This is where you’ll transform your raw smartphone snapshot into a crisp, clean white background photo that checks every box for platforms like Amazon or Shopify. We’re going to focus on an efficient, AI-powered approach that gives you consistently professional results without a steep learning curve.
The simple flow below shows how your lighting, the product itself, and your camera work together before you even touch an editing tool.
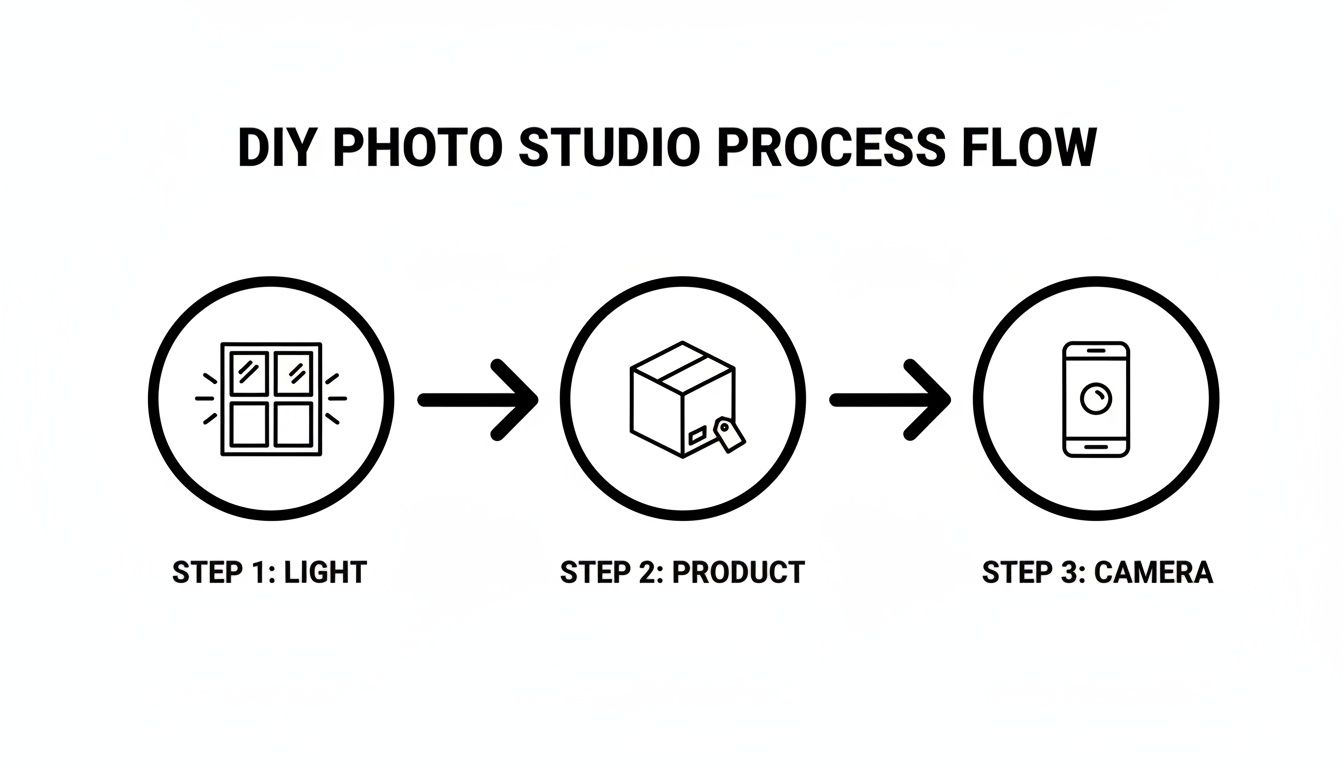
Starting with good light from the get-go makes every single editing step that follows faster and more effective.
Achieving a Perfect White Background Instantly
The first and most critical task in e-commerce photo editing is isolating your product on a pure white background. For marketplaces like Amazon, this isn’t just a recommendation; it's a hard rule. The background must be a true digital white—RGB (255, 255, 255).
Instead of painstakingly tracing with a pen tool, modern AI-powered tools like ProdShot knock this out in seconds. You just upload your image, and the software’s algorithm intelligently finds the product's edges and removes the background with one click. This tech is surprisingly precise, easily handling tricky details like stray fibers on a sweater or the tiny spaces between a fork’s tines.
This shift to AI-driven editing has been a game-changer for online sellers. The need for a perfect physical white backdrop has evolved; by 2025, these AI tools had slashed the dependency on flawless studio setups. Industry data shows that AI-powered background removal saw a 40%–70% jump in adoption among mid-size e-commerce brands between 2022 and 2025 alone.
The Subtle Art of Retouching
Once the background is gone, your product is floating on a clean white canvas. This is often when you start to notice tiny imperfections that were hidden before. The next step is all about making small, targeted adjustments to make your product look its absolute best.
This isn't about making fake-looking changes. It's about fine-tuning the details that build buyer confidence and show your product accurately.
Good retouching is invisible. The goal isn't to make your product look different, but to make it look like a perfect real-world version of itself, free from the distractions of dust, fingerprints, or weird lighting.
Here are the essential touch-ups every product photo needs:
- Dust and Blemish Removal: Even with careful prep, tiny dust specks can find their way onto your product. Use a "spot healing" or "clone stamp" tool to click on these little flaws and make them vanish.
- Color Correction: Your camera's sensor doesn't always see color the way your eyes do. Hold the actual product next to your screen. If the colors look a little off—maybe too yellow (warm) or too blue (cool)—tweak the temperature and tint sliders until they're a perfect match.
- Brightness and Contrast: Sometimes a photo can look a bit flat or washed out. A slight boost in contrast can make the colors pop and add some dimension. A small brightness adjustment can also help, just be careful not to "blow out" or overexpose any important details.
Adding Depth with Realistic Shadows
A product floating on a pure white background can sometimes look unnatural, almost like it’s been awkwardly pasted onto the page. The final touch that brings it all to life is a realistic shadow. This small detail grounds the product, giving it weight and making it look like it’s actually sitting on a surface.
Most AI editing tools give you an option to automatically generate a subtle drop shadow or reflection. When you’re adding a shadow, just keep a few things in mind:
- Direction: The shadow should fall away from your main light source. If the light in your photo comes from the top left, the shadow should be cast toward the bottom right.
- Softness: Real-world shadows have soft, blurry edges, not hard, sharp lines. Always go for a softer shadow to make it look natural.
- Opacity: A shadow shouldn't be a solid black blob. Lower its opacity so it looks like a gentle, semi-transparent gradient. A little goes a long way.
This entire workflow—from one-click background removal to subtle touch-ups and shadow effects—puts professional results within reach for any seller. And if you'd rather have an expert handle these final polishes, professional product photo editing services can be a fast and surprisingly affordable option.
Key Marketplace Image Specifications
Before you upload, it's a good idea to double-check that your finished images meet the technical specs for the platforms you sell on. Requirements can vary slightly, so getting it right the first time saves a lot of headaches.
Here's a quick checklist for the big players:
| Specification | Amazon | eBay | Shopify (General) |
|---|---|---|---|
| Minimum Size | 1000px on the longest side | 500px on the longest side | 800px x 800px recommended |
| Maximum Size | 10,000px on the longest side | 9000px x 9000px | 4472px x 4472px |
| Background | Pure white (RGB 255, 255, 255) required for main image | White or light gray recommended | Any, but white is best practice |
| File Format | JPEG (preferred), TIFF, PNG, GIF | JPEG, PNG, GIF, TIFF, BMP | JPEG (preferred), PNG, GIF |
| Product in Frame | Product must fill 85% or more of the image frame | Product should be clearly visible and in focus | Clear and uncluttered |
This table covers the most common requirements, but always check the latest seller guidelines for each specific marketplace, as they can update their rules. Keeping these specs in mind from the start will make your whole process much smoother.
Troubleshooting Common Product Photography Problems
Even when you've planned everything perfectly, a photoshoot can still go sideways. A cloud passes over the sun, you forget a camera setting, and suddenly you have a batch of photos that just don't work. Don't sweat it—most of these common problems are surprisingly simple to fix, either right there on set or with a few quick clicks in an editor.
This is your go-to guide for figuring out what went wrong and how to fix it, especially when you're aiming for that perfect white background photo. Think of it as your cheat sheet for turning frustrating mistakes into professional-looking shots.
The Background Looks Grey, Not White
This is, without a doubt, the number one issue every ecommerce seller runs into. You set up a crisp, clean white backdrop, take the picture, and it comes out looking dull, dingy, and grey. What gives? It's your camera's automatic sensor trying to be helpful by finding a "middle-grey" exposure, which darkens what should be a pure, bright white.
The Fix: You need to tell your camera what "true white" actually looks like. In your smartphone's camera app, simply tap on the whitest area of your background to set the correct exposure. You might also need to nudge the exposure compensation (it's usually a little sun icon slider) up by +0.3 or +0.7 to get that perfectly bright, clean look.
If the photo is already taken, you can correct this in post-production using a "Levels" or "Curves" tool. Just find the white point slider and drag it a little to the left. The background will pop to a clean white, but be careful not to overdo it and blow out the details on your actual product.
The Product Has a Weird Yellow or Blue Tint
Have you ever taken a photo indoors and noticed it has a sickly yellow glow? Or maybe everything looks strangely blue and cold? That’s a color cast, and it happens when your camera gets confused by the color temperature of your light source.
- Incandescent light bulbs will give your photos a warm, yellowish tint.
- Fluorescent lights often create a cool, sometimes greenish-blue cast.
- Natural daylight from a window is tricky; it shifts from cool blue in the morning to warm orange in the evening.
The Fix: Your best line of defense is to set your white balance before you start shooting. Most cameras and smartphones have presets like "Sunny," "Cloudy," or "Tungsten." For even better accuracy, use the "Custom White Balance" function. Just point your camera at something pure white (like your foam board backdrop) to calibrate it perfectly to your specific lighting.
To fix a photo you've already taken, look for the "Temperature" and "Tint" sliders in your editing app. If the image is too yellow, slide the temperature toward blue. Too blue? Slide it back toward yellow. A few small adjustments are all it takes to make the colors look natural and true-to-life.
Harsh Shadows Are Hiding Details
Nothing screams "amateur" like deep, dark shadows that swallow up important details of your product. This problem is almost always caused by a small, direct light source, like a bare lightbulb or direct, unfiltered sunlight. The smaller and harsher the light, the sharper and darker the shadows will be.
The Fix: The secret is to make your light source bigger and softer. In photographer-speak, this is called diffusion. If you’re using window light, you can tape a thin white bedsheet or some parchment paper over the glass to soften it. Using a lamp? Place a sheet of diffusion material between the bulb and your product.
You should also use a white foam board as a reflector. Position it on the opposite side of your main light source to bounce soft, gentle light back into the shadows. This simple trick will brighten them up and bring back all those hidden details. Mastering these quick fixes is a huge step, but for more complex issues, exploring professional product photo retouching can save a ton of time and ensure you get flawless results, every single time.
Your White Background Photo Questions Answered
Even with the best game plan, you’re always going to run into specific questions when you’re chasing that perfect product shot. Getting the right answers can be the difference between a smooth photoshoot and a day full of frustrating retakes.
This section is all about tackling the most common hurdles we see sellers face. We'll skip the fluff and get straight to the practical advice you need to solve these problems and get your photos looking sharp.
Does the Background Really Have to Be Pure White?
If you're selling on a major marketplace like Amazon, the answer is a hard yes. They demand a pure white background—specifically RGB (255, 255, 255)—to keep the shopping experience clean and consistent for everyone. It’s one of those rules you just can't bend.
Now, for your own branded website, social media, or secondary product images, you can get more creative. A soft off-white or a light grey can give your products a more premium, high-end vibe. But for that all-important main "hero" image, stick to pure white. It guarantees you're compliant and makes your product colors pop accurately.
Can I Actually Get Professional Shots with My Smartphone?
You absolutely can. Honestly, the camera in your phone right now is likely more powerful than a pro-level DSLR from ten years ago. The real secret to a great-looking product photo isn't the camera body—it's your control over lighting and stability.
Combine soft, even light with a simple tripod to lock your phone in place, and you'll capture images that are shockingly sharp and clear. Once you have that solid foundation, use a modern AI editor to handle the background removal and final tweaks. Your results will easily go toe-to-toe with photos from a fancy studio.
The best camera is the one you already have. The best light is the one you can control. Nail your lighting and keep your phone steady—you’ll be amazed at what you can produce.
How Do I Stop Glare and Reflections on Shiny Stuff?
Ah, reflections. The arch-nemesis of anyone shooting jewelry, glass, or chrome. The trick is to stop thinking about hitting your product with a small, direct light. Instead, your goal is to surround it with a large, soft light source that wraps around it.
Here are a few ways to do that:
- Use a Big Diffuser: A large white sheet or a piece of diffusion fabric placed between your light and the product will turn that harsh glare into a beautiful, soft highlight.
- Play with Your Angles: Seriously, sometimes just shifting your camera a few inches to the left or right is all it takes to make a distracting reflection disappear.
- Try Blocker Cards: Grab some small black foam cards and place them just out of the shot. They'll absorb light and create clean, defining dark lines on metallic surfaces, giving them shape and stopping them from looking blown out.
What's the Best Image Size and Format for My Store?
For pretty much every e-commerce platform, JPEG (or .jpg) is the way to go. It gives you that perfect mix of high image quality and a small file size, which is a huge deal for keeping your website loading quickly.
As for size, a good rule of thumb is to aim for at least 1500 pixels on the longest side of your image. This ensures the zoom feature on sites like Shopify and Amazon works perfectly, letting customers get a good, close look at the details. After editing, always run your photos through a compression tool to shrink the file size under 500KB without losing any noticeable quality.
Ready to turn your smartphone snaps into flawless, marketplace-ready product photos? ProdShot uses AI to instantly remove backgrounds, add hyper-realistic shadows, and make your products look incredible in seconds. Try ProdShot for free and see the difference for yourself.