

So, you want to take professional-grade product photos with your iPhone? Good news: you absolutely can. Forget what you've heard about needing an expensive DSLR and a studio full of complicated gear. The powerful little camera you carry around every day is more than up to the task of creating stunning images for your Shopify, Amazon, or Etsy store.
It all boils down to mastering three things: a few key pieces of gear, the right camera settings, and a bit of lighting know-how.
Your iPhone Is a Powerful E-Commerce Studio
The idea that you need thousands of dollars in equipment to get pro-level product shots is a total myth. Honestly, the cameras in modern iPhones—anything from the iPhone 12 onward—have completely changed the game. The gap between a dedicated "pro" camera and the one in your pocket has shrunk to the point where taking professional photos with an iPhone is not just possible, it's a smart, cost-effective strategy for any e-commerce seller.
This guide is here to cut through the noise and give you a simple, actionable plan. We're going to turn your iPhone into a reliable workhorse for producing crisp, clean, and compelling product photos that build trust and actually drive sales.
Why Your iPhone Is Enough
The tech packed into these phones is seriously sophisticated. Things like computational photography, incredible sensors, and powerful processing software all work behind the scenes to deliver amazing results right out of the box. With just a few simple tweaks, you can take those photos from good snapshots to polished, professional assets.
Here’s why your iPhone is the perfect tool for this:
- Incredible Image Quality: Newer iPhones shoot in high resolutions and even offer formats like ProRAW. This gives you a ton of detail and editing flexibility that was once only possible with traditional cameras.
- It’s Just… Easy: The best camera is the one you have with you, right? You can shoot, edit, and upload your product photos from one device, which dramatically speeds up your entire workflow.
- It Saves You Money: You already own the most expensive piece of equipment. The few extra things you'll need to create a great setup are incredibly affordable.
The secret to great product photography isn’t how much you spend on the camera—it’s how well you control the light, stability, and composition. Your iPhone gives you a brilliant head start, and the techniques we’ll cover here will take care of the rest.
Throughout this guide, we're focusing on practical steps you can use right away. We'll cover everything from building a dirt-cheap photo kit to mastering your camera's native settings and using simple lighting setups. My goal is to empower you to create a consistent, high-quality look for your online store using the powerful device that’s already in your pocket.
Building Your iPhone Photography Kit on a Budget
Your iPhone is the heart of your photo setup, but it’s a few smart, inexpensive accessories that will truly take your product shots from "good enough" to genuinely professional. If you want to improve your photo quality, the single best thing you can do is invest in stability and control. And the good news? It costs a lot less than you probably think.
We’re not trying to build a multi-thousand-dollar studio here. The real goal is to get rid of the little mistakes that make photos look amateur—things like blur from a shaky hand, inconsistent angles, and sloppy framing. With just a couple of key pieces of gear, you can create a reliable, hands-free setup that delivers the consistency every polished online store needs.
Essential iPhone Photography Gear Checklist
To get started, here’s a quick rundown of the gear that will make the biggest impact without breaking the bank.
| Gear Item | Why You Need It | What to Look For |
|---|---|---|
| Tripod | Eliminates blur from hand-shake and ensures every shot is perfectly sharp. It also provides consistent angles and framing for a uniform look across all your product photos. | Look for an adjustable height, sturdy legs that don't wobble, and a secure phone mount. A model with an overhead arm for flat-lay shots is a huge bonus. |
| Remote Shutter | Lets you take a photo without touching your phone, preventing the small jiggle that can ruin a shot, even when it’s on a tripod. | Bluetooth remotes are cheap and easy to use. If you have an Apple Watch, the Camera Remote app is a fantastic built-in option. Even the volume buttons on old wired earbuds work in a pinch. |
| White Foam Board | Acts as a simple, effective bounce card to fill in shadows and create soft, even lighting on your product. | Get a few from any craft or office supply store. They're lightweight, cheap, and incredibly versatile for manipulating natural light. |
This small toolkit forms the foundation for a repeatable, professional process that will save you countless hours in editing later.
The Tripod: Your Non-Negotiable First Purchase
If you only buy one thing from that list, make it a tripod. It doesn't matter how steady you think your hands are; holding your iPhone always introduces tiny movements that create micro-blur, softening the details that customers want to see. A solid tripod kills that problem instantly, guaranteeing every single shot is tack-sharp.
But it’s not just about sharpness. A tripod gives you unwavering consistency. When you’re shooting a whole product line or just different angles of one item, locking your iPhone in place ensures every photo has the same perspective and height. That uniformity is what makes a product page look clean, trustworthy, and professional.
A simple tripod isn't about fancy features. It’s about creating a stable foundation. It's the difference between a random snapshot and a deliberate, professional product shot.
Remote Shutters for a Flawless Capture
Okay, your phone is on the tripod—perfectly stable. But the moment you tap the screen to take the picture, you can still cause a slight shake that blurs the image. This is where a remote shutter becomes your best friend, letting you snap the photo without ever touching the phone.
The great news is you have a bunch of easy and affordable options:
- Bluetooth Remotes: These are tiny, dirt-cheap clickers that pair with your iPhone in seconds. One click, no shake. Simple.
- Your Apple Watch: If you have one, you’re already set. The Camera Remote app gives you a live preview from your iPhone and lets you trigger the shutter right from your wrist.
- Wired Earbuds: It’s a bit old-school, but the volume buttons on many wired headphones (like Apple's old EarPods) double as a shutter button. It’s a low-tech but totally effective trick.
When you realize how low the cost of professional product photography can be for a traditional shoot, this DIY approach becomes a no-brainer. For less than the price of a couple of lattes, you can build a setup that produces reliably crisp images for your Shopify or Etsy store. It's no wonder that by 2025, smartphones are projected to capture a mind-boggling 92.5% of all photos taken worldwide. You're not just using a phone; you're using the most dominant camera on the planet.
Diving Into Your iPhone's Native Camera Settings
Before you even think about downloading a fancy third-party camera app, let's get our hands dirty with the powerful tools already built into your iPhone. So many e-commerce sellers skip these crucial steps, but this is exactly what separates a quick, amateurish snapshot from a truly professional product photo.
Getting these settings right gives you direct control over how your images turn out, making sure every shot is sharp, consistently lit, and ready for your storefront. We're not getting bogged down in technical jargon here—just a few key adjustments that solve the most common headaches in product photography.
Manually Lock Your Exposure (and Never Look Back)
Ever framed the perfect shot, only to watch the brightness flicker and change right as you press the shutter? That’s your iPhone’s auto-exposure "helping" you out. While it's great for photos of your dog, it's a real pain for product shots. It loves to blow out white backgrounds or crush the detail in dark products.
Here's how to take back control. It's easy.
- Open your Camera app and frame up your product.
- Tap and hold on your product for a couple of seconds.
- A yellow box will pop up with “AE/AF LOCK” at the top. This confirms that your Auto-Exposure and Auto-Focus are locked in place.
- See that little sun icon next to the box? Now you can slide your finger up or down the screen to fine-tune the brightness without the camera second-guessing you.
My two cents: It's almost always better to shoot slightly darker (underexposed) than too bright. You can easily pull detail out of shadows when you edit, but once your highlights are blown out to pure white, that detail is gone forever.
Locking your exposure is non-negotiable if you want to take professional photos with an iPhone, especially when you're shooting a product from multiple angles. It guarantees every single photo in your gallery has the exact same lighting, which is key for a polished, high-end customer experience.
Turn On the Grid for Better Composition
One of the fastest ways to elevate your product photos is to get your composition right. Straight lines and balanced framing just scream professionalism. The absolute easiest way to nail this is by switching on your camera's grid.
The grid overlays your screen with nine little boxes, helping you perfectly center your product or align it with the horizon. It’s a simple visual guide that makes a world of difference.
To flip it on:
- Head over to Settings > Camera.
- Find the "Composition" section and toggle the Grid switch to on.
That's it. Now, when you open your camera, you'll have a guide to make sure everything is perfectly straight and centered. It's a classic "set it and forget it" feature that instantly tidies up your shots.
When (and When Not) to Use Portrait Mode
Portrait Mode is brilliant for creating that soft, dreamy, blurred background—an effect photographers call bokeh. It’s a fantastic tool for making your product pop right out of the screen, pulling the viewer's eye exactly where you want it.
But hold on, it's not for every situation. Portrait Mode is at its best for:
- Lifestyle Shots: Think a watch on a wrist or your handmade mug sitting on a styled coffee table. It helps separate the product from its environment.
- Single, Larger Items: It works great for products with clean, defined edges where you just want to soften a busy background.
Where should you avoid it? Definitely for your standard, white-background catalog shots. For those, you need every last detail to be tack-sharp. Portrait Mode can sometimes accidentally blur the fine edges of your product, which just looks sloppy. Use it as a creative tool for your hero images, not your bread-and-butter product listings.
Get More Editing Power with ProRAW
If you're rocking an iPhone 12 Pro or any newer Pro model, you have a secret weapon: Apple ProRAW.
Think of a normal photo (like a JPEG) as a fully baked cake. It's done. A ProRAW file, on the other hand, is like getting all the individual ingredients—the flour, sugar, eggs. You have complete control to bake the cake however you want.
Shooting in ProRAW captures a massive amount of extra image data straight from the camera's sensor. This gives you way more power in the editing room. You can tweak the white balance, rescue details from the deepest shadows, and make precise color adjustments without wrecking the image quality.
Yes, the files are bigger, but for your main product shots, it’s a trade-off worth making. You can enable it in Settings > Camera > Formats by toggling on Apple ProRAW. In the camera app, a "RAW" button will appear, letting you switch it on and off for specific shots. For anyone serious about product photography on an iPhone, this is as close as you can get to the flexibility of a DSLR.
Mastering Lighting and Backgrounds That Sell
Okay, your iPhone camera settings are locked in. Now for the fun part—the two elements that truly separate amateur shots from professional ones: lighting and backgrounds.
Great lighting is what gives a product its shape, shows off its texture, and sets the entire mood. The right background? It makes sure your product is the undisputed star of the show. You don't need a fancy studio for this. In fact, some of the best tools are probably already in your house.
The real secret is learning how to see and shape light. This is where you move beyond just the tech in your phone and start crafting the environment around your product. A simple, beautifully lit scene will beat a complicated, poorly lit one every single time.
Harnessing Natural Light from a Window
Your best friend and most affordable light source is a big window on a slightly overcast day. This gives you soft, diffused light that wraps around your product, minimizes those harsh, ugly shadows, and creates a really flattering, high-end feel.
First thing's first: turn off all the other lights in the room. Mixing different types of light creates weird color casts that are a total pain to fix in editing. Set up a small table or surface near the window, but try to avoid direct, blazing sunlight.
Here’s a dead-simple setup that works wonders:
- Position Your Product: Place your item at a 45-degree angle to the window. This creates a really nice interplay of light and shadow, giving it depth and dimension.
- Use a Reflector: Grab a cheap piece of white foam board from a craft store. Prop it up on the side of your product opposite the window. It will bounce that beautiful window light back into the shadows, brightening them up and revealing more detail. Simple, but effective.
- Diffuse Harsh Light: If the sun is just too bright and creating sharp shadows, you can soften it up easily. Just tape a thin white bedsheet or even a big piece of parchment paper over the window. Boom—you’ve just made a giant, inexpensive softbox.
This quick flowchart covers the essential iPhone settings to lock in before you start shooting with your new lighting setup.
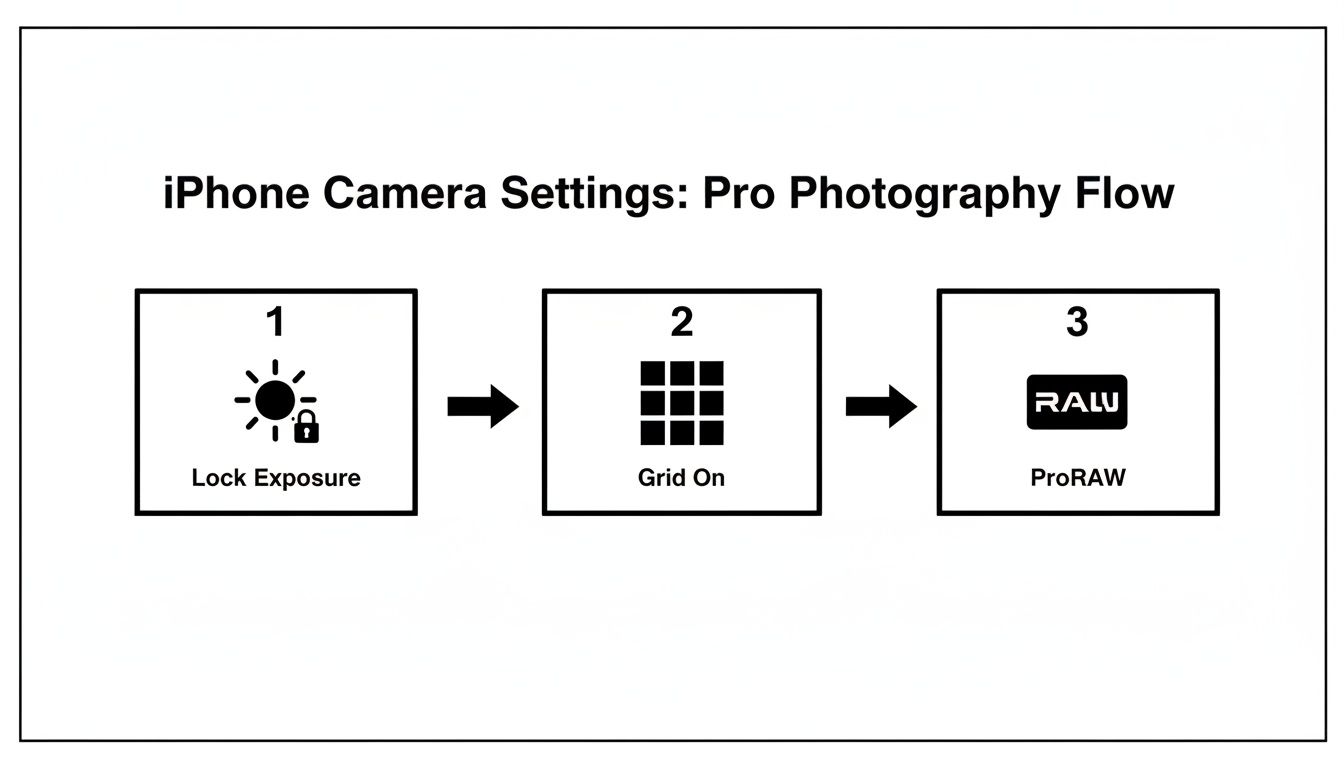
Running through this checklist ensures your exposure stays consistent from shot to shot, your composition is on point, and you’re capturing the most data possible for editing later.
Creating a Flawless Infinity Sweep Background
For those classic, clean e-commerce photos, you need a seamless background that makes your product look like it's floating in space. It’s called an "infinity sweep," and you can make one in about two minutes with a large piece of poster board.
Just lay the poster board on your table and gently curve it up against a wall, taping the top edge. You can also just prop it against a box. This curve creates a smooth, continuous backdrop with no distracting line where the table meets the wall. It’s the standard look for marketplaces like Amazon and Shopify for a reason: it puts 100% of the focus squarely on your product.
The whole point of a good background is to be completely unnoticeable. An infinity sweep gets rid of every distraction, guiding the customer's eye right to the product details. It’s the fastest way to look professional.
When to Use Artificial Lighting
Window light is amazing, but let's be real—it's not always available or consistent. If you need to shoot at night or want perfectly repeatable results for every single product, a small investment in artificial lighting is a total game-changer. You don’t need a massive, expensive kit; often, a single light source is all it takes.
A ring light is a super popular and affordable choice. It gives you even, nearly shadowless light that’s great for a lot of small-to-medium-sized products. For a slightly more dynamic look, an LED panel with a diffuser (a softbox) placed at that same 45-degree angle works wonders. You can—and should—still use your trusty white foam board as a reflector to fill in shadows. To really nail the shot, building out your perfect product photography lighting setup is just as important as choosing the right backdrop.
Tailoring Light to Different Product Types
You wouldn't light a fuzzy sweater the same way you'd light a chrome faucet. The type of light you use should complement your product’s material, texture, and shape. Thinking this through is what will really set your photos apart.
Soft Light for Soft Goods
For things like clothing, blankets, or skincare products, you want soft, diffused light. It smooths textures and creates a gentle, appealing vibe.
- How to Get It: Use a large, diffused window (like with the bedsheet trick) or an artificial light with a big softbox. Remember: the larger the light source relative to your product, the softer the light.
Hard Light for Texture and Detail
Got a product with interesting textures? Think electronics with brushed metal, engraved jewelry, or rugged leather. Hard light can make those details pop by creating crisp, defined shadows.
- How to Get It: Use a smaller, more direct light source, like a bare LED bulb or even direct sun (but use it carefully!). Just be warned, this can create intense reflections on shiny surfaces.
Managing Reflections on Shiny Products
Photographing jewelry, glass, or anything with a reflective surface is notoriously tricky. The key isn't to eliminate reflections but to control what is being reflected.
- Create a "Light Tent": You can build a little studio by surrounding your product on the sides and top with white foam board. This way, the only thing being reflected is clean, white surfaces.
- Shoot from an Angle: Avoid shooting head-on. Simply changing your angle can dramatically reduce glare and kill unwanted reflections.
- Use a Polarizer: This is a more advanced move, but a polarizing filter attachment for your iPhone can cut through glare like magic. For most people, though, just controlling the environment is enough.
Creating a Repeatable Product Photography Workflow
Consistency is the secret sauce that makes an online store look polished and trustworthy. When a potential customer lands on your page and sees a clean, cohesive gallery, it instantly builds confidence in your brand. This is where a repeatable workflow becomes your most valuable asset—it turns a potentially chaotic process into a streamlined system.
A solid workflow isn't just about speed; it's about stamping your brand with a uniform visual identity. It means planning your shots, locking in the same conditions for every product, and setting yourself up for an editing process that’s quick and painless. It’s the difference between just snapping pictures and deliberately crafting a high-quality product showcase.
The iPhone has become a quiet powerhouse for e-commerce sellers. It's always with us, and its camera is more than capable of producing professional-grade shots. With a staggering 1.8 trillion pictures taken globally each year, it's clear the phone is our go-to creative tool.
Plan Your Essential Shot List
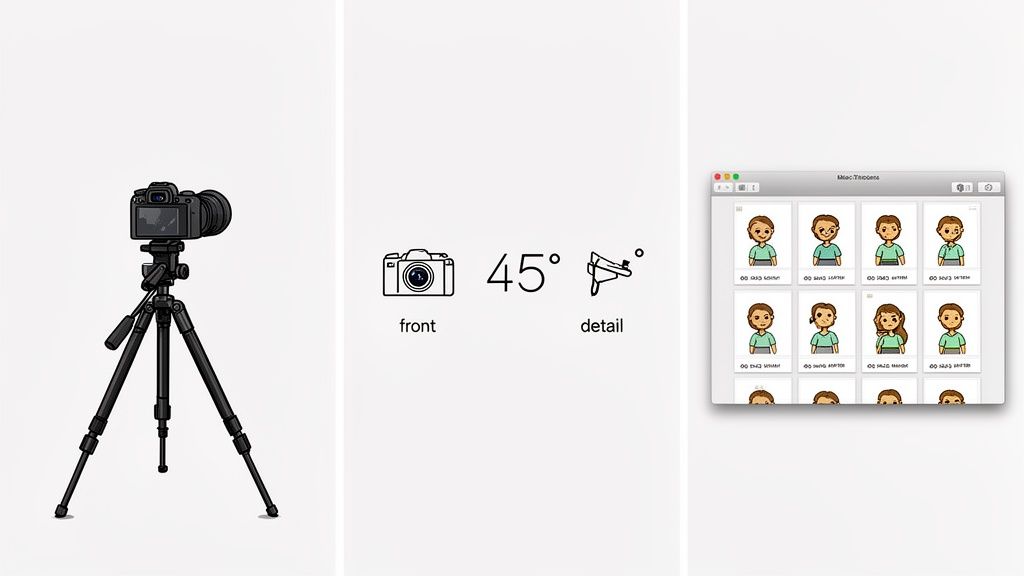
Before you even pick up your iPhone, you need a game plan. Think about every angle a customer would want to see. A good set of product photos tells a complete story, answering questions visually before they’re even asked. Don't just get a front view and call it a day. Create a checklist you can run through for every single item.
Here are the core angles every product page should have:
- The Hero Shot: A straight-on, perfectly centered view of the front. This is your main image.
- The 45-Degree Angle: This shot is great for showing depth and dimension, capturing the front and side at once.
- The Profile Shot: A direct side view.
- The Back Shot: Crucial for showing details like ingredient lists, clasps, or ports.
- The Detail Shot: A close-up (macro) shot that highlights texture, craftsmanship, or key features.
- The Scale Shot: An image showing the product next to a common object to give a clear sense of its real-world size.
Having this checklist makes sure you never miss a critical shot and keeps all your product pages looking consistent.
Use Your Mac as a Live Preview Screen
One of the trickiest parts of shooting with an iPhone is its small screen. It's so easy to miss a tiny speck of dust, a stray thread, or a weird reflection until it’s too late. The solution? Use your Mac as a huge, real-time monitor.
Thanks to Apple's Continuity Camera feature, this is surprisingly simple. On your Mac, open an app like QuickTime Player, go to "New Movie Recording," and then select your iPhone as the camera source. Instantly, your iPhone's camera feed is mirrored to your big screen, letting you scrutinize every little detail before you hit the shutter.
This is a pro studio trick that’s incredibly easy to replicate at home. It forces you to slow down and catch the little mistakes that are almost invisible on a phone, saving you a ton of hassle in post-production.
Embrace Batch Processing for Ultimate Consistency
Batch processing is the key to an efficient workflow. The idea is simple: shoot all of your products under the exact same conditions. Use the same lighting setup, the same camera settings (remember that AE/AF lock!), the same background, and the same tripod position for every single item.
When you batch your photos this way, you create a set of images that are already visually aligned. This makes editing dramatically faster because the tweaks you make to one photo—like adjusting brightness or white balance—can often be applied to the entire batch in one go. For anyone with a large inventory, this is a non-negotiable strategy for maintaining a polished look without getting bogged down in editing.
This consistency also makes automated tools far more effective. When you use a Shopify photo editor or similar software, the AI has a clean, consistent starting point for every image, which means better, more predictable results.
From Phone Edits to AI Automation
Taking the picture is really just the first step. The magic that makes a product photo truly convert happens in the edit. The good news? Your iPhone’s own Photos app is a surprisingly solid place to start, letting you lay a great foundation before you even leave your shooting space.
Making a few small tweaks here can have a huge impact. I always focus on bumping up the Brightness to make my whites clean and crisp, increasing the Contrast for a bit of extra pop, and adding a touch of sharpness. You can also quickly crop your images to fit specific requirements, like the 1:1 square format that’s so common online. These simple edits create a clean, consistent look across all your product shots.
The Final Touch: AI-Powered Perfection
Once you have a clean, well-lit photo, it's time to let automation take over the tedious work. Instead of spending hours meticulously cutting out backgrounds or trying to paint in realistic shadows, specialized tools can now handle these tasks in just a few seconds.
This is where the real workflow acceleration begins for e-commerce sellers. By uploading your edited iPhone shots, you can:
- Instantly remove backgrounds to get that clean, professional look that meets Amazon and Shopify standards.
- Generate natural-looking shadows that give your product a sense of place and realism.
- Create custom scenes by dropping your product into entirely new, AI-generated environments.
Think of it this way: AI isn't here to replace good photography. It's here to supercharge it. When you feed an AI product photo generator a high-quality iPhone photo, you're giving it a fantastic starting point, which means you get better, more believable results, faster.
After you've created these killer product images, you can take it a step further. It's now possible to turn your product photos into engaging video ads with AI, giving you an entirely new way to capture attention and drive sales from the assets you've already created.
Common Questions About iPhone Product Photography
When you're just getting started with iPhone product photography, a few questions always seem to pop up. Let's run through the most common hurdles I see e-commerce sellers face and get you some clear, practical answers.
Do I Need the Latest iPhone Model?
Honestly? No, you really don't. While the newest Pro models have some incredible bells and whistles like ProRAW and extra lenses, the single most important factor for a great product shot is lighting. That's it.
An older model like an iPhone 12 or 13, paired with a solid lighting setup and a tripod, will blow a brand-new iPhone 15 Pro out of the water if it's used in a poorly lit room. The fundamentals—light, composition, and stability—always win over the latest sensor. Put your budget and energy into mastering your lighting first.
How Do I Photograph Reflective Products?
Ah, the classic headache: shooting jewelry, glassware, or anything with a chrome finish. The secret isn't to eliminate reflections, but to control what's being reflected. Hitting it with a direct flash or a harsh light is a guaranteed way to get a distracting, amateurish glare.
The trick is to build a little "light tent" around your product using white foam boards on the sides and top. This simple setup ensures the surfaces reflect a clean, neutral white instead of your camera, your ceiling, or your cat walking by in the background. Sometimes, just changing your shooting angle by a few degrees is enough to make a bad reflection disappear.
A common mistake is trying to fight reflections with more light. The real solution is to control the environment your product is reflecting. Think diffusion, not power.
What Are the Biggest Mistakes to Avoid?
The most frequent missteps are also the easiest to fix once you know what to look for. Seriously, avoiding these three things will instantly make your photos look more professional.
- Inconsistent Lighting: Never mix your light sources. Window light has a different color temperature than the light from your ceiling fixture, which leads to weird color casts and messy shadows. Stick to one primary source of light and own it.
- Busy Backgrounds: Your background’s job is to be invisible. Wrinkled fabric, distracting lines, or clutter in the corner will pull the eye away from what you're actually trying to sell. An infinity sweep is your best friend here.
- Unstable Shots: Even the tiniest handshake will introduce blur and soften the details that matter. A tripod is completely non-negotiable if you want to achieve that crisp, professional sharpness.
Ready to turn your iPhone shots into flawless, marketplace-ready images in seconds? ProdShot uses AI to automatically remove backgrounds, add perfect shadows, and create stunning product photos that convert. Try ProdShot for free and see the magic for yourself!