
Product background photography is all about choosing, styling, and shooting the perfect backdrop for your product. It’s the secret sauce that makes your items look professional, desirable, and trustworthy, and it has a direct line to your e-commerce conversion rates.
Why Your Product Background Matters More Than You Think
Let's be honest. A fantastic product shot against a distracting, unprofessional background is a guaranteed way to lose a sale. In a crowded digital marketplace, your product's background isn't just empty space; it’s the stage. It sets the first impression and convinces a shopper to click "add to cart."
A clean, well-executed background does more than just make your product pop. It builds instant trust by cutting through the visual clutter, letting customers focus on the details that matter. This is exactly why platforms like Amazon and Shopify have such strict guidelines—they know that visual consistency is the bedrock of a great shopping experience.
The Financial Impact of Visuals
The connection between excellent product presentation and sales performance is undeniable, as this ultimate guide to increasing e-commerce conversion rates breaks down. A polished image can even reduce returns by giving customers a clear and accurate idea of what they’re buying.
The demand for high-quality visuals has created a huge market. In fact, the product photography services market is expected to jump from $870 million in 2025 to $1.78 billion by 2033. This explosion is driven by the nonstop growth of e-commerce, which has created an insatiable need for images that grab attention and drive sales.
I’ve seen it time and time again: the background of a photo is responsible for over half of its perceived quality. A cluttered or poorly lit backdrop can make a premium product feel cheap, while a clean, professional one can turn an everyday item into a must-have.
Leveling The Playing Field For Small Sellers
Not long ago, getting this level of quality meant shelling out for expensive studio time, professional photographers, and complex editing software. This put small business owners and solo entrepreneurs at a huge disadvantage against big brands with deep pockets.
Fortunately, that's no longer the case.
This guide is designed for sellers who need to create stunning images without breaking the bank. We’ll walk through a practical workflow that uses tools you already own—like your smartphone—paired with powerful AI solutions that handle background removal and replacement automatically. This approach completely levels the playing field, making it possible for anyone to produce conversion-ready images that stand out and sell.
Before you even touch your camera, the first real decision you make is about the backdrop. What story is the background going to tell? In product photography, the background isn't just dead space—it’s a silent partner that frames your item, broadcasts your brand’s vibe, and tells the customer exactly where to look. Get it wrong, and you create confusion. Get it right, and you build trust and drive sales.
Your choice here is all about context. Where are you selling? The crisp, no-nonsense look needed for an Amazon listing is worlds away from the warm, aspirational feel you’d aim for on Instagram. Let's dig into the three core background types every e-commerce seller needs to have in their playbook.
The Essential White Background
For most online marketplaces, a pure white background isn't just a suggestion; it's the law of the land. Platforms like Amazon and Shopify practically demand it for main product images because it ensures a clean, consistent experience for shoppers. It strips away every possible distraction, forcing the customer's eye to focus solely on your product’s details, texture, and quality.
A white background is the gold standard for a reason: clarity. It’s a neutral canvas that puts your product on a pedestal, making it the undisputed hero of the shot. Plus, these images are workhorses—you can reuse them in catalogs, ads, and promo materials without ever worrying about them clashing with your design.
Key Takeaway: A pure white background (RGB 255, 255, 255) is the most valuable player in your product photography toolkit. It keeps you compliant with major marketplaces and gives you maximum marketing flexibility.
The Immersive Lifestyle Background
If white backgrounds are about informing, lifestyle backgrounds are all about inspiring. These shots drop your product into a real-world setting, helping customers picture it in their own lives. A great lifestyle photo tells a story and connects your product to an emotion or a specific moment.
Just think about the difference it makes:
- A ceramic coffee mug: Instead of floating in space, picture it on a rustic wooden desk next to a laptop, with steam rising from a fresh pour.
- A waterproof backpack: Don't just show it. Capture it resting on a mossy rock with a beautiful mountain trail blurred out behind it.
- Skincare products: Arrange them on a minimalist bathroom vanity with fluffy towels and a hint of steam in the air.
These scenes don't just display a product; they sell an experience. This is your go-to style for social media, website banners, and email campaigns where building a genuine connection is the name of the game. For a deeper dive into making your storefront pop, check out our guide on how to remove a background for Shopify product images.
The Bold Textured or Colored Background
Ready to make a statement? A textured or solid-colored background is how you do it. This approach is less about documenting the product and more about creating a distinct mood that screams your brand's identity. It's perfect for hero images, new collection launches, or any social media post that needs to stop the scroll.
A luxury watch photographed on a slab of dark, moody marble. A vibrant kids' toy set against a bold, canary-yellow backdrop. These backgrounds inject personality and a premium feel that a plain white background just can't match.
The color you choose is a powerful tool.
- Pastels can create a feeling of softness and calm, perfect for baby products or wellness brands.
- Bright, saturated colors bring energy and excitement, making them great for fashion or new tech.
- Earthy tones like olive, beige, and terracotta communicate a natural, organic, or grounded feel.
Using these backgrounds consistently helps you build a visual signature that customers will instantly recognize. They're a fantastic middle ground, giving you more creative punch than a white background without the complexity of a full-blown lifestyle shoot.
To make it even clearer, think about your specific goal. The right background is the one that gets you closer to a sale on a particular platform.
Matching Your Background to Your E-commerce Goal
This quick guide will help you pair the perfect background with your sales channel and marketing objective.
| Background Type | Best For | Primary Use Case | Example Scenario |
|---|---|---|---|
| White | Amazon, Shopify, Google Shopping, Most Marketplaces | Creating a clean, distraction-free primary product listing. | A clear, front-on shot of a new pair of sneakers for its main Amazon product page. |
| Lifestyle | Instagram, Pinterest, Blog Posts, Email Marketing | Helping customers visualize the product in their own lives and telling a brand story. | A woman wearing your brand’s sundress while walking on a beach, posted to Instagram. |
| Textured/Colored | Website Hero Images, Social Media Ads, Special Campaigns | Reinforcing brand identity, creating a mood, and grabbing attention. | A new luxury handbag featured on a background of rich velvet for a homepage banner. |
Ultimately, the most successful brands don't just stick to one style. They build a diverse portfolio of images, using the stark clarity of a white background for marketplaces and the rich storytelling of lifestyle and colored shots to build their brand elsewhere.
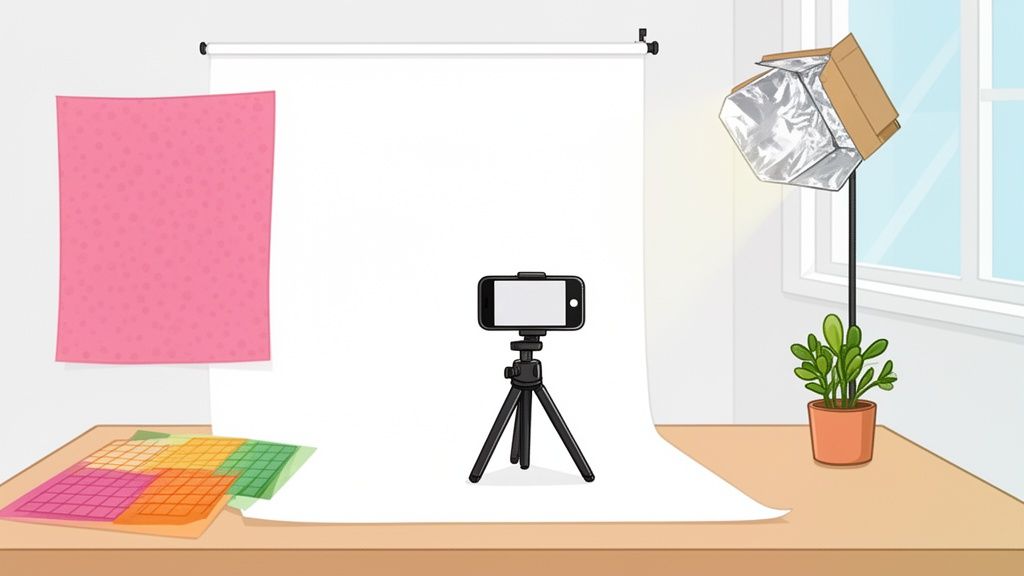
Getting Flawless Product Shots with Just Your Smartphone
You really don't need a fancy DSLR camera to create product images that stop the scroll. The camera you already carry in your pocket is a powerhouse, loaded with tech that can deliver professional-level shots—if you know how to use it right.
Forget the idea of needing an expensive studio. This is all about practical, real-world steps you can take today to capture images that sell, using your smartphone and a few things you probably have lying around the house. We'll zero in on the settings, lighting tricks, and simple composition rules that truly make a difference.
Mastering Your Smartphone Camera Settings
Before you even think about setting up your product, take a minute to dive into your phone's native camera app. A few quick tweaks here can save you a ton of editing time later and seriously upgrade the quality of your raw images. Nailing these basics is your first step to better product photos.
First things first, turn on the gridlines. This is a non-negotiable. Buried in your camera settings is a simple feature that overlays a rule-of-thirds grid on your screen, and it's your secret weapon for good composition. It helps you get your product perfectly centered or place it on one of the intersecting lines for a more dynamic feel, instantly making your photos look more intentional and professional.
Next, get comfortable with locking your focus and exposure. Tap and hold on the most important part of your product. You'll see a box pop up, often with a little sun icon. Once that's locked, the focus won't jump around, even if you move the phone slightly. From there, you can slide your finger up or down to manually brighten or darken the shot until your product looks just right—not too dark, not blown out.
Pro Tip: Locking your focus and exposure is absolutely crucial for creating a consistent look across all your product photos. It means every shot you take from that angle will have the same sharpness and lighting, which is key for a cohesive gallery on your product page.
Finally, a simple rule to live by: never, ever use the digital zoom. When you pinch to zoom on a smartphone, you aren't actually zooming. You're just cropping the image and blowing up the pixels, which completely butchers the quality. The result is always a blurry, pixelated mess. If you need a closer shot, just move your phone closer. Seriously.
DIY Lighting and Reflectors on a Budget
Lighting is everything. It’s the one element that can make a high-end product look cheap or a simple item look like a luxury good. Bad lighting creates harsh, ugly shadows that hide the very details you want to show off.
The good news? The best light source is completely free: a large window on an overcast day. This gives you soft, diffused light that wraps beautifully around your product. Set up your shot near the window, but make sure it’s not in direct, harsh sunlight, which is your enemy.
To really control that natural light, you'll want to build a simple reflector.
- What you'll need: A piece of white foam board is perfect, but even a sturdy piece of cardboard covered in aluminum foil works in a pinch.
- How to use it: Position your product so the light from the window is hitting it from one side. Now, place your homemade reflector on the opposite side, just out of frame.
- The result: The reflector bounces that soft light back onto the product, filling in the shadows and revealing more detail. It’s a trick that costs almost nothing but adds a massive amount of professional polish.
Staging Your Product for Maximum Impact
How you stage your product does more than just show what it looks like; it tells a story and helps a potential customer understand its size and function. The goal is always to present it clearly, honestly, and in an attractive way.
Start by getting the essential angles. Your customer wants to see the front, back, and sides. They want to see unique details, like a clasp on a necklace or the texture of a fabric. A 45-degree angle is a go-to for many products because it shows both the front and the side, giving a better sense of depth. For things like apparel, stationery, or food, a top-down shot (often called a "flat lay") can work wonders.
Use props, but use them with purpose. A prop should add context, not create clutter. For instance, placing a credit card next to a wallet instantly gives a sense of its real-world size. Selling a print? Show it hanging on a wall above a small sofa. The prop should support the product, never steal the spotlight.
This simple flow chart helps visualize how to think about your background choice based on your goal—whether it's for a strict marketplace or for telling a brand story.
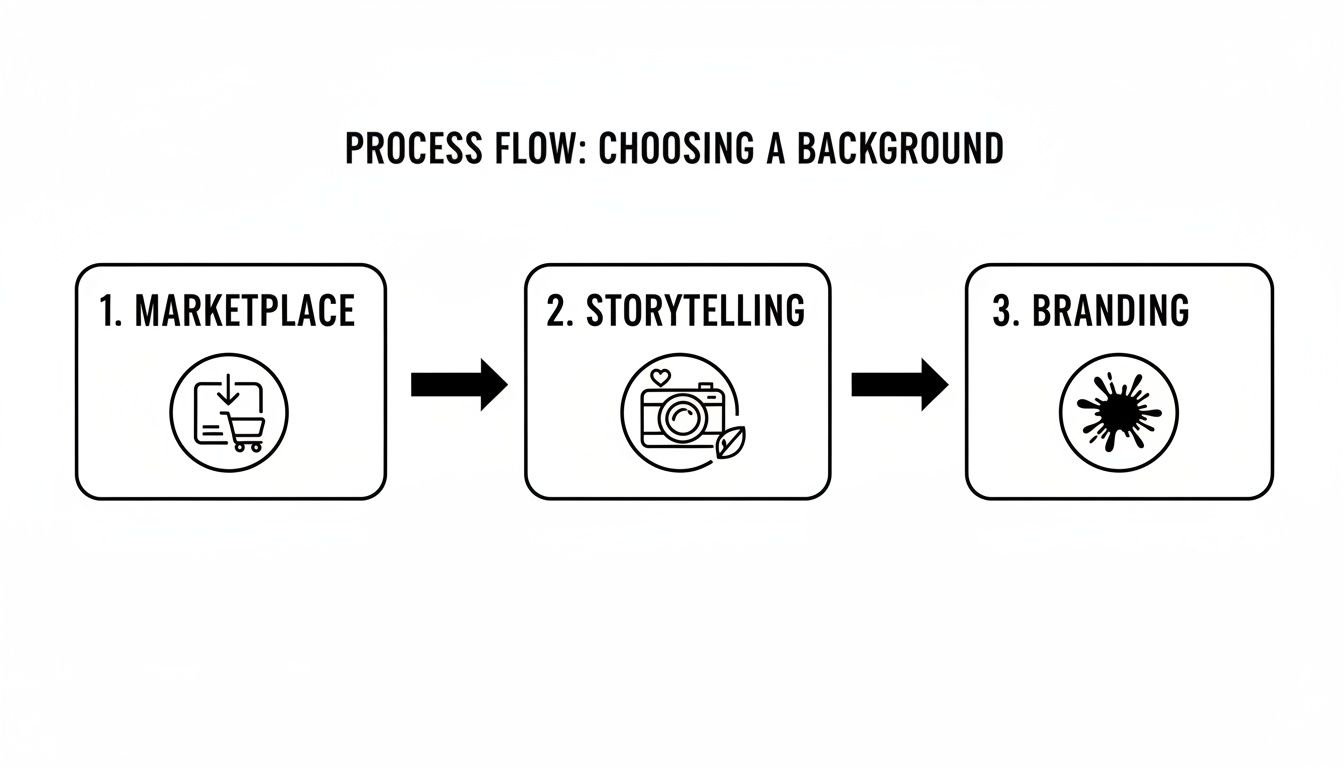
The big takeaway here is that your background shouldn't be an afterthought. It needs to be a deliberate choice that shifts from clean and compliant for marketplaces like Amazon, to rich and narrative-driven for your social media, to perfectly on-brand for your website's hero images.
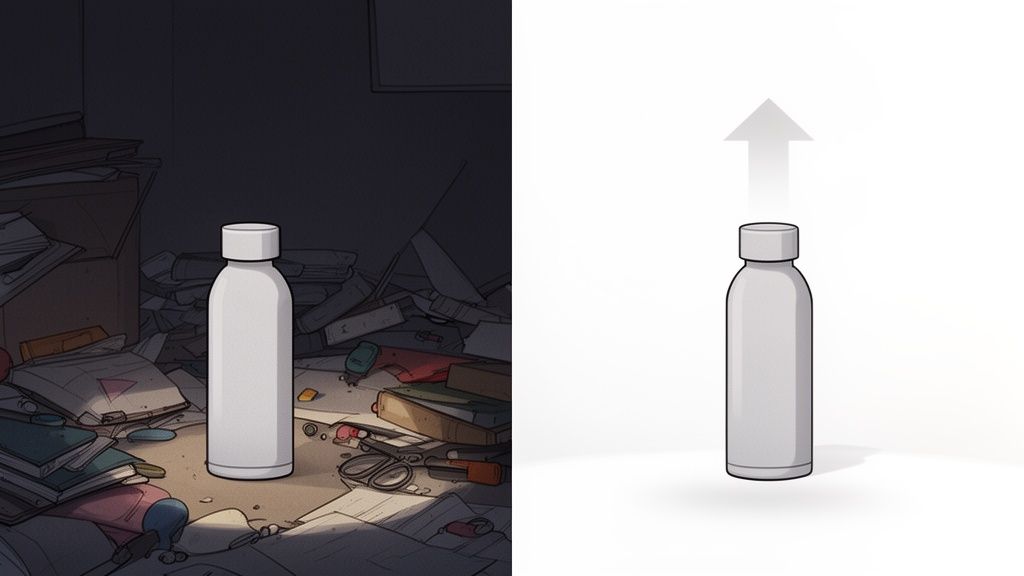
Using AI to Transform Your Photos Instantly
So you’ve snapped a great raw photo with your phone—it’s sharp, well-lit, and the staging is on point. What now? The next step is closing the gap between "good enough" and "professionally polished," and this is where a new wave of AI tools becomes your secret weapon. Forget spending hours in Photoshop; these platforms are built for sellers who need to move fast.
The entire idea is to take your solid smartphone picture and instantly get it ready for your storefront. The workflow is incredibly simple and designed for people who are busy running a business, not learning complex software.
It usually comes down to just a few clicks. You upload your original image, and the AI immediately gets to work. Its first and most critical job is to perfectly snip your product out from its original background, handling all the tricky details like fuzzy edges or complex shapes that would take forever to trace by hand.
From Raw Shot to Perfect Backdrop in Seconds
Once the background is gone, the fun begins. You can instantly swap in a flawless, pure white backdrop that meets the strict image requirements for marketplaces like Amazon or Etsy. No more messing with color codes or trying to manually clean up gray spots—the AI nails a perfect RGB (255, 255, 255) background every single time.
Or, maybe a lifestyle shot is more your speed. Imagine dropping your skincare bottle onto a chic marble vanity or placing your hiking boots on a sun-drenched mountain trail. These tools have huge libraries of scenes and can even generate brand-new ones from a simple text prompt. You can create a whole visual story for your product without ever leaving your desk.
The entire process boils down to a simple formula: upload, pick a style, and generate. It’s a workflow that makes high-end product photography accessible to literally anyone.
The Massive Advantage of AI Editing
The time and cost savings here are just enormous. If you've ever tried to edit a photo yourself, you know it can take anywhere from 15 minutes to over an hour for a single image, even if you know what you're doing. Hiring a pro retoucher? That gets expensive fast, especially if you have a big catalog of products.
AI tools cut that whole process down to just seconds per photo. It’s a total game-changer for small sellers who need to get new products listed quickly while keeping their storefront looking fresh and consistent.
Think about it: a virtual photography setup can lead to a 90% reduction in traditional shoot costs. By swapping a physical studio for an AI one, brands can reinvest that budget directly into marketing or product development.
And it's not just about swapping backgrounds. These tools pack a full suite of automated tweaks to get your final image looking perfect.
- Intelligent Lighting: The AI analyzes your product and automatically adjusts the highlights and shadows to make it pop, ensuring it looks like it truly belongs in its new setting.
- Realistic Shadows: A fake-looking shadow is a dead giveaway of a bad edit. AI generates soft, realistic drop shadows that ground your product, giving it a real sense of depth.
- Perfect Color Balance: Did your white T-shirt come out looking a little yellow in the photo? AI can automatically correct those color casts, making sure your product colors are true-to-life for your customers.
For anyone who wants to dive deeper, you can learn more about how an AI product photo generator can create entire visual campaigns from just a single starting image.
Ultimately, these tools put high-quality product photography in everyone's hands. They do all the technical heavy lifting, so you can focus on what you do best: selling your products. By turning your simple smartphone shots into polished, conversion-ready assets, AI makes sure your brand looks incredible, no matter where you sell.
Getting Your Images Ready for E-commerce
Taking a great product photo is really just the first step. The real magic for online sales happens when you get the technical stuff right. To stand out on crowded platforms, your images need to be optimized to load fast, look crisp, and actually get seen by shoppers.
A beautiful shot with the wrong specs can drag your site's speed to a crawl, which is a killer for both the customer experience and your search ranking.
Think of each platform's image rules not as annoying restrictions, but as a clear roadmap to getting more sales. Nailing the specs from the get-go saves you from a world of upload errors and makes your entire shop look clean and professional.
Mastering E-commerce Image Specs
While the exact numbers change a little here and there, the big players like Shopify, Amazon, and Etsy all want the same thing: sharp, high-resolution images that don't take forever to load. A slow product page is a guaranteed way to lose a sale—studies have shown that even a one-second delay can tank your conversion rate.
Here's a quick cheat sheet for the specs you'll want to hit on the big three:
- Amazon: They love square images. Aim for at least 1000 pixels on the longest side, but 1600 pixels is even better because it enables their popular zoom feature. Keep your file sizes under 10MB and stick to JPEG, TIFF, or GIF formats.
- Shopify: You get a lot more breathing room here, with file sizes up to 20MB and dimensions as large as 4472 x 4472 pixels. But honestly, that's overkill. For the best performance, a square image around 2048 x 2048 pixels is the way to go.
- Etsy: They suggest making your images at least 2000 pixels on the shortest side. The file size limit is pretty generous, but just like with Shopify, it's smart to keep images under 1MB to give your customers a snappy browsing experience.
The universal sweet spot? A high-quality JPEG, around 2000 pixels on the longest side, compressed to be well under 1MB. This hits the perfect balance of quality and speed that works almost everywhere.
Why Your File Names are an SEO Goldmine
Once your images are sized up perfectly, don't just hit "save." Naming your file IMG_9875.jpg is a huge missed opportunity. Search engines like Google read everything, including the file names of your images, to figure out what your page is all about.
A descriptive file name packed with keywords is like a direct signal to Google, helping it index your product and show it to people who are actually looking for it.
| Bad File Name | Good File Name |
|---|---|
photo1.jpg |
handmade-leather-tote-bag-brown.jpg |
DSC_0024.png |
organic-lavender-bar-soap-front.jpg |
final_edit_v2.jpg |
blue-suede-womens-ankle-boots-side-view.jpg |
This simple habit is a free boost for your store’s SEO. It literally takes seconds and can make a real difference in how easily customers find you.
The Magic of Batch Processing
Let's be real: optimizing photos one by one is a total nightmare, especially if you have a bunch of products. This is where batch processing becomes your best friend. It lets you apply the same set of changes—resizing, renaming, compressing—to all your photos at once. You can learn more about how to resize your images in bulk in our dedicated guide.
Batch processing guarantees consistency. Every single image will have the same dimensions, format, and quality level, giving your storefront that polished, cohesive look. But most importantly, it saves you hours of tedious work, so you can get back to the parts of your business that actually need your attention.
To complement your stunning product images on e-commerce platforms, delve into the efficiency of using printable shipping labels for smooth and reliable Australian shipping.
Avoiding Common Product Photography Mistakes

Even with the best gear and intentions, it's incredibly easy to run into frustrating issues that can stop a product photoshoot in its tracks. I've been there. The good news is that knowing what to look out for is half the battle.
Understanding these common pitfalls ahead of time is the fastest way to get pro-level, consistent results without wasting hours on reshoots. From distracting glare to blurry shots, most problems have surprisingly simple—and cheap—fixes.
One of the biggest offenders I see is inconsistent lighting. When one photo in your gallery is bright and the next is dim, it just looks unprofessional. The fix? Lock it down. Use the exact same lighting setup for every shot in a series and, most importantly, lock the exposure on your smartphone so it doesn't try to "help" you by auto-adjusting.
Another classic headache is camera shake. It results in those slightly blurry, soft-focus images that just scream amateur. You don't need a fancy tripod to solve this. Seriously, a simple stack of books or a coffee mug can give you the stability you need for a tack-sharp photo every single time.
Fixing Color and Glare Issues
Ever take a picture of a perfectly white product only to have it come out looking weirdly yellow or blue? That’s a classic white balance issue. Your camera is just getting confused by the color of your light source.
Most smartphone cameras let you adjust this manually in the pro settings. An even easier trick is to just place a plain white piece of paper next to your product and use that to set a custom white balance. Your colors will suddenly look true-to-life.
Glare is another fun one. Distracting reflections on shiny products can completely ruin a shot by hiding important details.
- Solution 1: Just move your light. Often, simply changing the angle of your light source is enough to make the reflection disappear.
- Solution 2: Diffuse it. You can place a thin white sheet or some parchment paper between your light and the product. This softens the light, killing those harsh, glaring hotspots.
Tackling these small issues makes a huge difference in the final quality of your product background photography. The goal is to solve problems during the shoot so you spend less time trying to fix them in post-production.
Got Questions? We've Got Answers
Stepping into the world of product photography can feel like a lot at first. You’ve probably got a ton of questions floating around, especially when you're trying to get everything just right. Let's clear up some of the most common ones so you can build a visual strategy that actually gets results for your store.
Do Good Photos Really Affect Sales That Much?
The short answer? Massively. It's not just about looking pretty. High-quality product images can boost your conversion rate by up to 94% compared to a listing with weak photos.
Think about it from your customer's perspective. Professional visuals build instant trust. They clear up uncertainty and make your products shine in a sea of competitors on crowded marketplaces. Better photos lead directly to more sales and, just as importantly, fewer returns.
Is It Okay to Mix Different Background Styles?
Not only is it okay, it’s a smart move. A killer strategy uses different backgrounds for different channels.
- White Backgrounds: Use these for your main marketplace listings on Amazon or Shopify. They meet the platform requirements, look clean, and keep the focus squarely on your product.
- Lifestyle & Colored Backgrounds: Save these for social media, email newsletters, and your website’s homepage. This is where you tell your brand’s story and build an emotional connection with shoppers.
This two-pronged approach gives you a complete visual toolkit to work with.
A quick tip from experience: Keep your main product shots consistent. All of them should feel like they belong to the same family. But your Instagram feed? That's where you can get creative and mix it up. This creates a brand experience that’s both cohesive and exciting.
What's the Best Lighting Setup on a Tight Budget?
You really don't need to drop hundreds on a fancy studio lighting kit when you're starting out. The best (and cheapest) light source you have is a large window on an overcast day. It gives you soft, diffused, and totally free light.
To take that simple setup to the next level, all you need is a DIY reflector. Grab a piece of cardboard and wrap it in aluminum foil, or just use a white foam board. Place it on the opposite side of your product from the window. It will bounce that beautiful natural light back, filling in harsh shadows and making your product pop. It’s a simple trick that adds a professional touch for practically zero cost.
Ready to see what your product photos could look like? ProdShot uses AI to instantly remove backgrounds and generate stunning, sales-ready images in seconds. Start your free trial today!