
Choosing the right background is one of the most powerful decisions you'll make in the studio. Think of it as the stage for your subject—it’s the silent partner that sets the mood, kills distractions, and makes your hero product or person truly shine. A simple backdrop change can instantly take a photo from looking amateur to feeling high-end.
The Foundation of Great Studio Photography
Before you even think about dialing in your lighting or camera settings, you have to get the visual foundation right. Your background isn't just "the thing behind the subject." It's an active part of your composition that tells the viewer's eye exactly where to go.
A busy, cluttered background screams unprofessionalism and can confuse anyone looking at your image. On the other hand, a clean, intentional backdrop communicates quality and immediately builds trust.
This is especially true in e-commerce. Don't just take my word for it—data from millions of online listings shows that product photos shot on clean, professional backdrops can boost conversions by up to 30%. In stark contrast, messy or inconsistent backgrounds often lead to bounce rates that are 20-25% higher, simply because they distract shoppers. You can dig into more of this kind of data over at Flatlay Studio.
Your Studio Workhorse Backdrops
While the creative options are endless, three specific materials are the absolute workhorses you'll find in almost any professional studio. Each one offers a different mix of texture, practicality, and reusability, making them perfect for different kinds of shoots.
Seamless Paper: This is the undisputed champ for clean, consistent looks. It’s my go-to for e-commerce product photography, corporate headshots, and any shot that needs a flawless, non-reflective surface.
Muslin: A versatile, drapable fabric that brings a bit of texture and depth into the frame. It's fantastic for portraits where you want a softer, more classic, or even a moody vibe.
Vinyl: This is the durable, easy-to-clean hero. Vinyl is a lifesaver for messy shoots—think food photography, paint splashes, or anything with liquids. It can take a beating, though you have to watch out for glare on some of the glossier finishes.
Key Takeaway: The job of a studio background isn't just to fill the space behind your subject. It's to give you complete control over the visual environment, strip away all distractions, and put the spotlight exactly where you want it: on your product or model.
Getting a handle on these core options is your first step toward building a flexible photography toolkit. To help you decide where to start, I've put together a quick cheat sheet.
Studio Background Quick Comparison Guide
This table breaks down the three most common background materials to help you make a quick decision based on what you'll be shooting most often.
| Background Type | Best For | Pros | Cons |
|---|---|---|---|
| Seamless Paper | Product shots, headshots, e-commerce | Perfectly smooth, wide color variety, affordable | Easily damaged, disposable, can get dirty quickly |
| Muslin Fabric | Portraits, artistic shots, video | Reusable, adds texture, portable and lightweight | Wrinkles easily, needs steaming, can be inconsistent |
| Vinyl | Food photography, messy shoots, high-volume use | Extremely durable, wipeable, long-lasting | Can be reflective, heavier, more expensive upfront |
As you can see, there's no single "best" option—it all comes down to what you're trying to achieve. Most professional photographers end up owning at least two, if not all three, to cover all their bases.
Choosing Your Backdrop Material

Walking into a photo supply store and seeing all the backdrop options can be overwhelming. But picking the right material is less about what looks pretty on a shelf and more about how it will perform during a real shoot. Think of it like a chef choosing the right pan—each one has a job, and using the right one makes all the difference.
Let's break down the three most common materials you'll run into. Getting a handle on their textures, durability, and how they react to light will help you invest in gear that works for you, not against you.
Seamless Paper: The Clean Slate
If you need a perfectly smooth, distraction-free background, seamless paper is your go-to. It's the workhorse for clean e-commerce shots and crisp headshots for a reason. When the product is the hero and you need zero wrinkles or texture, paper delivers every time.
It comes on giant rolls in just about every color you can imagine. The real magic is its single-use nature. Get a scuff mark or a footprint on it? No problem. Just tear off the dirty section, roll down a fresh piece, and you’re back in business with a flawless surface.
Of course, being disposable is both its greatest strength and its weakness. It’s sensitive to dirt and moisture, so you have to be a bit careful. It’s the perfect tool for getting that clean, consistent look, but it does require a bit of mindful handling.
Muslin Fabric: The Artistic Classic
Now, if paper is the clean slate, think of muslin as your classic, textured canvas. This durable, reusable cotton fabric is all about adding a bit of depth and character. The soft, gentle drapes and subtle weave can give your portraits or artistic product shots a beautiful, almost painterly feel.
Muslin's versatility is why you see it everywhere. In fact, muslin backdrops are used in an impressive 55% of professional studios thanks to their light weight and affordability. They just have a timeless quality that’s hard to beat.
The trade-off for all that character is a little prep work. Muslin almost always comes folded, which means you’ll have to deal with wrinkles. A good steamer or pulling it taut on a frame is a must before you start shooting. It’s super portable, but you’ll need to budget a few extra minutes to get it looking just right.
Pro Tip: Always keep a handheld steamer in your studio kit. You can knock out most wrinkles on a hanging muslin backdrop in less than five minutes, which will save you a ton of headache in post-production.
Vinyl: The Indestructible Workhorse
Finally, there’s vinyl, the true tank of the backdrop world. This stuff is built to last. It’s tough, tear-resistant, and—most importantly—you can just wipe it clean. This makes it the hands-down winner for any kind of messy shoot.
Photographing food, liquids, powders, or even pets? Vinyl doesn’t flinch. A quick wipe with a damp cloth is all it takes to clean up a major spill, making it a brilliant long-term investment if you run a high-volume studio. Selecting the right product photography backdrop like vinyl can be a game-changer for showcasing your brand and boosting sales.
The only real watch-out is potential glare. Some cheaper or glossier vinyls can create hot spots when hit with direct light. Sticking to high-quality, matte-finish vinyl almost completely solves this problem, giving you a tough and reliable surface that will survive years of abuse.
To help you decide, here’s a quick breakdown of how these three stack up.
| Feature | Seamless Paper | Muslin Fabric | Vinyl |
|---|---|---|---|
| Durability | Low (disposable) | High (reusable) | Very High (wipeable) |
| Texture | Perfectly Smooth | Textured & Soft | Smooth (Matte or Gloss) |
| Maintenance | Replace when dirty | Requires steaming | Easy to wipe clean |
| Glare Risk | None | None | Low to Medium |
| Best For | E-commerce, Headshots | Portraits, Artistic Shots | Messy Shoots, High Volume |
Ultimately, the best material comes down to what you’re shooting. For ultimate cleanliness, grab paper. For texture and mood, go with muslin. And for anything that might get messy, vinyl is your best friend.
Using Color to Influence Mood and Sales
Think of the background color in your product photos as the opening line of a conversation. It’s the first thing a customer’s brain processes, setting the stage for everything that follows. Choosing the right hue is less about decoration and more about psychology—it's a powerful tool that can guide emotions, build trust, and ultimately drive a sale.
The biggest mistake you can make is treating color as an afterthought. Swapping a simple gray for a warm, sunny yellow doesn't just change the look; it completely rewrites the story of your product. This is why a little color theory know-how is one of the most valuable assets a photographer can have.
The Power of Neutral Backgrounds
When your goal is to sell a product, especially in the cut-and-dry world of e-commerce, neutral tones are your best friend. A crisp white, a muted gray, or a deep black backdrop does one job incredibly well: it eliminates all distractions, forcing the viewer's gaze right where you want it—on your product. It’s like creating a visual stage where your item is the star of the show.
This isn’t just an artistic preference; it’s a strategy backed by hard data. It's estimated that neutral tones like white, black, and gray make up 75% of professional backdrop usage for a reason. Eye-tracking studies have shown that these clean visuals can lead to 25% higher viewer retention on e-commerce sites. The formula is simple: less visual noise means more focus on what you’re selling. You can find more practical tips like this in the photography handbook from Kate Backdrop.
E-commerce giants have found that product listings with solid, neutral backgrounds can convert up to 32% better. In fact, Amazon's own 2024 metrics pointed to a 1.2x sales uplift for images that were optimized with these clean, focused backdrops.
Beyond Neutrals: Evoking Emotion with Color
But what if you're not just selling a product, but a feeling? An experience? That's when you step away from the neutrals and into the world of color. A bold, vibrant background can tell a story and connect your product to a lifestyle or an idea before the customer even reads a word of the description.
Think about how your color choice would shift depending on what you're shooting:
- Children's Toys: A bright, sunny yellow or a playful primary blue instantly says "fun," "energy," and "joy."
- Organic Skincare: A deep forest green or a soft, earthy beige immediately brings to mind nature, wellness, and purity.
- Luxury Jewelry: A delicate pastel pink, a sophisticated navy, or even a dramatic black can communicate elegance, exclusivity, and premium quality.
This approach helps you build a cohesive brand identity that speaks directly to your ideal customer. The colors you choose become a core part of your brand’s visual language, creating an instant connection that sticks.
Background Color Guide for E-commerce Categories
To help you get started, we've put together a quick guide with color suggestions for different product types. Think of this as a starting point for aligning your photos with your brand identity and the psychology of your target audience.
| Product Category | Recommended Background Colors | Psychological Impact |
|---|---|---|
| Electronics & Gadgets | Cool Gray, Slate Blue, Black | Sophistication, Technology, Professionalism |
| Fashion & Apparel | Soft Pastels, Beige, Vibrant Hues | Varies by brand: Elegance, Trendiness, Fun |
| Food & Beverage | Earth Tones, Rich Reds, White | Freshness, Appetite, Cleanliness |
| Health & Wellness | Greens, Light Blues, Soft Whites | Nature, Calm, Purity, Trust |
| Home Goods & Decor | Cream, Taupe, Muted Tones | Comfort, Warmth, Modernity |
Ultimately, choosing your background color is a strategic move. Whether you go with a clean, neutral canvas to boost conversions or a rich, evocative hue to build your brand story, it’s one of the most impactful decisions you can make in your studio.
A great backdrop is a fantastic start, but it’s the setup and lighting that really bring it to life. This is where you take a simple roll of paper or a piece of cloth and turn it into the clean, professional foundation your products deserve. Getting these two things right is what separates a decent shot from a truly great one.
First things first, let's get that backdrop set up properly. Each material has its own quirks and needs a slightly different touch to look its best. Think of it like prepping a canvas before you even think about painting.
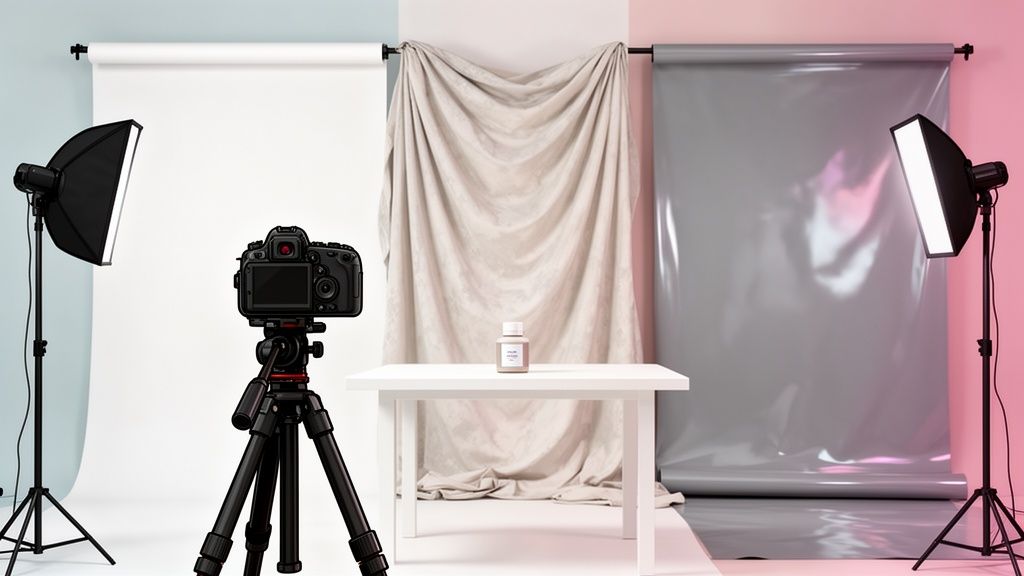
Getting Your Background System Ready
Whether you've got seamless paper, muslin, or vinyl, you'll need a solid support system. This is usually just two light stands with a crossbar that extends between them. If you’re setting up a more permanent studio and are watching your budget, a sturdy curtain rod mounted securely on a wall can work surprisingly well.
Once your stand is up, it's all about handling the material correctly:
- Seamless Paper: Gently feed the crossbar through the cardboard core of the paper roll. As you unroll it, let it form a nice, gentle "sweep" where it curves from the wall down onto the floor. A-clamps or a bit of gaffer tape on the floor end will stop it from annoyingly rolling back up on you.
- Muslin Fabric: Just drape the muslin over your crossbar and use a few A-clamps to hold it in place. The real enemy of muslin is wrinkles. A handheld steamer is an absolute lifesaver here—give it a good steam for a few minutes, and you'll have a much smoother, more professional surface to work with.
- Vinyl: Be careful with vinyl, as creases can be permanent. Roll it out smoothly to create that sweep, just like you would with paper. It's heavier, so make sure your support stand is up to the task and use strong clamps. The good news is its weight usually helps it hang perfectly flat without much extra work.
Lighting Your Backdrop for a Flawless Look
With your background in place, it's time to light it. Your goal is to create a perfectly even field of light, free of any distracting shadows or bright hotspots. This is what creates that clean separation and makes your subject truly pop.
A classic rookie mistake is trying to light your subject and your background with the same light. This almost always ends with a big, ugly shadow of your product cast right onto the backdrop.
Pro Tip: Always light your subject and your background independently. Using dedicated lights for your background gives you total control over its brightness and look, which is essential for professional backgrounds for studio photography.
For that perfectly even, pure white or solid color look, a two-light setup is the way to go. Place one light on each side of the backdrop, aiming them toward the center. If you position them at about a 45-degree angle to the background, the light will spread out beautifully and cancel out any potential shadows.
This flowchart breaks down the thinking behind choosing a background color to achieve your specific goal.

As you can see, the path often starts with a neutral color. It’s the simplest way to put all the focus on the product, which is the first step toward making a sale.
Troubleshooting Common Lighting Issues
Even with the best intentions, you might hit a few snags. Don't worry, they're usually easy fixes.
- Hotspots (Bright Patches): Seeing a spot that's way too bright? Your light is probably too close or aimed too directly. Just move the light back a bit, or "feather" it by angling it slightly away from the bright spot.
- Uneven Lighting: If one side is dark and the other is bright, it’s a symmetry problem. Double-check that your lights are at the same distance, angle, and power setting.
- Color Casts: If your pure white background is looking a little blue or orange, you might be getting light bouncing off a colored wall in your room. You can use black cards (often called "flags") to block that unwanted spill light from contaminating your backdrop.
Mastering a clean, well-lit background is a fundamental skill in product photography. It's especially critical if you're shooting for online marketplaces with strict image requirements. For a deeper dive into this, check out our guide on professional Amazon product photography, which builds on these very principles. When you control the background, you ensure your product is always the hero of the shot.
Creative and Portable Background Solutions

Think you need a massive, dedicated studio to get professional-looking shots? Think again. The reality is, with a little resourcefulness, you can transform just about any small space—a corner of your living room, a client's office—into a fully functional photo set.
This is all about getting creative and working smart, especially for on-the-go photographers and small business owners. These compact, DIY solutions prove that amazing results have more to do with ingenuity than a huge footprint or expensive gear. Let's dive into how you can get that high-end look using materials that are easy to find and won't break the bank.
DIY Backgrounds from Everyday Materials
Your local hardware or craft store is basically a secret goldmine for backgrounds for studio photography. With a bit of creative thinking, you can assemble a whole collection of unique, textured surfaces that look incredible on camera but cost next to nothing.
Foam Boards: A simple white foam board is an absolute must-have. It’s light, cheap, and can pull double duty as a clean backdrop for smaller product shots or as a reflector to bounce light and soften shadows. For a quick upgrade, grab some marble-patterned contact paper and wrap the board—instant faux-marble surface perfect for food or jewelry flat lays.
Fabric and Textiles: Don't sleep on the fabric aisle. A few yards of velvet, linen, or even a rough canvas can be clamped to a stand or draped over a table to add instant mood and texture. They're incredibly easy to pack up and offer endless options for color and feel.
Painted Walls and Panels: Sometimes, the simplest answer is the right one. A clean, smoothly painted wall in a neutral color can be the perfect no-fuss backdrop. For more options, grab a few large pieces of plywood or MDF board and paint them with different colors and textures. You'll quickly build a library of custom, portable background panels.
Key Insight: The best DIY backgrounds are often the simplest. By focusing on core elements like texture and color, you can build a versatile toolkit that’s both incredibly effective and budget-friendly.
Portable Backdrops for the Traveling Photographer
If you’re a photographer who’s constantly on the move, portability isn’t just a nice-to-have; it's everything. Thankfully, the market is full of great options designed specifically for quick setups and easy travel.
Pop-Up Backdrops are a total game-changer. These things have a flexible metal frame that literally "pops" open into a taut, wrinkle-free surface in seconds. When you're done, they fold down into a small, circular bag that's a breeze to carry. Many are even double-sided, giving you two colors or patterns in one compact package—think clean white on one side and a classic mottled gray on the other. They are absolutely perfect for taking corporate headshots on-site or knocking out a quick product shoot.
For those who want a more traditional studio feel on the go, a collapsible background stand is essential. These lightweight aluminum stands pack down neatly into a carry bag. Pair one with a "car size" roll of seamless paper (usually about 2.08 meters wide), and you've got a complete, professional setup that fits in the trunk of your car. This combo gives you that flawless, smooth sweep that’s ideal for full-body portraits or larger product arrangements.
Embracing Digital and AI Backgrounds
Getting the perfect shot in-camera is a great goal, but the reality is that the work often continues long after you've packed up your lights and backdrops. The final magic usually happens on a computer, where you can transform a good photo into a great one, or even swap out the background entirely. This is where traditional photography meets the demands of the modern digital marketplace.
Even if you're just aiming for that classic, clean look, you'll find yourself doing post-production. One of the most common tasks for any e-commerce seller is getting a perfectly pure white background. No matter how well you light your shot, you'll often need to bump up the exposure or tweak the white balance to kill any lingering gray tones or weird color casts. Consistency is king, and this step ensures every product looks crisp and uniform.
The Rise of AI Background Replacement
But simple tweaks are just the beginning. The real game-changer in recent years has been AI-powered background replacement. This isn't just a minor improvement; it’s a fundamental shift in how sellers can create and use product imagery. Suddenly, you're no longer stuck with the background you shot on.
So how does it work? In simple terms, a smart algorithm analyzes your photo, figures out what the product is, and neatly cuts it out from its original surroundings. From there, it can place your product onto any digital background you can dream up. The possibilities are pretty much endless.
This leap in technology is saving businesses countless hours that used to be sunk into tedious, manual editing in programs like Photoshop. It means a single product photo can be repurposed for dozens of marketing campaigns just by switching up the digital scene.
Unlocking Creative and Commercial Freedom
The benefits of jumping into digital and AI backgrounds go way beyond just saving time. This approach gives small businesses and solo entrepreneurs a level of flexibility that used to be reserved for brands with massive marketing budgets.
- Perfect Consistency: Need thousands of images with the exact same hex code for your background? No problem. AI ensures your entire online store or catalog looks unified and professional.
- Endless Creative Options: You can instantly drop your product into any scene you want. That water bottle can be on a mountaintop at sunrise, a sofa can appear in a minimalist loft, or a watch can sit on a slab of black marble.
- Cost-Effective Scalability: Instead of shelling out for expensive and time-consuming location shoots, you can generate a whole library of lifestyle images from a single, simple studio shot. This dramatically cuts down production costs.
This technology allows you to create visuals that speak directly to specific audiences. If you're looking at what's next, concepts like using Artificial Intelligence Personalization to generate custom backdrops show just how deep AI's impact on visual marketing will be. Want to try it out yourself? See how an AI product photo generator can turn your basic images into scroll-stopping assets.
Your Studio Background Questions, Answered
Diving into the world of backgrounds for studio photography can feel a bit overwhelming. You've got questions about size, material, and maintenance. Let's cut through the noise and tackle the most common ones I hear from photographers, so you can get the right gear and start shooting.
What Size Background Do I Really Need?
This one's easy: it all comes down to what you're shooting.
For small products like jewelry, cosmetics, or even simple headshots, a smaller backdrop is your best friend. A roll that's about 1.35 meters (or 53 inches) wide is perfect. It’s a breeze to set up, especially if you’re working in a tight space.
But the minute you start shooting full-body portraits, furniture, or larger items, you'll need more real estate. A wider background saves you the headache of constantly seeing the edges sneak into your shot. I often recommend a "car size" roll, which is typically 2.08 meters (around 82 inches). It's a great middle-ground—big enough for most jobs but not as massive and hard to handle in a home studio as the giant 2.72-meter rolls.
The Bottom Line: Start with what you shoot most. A smaller roll saves you space and cash, but if you have plans for bigger subjects, investing in a wider one from the get-go will prevent a lot of frustration.
How Do I Clean and Store My Backdrops?
Taking care of your backgrounds is the key to making them last. Each material has its own quirks.
- Seamless Paper: Think of this as a "one and done" situation. The best defense is a good offense—try to keep shoes and dirt off it. When it inevitably gets dirty or torn, just grab a pair of scissors, cut off the used section, and pull down a fresh, clean piece. Always store the rolls standing up to stop them from getting flat spots or weird dents.
- Muslin: Most muslin is machine washable on a gentle cycle (but always double-check the tag!). A handheld steamer will become your best friend, zapping wrinkles in minutes before a shoot. Once you're done, fold it up for storage.
- Vinyl: This is the workhorse. It’s incredibly easy to clean. A quick wipe with a damp cloth and maybe a little mild soap is all it takes. The golden rule with vinyl? Always roll it for storage. Folding it will create permanent creases that are a nightmare to edit out later.
Is a Green Screen a Good Choice for Product Photos?
I get this question a lot. While a green screen (chroma key) is a powerhouse for video, it’s usually not the best move for product photography.
The whole point of a green screen is to digitally remove the background, but this process often creates "color spill"—a faint green halo that reflects onto your product. Getting rid of that green glow in post-production is a tedious, time-consuming task.
For most e-commerce shots, you're far better off shooting on a clean, neutral background like white or light gray. This gives you a much better starting point. If you need a transparent background for a marketplace like Amazon, it's so much easier to use a tool to remove it. In fact, you can see how streamlined background removal for Shopify can completely simplify that part of your workflow, saving you from the headaches of chroma keying.
At ProdShot, we believe creating stunning product images shouldn't be complicated. Our AI-powered tool lets you turn simple smartphone pictures into high-quality, professional shots in seconds, ready for any online marketplace. Get started for free on prodshot.net.