
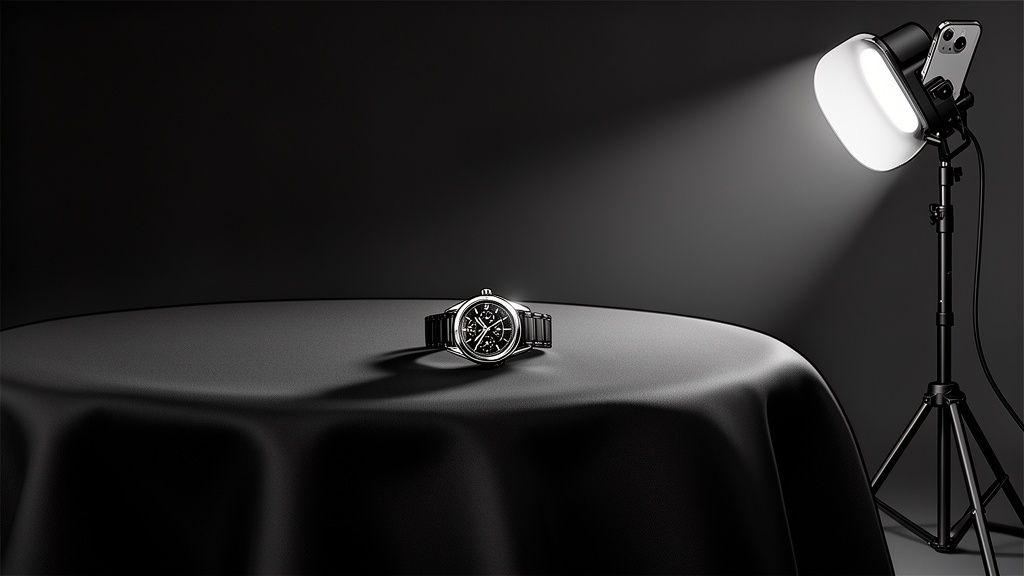
Ever wonder how top sellers on Shopify and Etsy get that ridiculously polished, studio-quality look? The secret is often much simpler than you'd think. It's not about a huge budget or fancy gear—it's about a simple black cloth for background. This one trick creates a high-contrast, distraction-free canvas that makes almost any item pop. If you're selling jewelry, electronics, or cosmetics, this is a total game-changer.
Why a Black Cloth Is Your Secret Weapon for Product Photography

You don't need to break the bank on a professional studio to create standout product images. In fact, one of the most powerful tools in a photographer's kit is also one of the simplest: a good piece of black fabric. It acts like a perfect void, swallowing light and erasing visual clutter, which forces the customer’s eye right where you want it—on your product.
The magic here is all about contrast. A shimmering piece of jewelry, a sleek gadget, or a richly colored lipstick looks absolutely magnetic against a deep black backdrop. The dark, non-reflective surface also minimizes the distracting glares and weird shadows that can make DIY photos look, well, amateur.
The Foundation for Flawless AI Editing
Here's where this old-school trick gets a modern twist. A clean shot against a black cloth is the perfect starting point for post-processing with AI-powered tools. When you feed an AI an image with a clear, uncluttered background, it can work its magic with incredible precision.
This is exactly where a service like ProdShot comes into play. The AI can instantly and flawlessly separate the product from its background, making it a breeze to remove or swap it out. This means you get clean edges and pro-level results without spending hours on tedious manual editing.
The goal is simple: give the AI a perfect canvas. A well-lit photo on a simple black cloth removes all the guesswork for the software, giving you a polished, marketplace-ready image in seconds.
Turning Simple Shots into Sales Drivers
At the end of the day, using a black cloth isn't just about pretty pictures; it's a smart business move. High-quality visuals are proven to build customer trust and have a direct impact on their decision to buy. A polished image sends a clear message: this is a professional, trustworthy brand.
When you pair this simple photography trick with powerful AI editing, you can achieve a level of quality that was once reserved for big brands with deep pockets. This combination lets you:
- Build a consistent brand look across all your product listings.
- Slash your photography and editing time from hours down to just minutes.
- Generate images that are optimized for platforms like Amazon, which have notoriously strict image requirements. For more on that, you can find tips for https://prodshot.net/professional-amazon-product-photography to make sure your listings are always compliant.
And if you want to push the envelope even further, exploring AI studio product photoshoot tools can unlock even more innovative ways to get stunning results.
By starting with something as basic as a black cloth, you create a super-efficient workflow that turns a simple DIY photo into a powerful sales asset. It’s a minimal investment of time and money that delivers a massive return by elevating your brand's image and boosting conversions. Honestly, it's the smartest way to level up your e-commerce game.
Getting the Right Black Cloth for Your Products
Let's be real: grabbing any old black fabric from a craft store for your product photos is a recipe for frustration. The specific material, finish, and even the size you pick will either make your life a whole lot easier or send you into an editing nightmare. Getting this first step right is the foundation of a killer product shot.
Not all black fabrics are created equal, especially under photography lights. Some have a sneaky sheen that bounces light right back at your camera, turning your intended deep black into a washed-out, distracting gray. Others are absolute magnets for dust and lint, which means hours of spotting and cloning out tiny white specks in post-production.
Let's break down the best options so you can invest in a cloth that works for you, not against you.
Material Matters Most: The Big Three
When you're trying to create that perfect, light-swallowing void behind your product, three materials consistently rise to the top. Each one has its own strengths and is a better fit for different products and budgets.
Velvet: This is the undisputed king of black backgrounds. Black velvet is a beast at absorbing light, thanks to its deep, plush pile that traps light rays and stops them from bouncing back. It's the absolute best choice for highly reflective items—think jewelry, watches, glossy electronics, or glassware. It creates a pure, deep black that makes shiny products look incredibly high-end.
Muslin: Think of muslin as the versatile and budget-friendly workhorse. It's a tightly woven cotton fabric that’s both durable and pretty lightweight. While it won't absorb light quite as perfectly as velvet, a good quality, heavyweight muslin is a fantastic all-around option. It's especially great for larger products and is generally way easier to clean and maintain.
Felt: Felt is a non-woven fabric with a flat, textureless surface that does a surprisingly good job of absorbing light and killing reflections. It's an affordable choice that you can easily cut to any size without worrying about fraying edges. The one major downside? It can attract lint and dust like crazy, so keep a lint roller handy for a quick once-over before every shoot.
Need a quick way to decide? Here’s a simple breakdown to help you pick the right material for your needs.
Comparing Black Background Cloth Materials
This quick-glance comparison will help you choose the best black cloth material based on your product type, budget, and the final look you're going for.
| Material Type | Best For | Light Absorption | Wrinkle Resistance | Average Cost |
|---|---|---|---|---|
| Velvet | Reflective items (jewelry, glass, electronics) | Excellent | Good | $$$ |
| Muslin | General purpose, larger products, clothing | Good | Fair (needs steaming) | $$ |
| Felt | Small to medium non-reflective items | Very Good | Excellent | $ |
Ultimately, velvet is your best bet for premium, reflective products, while muslin and felt offer fantastic, cost-effective alternatives for a wide range of other items.
The impact of this choice is huge. Just look at Europe, which commands a massive 40% of the product photography market. Top agencies there swear by black velvet cloths for shooting jewelry and electronics, and they report cutting their editing time by up to 50% because shadows and reflections are practically eliminated from the get-go.
For a ProdShot user, this is a game-changer. A clean smartphone photo against a proper black cloth gives our AI the perfect canvas to work with, delivering stunning results in seconds. This completely sidesteps the need for expensive studios that often charge $50-200 per image. If you're curious, you can explore more about these industry statistics and see how much a smart setup can save you.
What to Look for When You're Buying
Beyond just the type of fabric, a few other key details separate a great black cloth from a mediocre one.
First, obsess over the finish. You need something completely matte or non-reflective. When you're in the store, hold the fabric up to a light and move it around. If you see even a hint of a sheen or shininess, put it back. That subtle sheen will blow out into a gray, ugly background in your final photos.
The weight of the fabric also makes a big difference. Heavier fabrics just hang better, resist wrinkles more effectively, and are far less likely to be see-through. A thin, cheap black cloth might seem like a bargain, but you run the risk of your lights blasting right through it and revealing whatever mess is hiding behind it.
Pro Tip: Always ask for a small sample you can take outside or hold under a bright light. A true, deep photographic black will still look black even under direct sun. A lower-quality fabric will start to show weird undertones of blue, brown, or even purple.
Finally, think about the size. It is always better to go bigger than you think you need. A larger cloth gives you way more flexibility to shoot from different angles and work with bigger products without seeing the edges of your backdrop. You want enough fabric to create a "sweep"—a smooth, seamless curve from the vertical surface down onto your table or the floor. This one simple thing will save you a world of cropping and editing headaches later.
Your Guide to a Flawless Black Background Setup
Getting the right black cloth is a huge first step, but how you set it up is what really separates an okay shot from a truly professional one. A flawless, deep black background doesn't just happen by magic. It’s built through careful preparation and mounting.
Let's walk through the practical steps to turn that piece of fabric into a perfect, seamless canvas for your products.
The first and most common enemy you'll face is wrinkles. Creases and folds are absolute light-magnets, and they’ll turn your beautiful black backdrop into a distracting grid of gray lines. Getting your fabric perfectly smooth is non-negotiable.
Preparing Your Cloth for the Shoot
Before you even think about hanging the cloth, you have to get rid of those wrinkles. The best way to do this really depends on the material you chose.
For a tough, workhorse fabric like muslin, a handheld steamer is your best friend. It’s fast, incredibly effective, and much gentler than applying direct, scorching heat.
No steamer? No problem. An iron on a low-heat setting with plenty of steam can work wonders. Just do yourself a favor and place a thin towel between the iron and your black cloth. This little buffer prevents you from accidentally creating a shiny, melted patch. If you're working with something delicate like velvet, never apply direct heat. The best trick is to hang it in a steamy bathroom for about 20-30 minutes. The moisture will gently release the wrinkles without crushing or damaging the plush fibers.
This little flowchart breaks down the initial fabric choice, which is key to know before you start prepping.
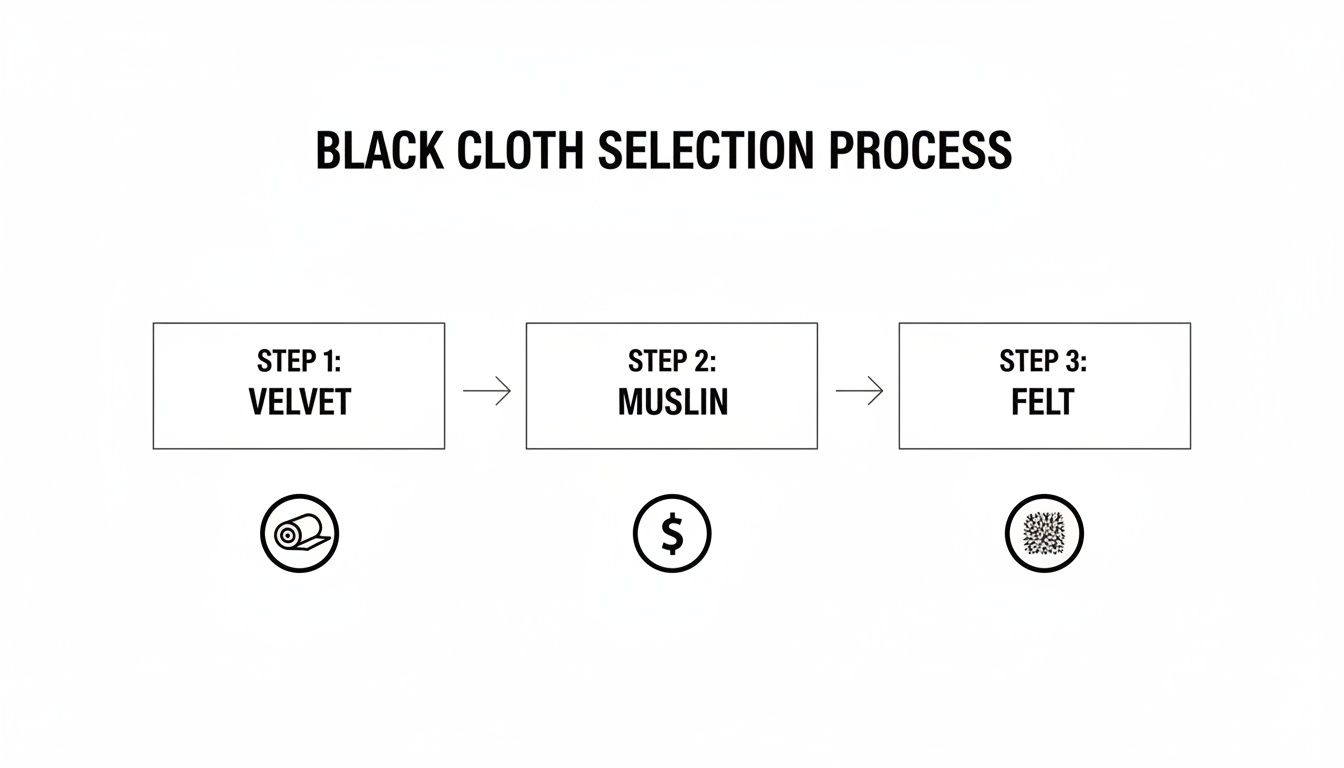
As you can see, velvet is the go-to for premium, reflective items, while muslin is a fantastic, cost-effective all-rounder. Felt is just a simple, no-fray solution when you need something quick.
Building Your Support System
You absolutely don't need to shell out for an expensive, professional-grade stand right away. A perfectly solid support system can be put together with things you probably already have or can find for cheap. The goal is simple: hang the cloth so it drapes smoothly without sagging in the middle.
Here are a few DIY and budget-friendly ways to get it done:
- The Household Method: Grab two tall objects—think bookshelves or ladders—and place them a few feet apart. Drape your cloth over a long pole (a broomstick or curtain rod works great here) and rest the ends on top of your supports. Use some cheap clamps or even heavy-duty tape to lock it in place.
- Wall Mounting: If you've got a dedicated spot for shooting, you can use removable adhesive hooks or mount a curtain rod directly on the wall. This gives you a super stable, semi-permanent setup that’s always ready to go.
- Inexpensive Stand Kit: For around $40-$60, you can find a basic backdrop stand kit online. They’re lightweight, adjustable, and portable, making them a fantastic investment if you see yourself shooting regularly.
Whichever method you pick, make sure the cloth is pulled taut from side to side. This is crucial for eliminating that dreaded sag in the middle of your shot.
Creating the Perfect Seamless Sweep
One of the biggest giveaways of a DIY product photo is that harsh, ugly line where the wall meets the floor. To get that polished, "infinity background" look, you need to create what’s called a seamless sweep. It’s nothing more than a gentle curve that transitions the fabric from the vertical backdrop to the horizontal surface your product sits on.
To nail the sweep, your black background cloth needs to be long enough. Just pull the bottom of the fabric forward, away from the stand or wall, and let it drape onto your table or the floor in a smooth, gradual curve. Whatever you do, avoid a sharp 90-degree angle.
This simple technique creates the illusion that your product is floating in an endless black void, which is exactly the effect you want. It gets rid of distracting lines and makes your life so much easier in post-processing, especially when you’re feeding the images to an AI tool.
For sellers on eBay and Etsy, this low-cost hack—often under $20 for a good cloth—is an absolute game-changer. It works beautifully with AI tools that can auto-remove tiny imperfections and optimize lighting. In fact, clean, pro-level visuals have been shown to boost views by as much as 94%. You can read the full research on e-commerce photography to see just how big the impact is.
Once your sweep is in place, do one final check. Grab a lint roller and go over the whole surface to pick up any dust or pet hair. Now you have a perfectly smooth, deep black canvas, and you're finally ready to start lighting your product.
Mastering Lighting for a Dramatic Black Backdrop

This is where the magic happens. With your flawless black cloth for a background in place, lighting is the final touch that elevates a simple setup into a dramatic, eye-catching shot. The goal is pretty straightforward: light your product perfectly while ensuring your background stays a deep, pure black.
A lot of beginners make the mistake of blasting the whole scene with light. This almost always turns a beautiful black cloth into a washed-out gray, killing the very contrast you worked so hard to create. The secret? Light the subject, not the background.
Using Natural Light from a Window
You really don't need a bunch of expensive gear to get started. A large window with some indirect sunlight is one of the best lighting tools you can get—and it’s free. It all comes down to how you position your setup.
Set up your table and black background a few feet away from the window, turning it at about a 45-degree angle. This lets the light skim across the surface of your product from the side, creating soft, natural-looking shadows that define its shape and texture. Just try to avoid placing your product directly in front of the window, as that can lead to harsh backlighting or unwanted silhouettes.
Pro Tip: If the sunlight is a little too harsh and creating sharp, distracting shadows, just tape a piece of white parchment paper over the window. It acts like a giant, cheap diffuser, softening the light for a much more flattering, professional look.
Controlling Your Shot with Artificial Lights
For more consistent and repeatable results, a few simple artificial lights are a fantastic way to go. You can use anything from affordable LED panels to a basic desk lamp with a bright bulb. The real control comes from how you position and shape that light.
The most effective and simple setup starts with just one light. Place your main light (often called the key light) off to one side of your product—again, at roughly a 45-degree angle and aimed slightly down. This classic position creates dimension and highlights the product’s form without spilling a bunch of light onto your black cloth background.
To take things a step further, you can bring in a second, less powerful light or even just a simple white foam board on the opposite side. This is your fill light or reflector. Its only job is to gently bounce some light back into the shadows, which helps reveal more detail without overpowering the main light source.
Getting these details right has had a huge impact on e-commerce. After the 2020 online sales surge, sellers quickly learned that using a black velvet cloth for the background dramatically cut down on mobile optimization issues. This is a big deal, since nearly 75% of product discovery happens on mobile. Improving zoomable details with proper lighting has even been shown to lift conversions by 30%.
Essential Camera Settings for a Pure Black Background
Your camera settings are the final piece of this puzzle. Whether you're using a smartphone or a DSLR, a few key adjustments will make sure your product is tack-sharp and your background remains perfectly black.
For Smartphone Photographers:
- Use a Manual Camera App: I’d recommend downloading an app like Halide or ProCamera. They give you manual control over focus and exposure, which is absolutely essential for this kind of shot.
- Lock Focus and Exposure: Tap on your product to set the focus point. Then, slide your finger down to slightly decrease the exposure. This tells your phone to prioritize the bright product, which naturally makes the background even darker.
For DSLR and Mirrorless Users:
- Shoot in Manual Mode (M): This is non-negotiable. It gives you full control over the exposure triangle—aperture, ISO, and shutter speed.
- Set a Low ISO: Start with your camera's base ISO, which is usually 100 or 200. This keeps digital noise to a minimum and ensures your blacks are clean and smooth.
- Choose Your Aperture: For a single product, an aperture of f/8 or f/11 usually provides a great depth of field, keeping the entire item in sharp focus. If you're working with something intricate, our guide on how to take great jewelry product photos has more specific advice.
- Adjust Shutter Speed: With your ISO and aperture locked in, all you need to do is adjust your shutter speed until the product is perfectly exposed. Don't worry if the background looks totally dark on your screen—that's exactly what you're going for.
By carefully controlling your light and dialing in these settings, you can reliably capture stunning, professional-looking images where your product just pops against a luxurious, deep black void.
From Raw Photo to Perfect Listing with AI Editing
Taking the photo is just the first part of the equation. Turning that raw shot into an image that actually sells is where the magic happens—or at least, where it used to be a ton of work. The crisp, high-contrast photo you just captured on your black cloth background? That’s the perfect starting point for an incredibly fast and powerful AI editing workflow.
Think about it: an AI algorithm loves a clean image. When it sees a sharply defined product against a simple, non-reflective background, it can perform tasks like background removal with near-perfect accuracy. This completely sidesteps the old, tedious process of manually tracing edges in Photoshop, a job that could easily eat up your entire afternoon.
The AI Workflow, Demystified
The process is refreshingly simple. You just need to upload your best shot—the one where the focus is tack-sharp and the lighting shows off all the right details. From there, the AI takes the wheel, turning your DIY photo into a polished, professional asset in just a few clicks.
Here’s a quick rundown of what that looks like in practice:
- Upload Your Shot: Grab the photo you took against the black cloth. That clean separation between your product and the background is the secret sauce.
- Instant Cut-Out: The AI immediately identifies and zaps away the black background, leaving your product perfectly isolated on a transparent layer.
- Smart Enhancements: From there, the tools get even smarter. Many can analyze your product to auto-correct colors, fix minor lens distortion, and even tweak the lighting to add a bit more pop and dimension.
This whole process means you can skip the steep learning curve of complex editing software. You’re essentially handing off all the technical heavy lifting to an intelligent system, which frees you up to focus on, you know, actually running your business.
Why This Crushes Manual Retouching
The benefits of using AI go way beyond just saving time. Manual retouching is a huge resource drain. It’s not just slow; it’s expensive. You’re either paying for a pricey software subscription or hiring a freelance editor who charges by the image. For sellers with more than a handful of products, this creates a massive bottleneck.
By starting with a clean photo on a black cloth for background, you're basically setting the AI up for a slam dunk. This simple prep work slashes the margin for error, ensuring the final result is flawless and ready for any e-commerce platform.
An AI tool like ProdShot offers a much more scalable path forward. You can process dozens of images in the time it would take to manually edit just one, all for a tiny fraction of the cost. This is how you build a consistent, high-quality product gallery without breaking the bank. If you want to see it in action, check out how an AI product photo generator can transform a basic shot into something special.
The end result is a super versatile, marketplace-ready image. You can drop your perfectly cut-out product onto a pure white background for Amazon, a branded color for your own site, or even a lifestyle scene for social media. This flexibility ensures your visuals always look sharp and on-brand, wherever they appear.
Once your raw photo is looking stunning, you can pair it with killer copy by learning how to write product descriptions that actually sell. A powerful image and persuasive text are an unbeatable combo. By marrying a simple, effective photo technique with modern AI, you create a workflow that’s efficient, affordable, and delivers results that will truly elevate your brand.
Running Into Issues With Your Black Background?
Even with a perfect setup, hitting a few snags is just part of the game. Nailing that deep, velvety black background consistently takes a bit of practice. Let's walk through some of the most common issues people run into and how to fix them, so you can troubleshoot like a pro.
Why Does My Black Cloth Look Gray in My Photos?
This is, hands down, the most common frustration I hear about, and the culprit is almost always the same thing: too much light is hitting your background. Your mission is to light the product, not the backdrop. When light spills onto that black cloth, your camera sees it as a mid-tone, which translates into a washed-out gray instead of that rich, pure black you're after.
The fix is surprisingly simple. You just need to create more distance between your subject and your background. Pull your product and your main light source forward a few feet. This simple move allows the light to hit your product and then "fall off" into darkness long before it reaches the cloth. For extra control, you can also use a piece of black foam board—we call this a flag in the photo world—and place it between your light and the background to block any rogue light spill.
Keeping Dust and Wrinkles at Bay
A pristine black background needs a little bit of upkeep. Dust, pet hair, and lint are like tiny little spotlights on a dark surface, and they can create a mountain of tedious cleanup work in post-production.
Luckily, the solution is easy but absolutely essential.
- For Dust: A sticky lint roller is your new best friend. Seriously. Make it a non-negotiable habit to give your black cloth for background a quick, thorough roll-down right before every single shoot.
- For Wrinkles: To dodge creases in the first place, never fold your cloth for storage. Instead, roll it up tightly around a cardboard tube (the kind from wrapping paper works great). This keeps the surface smooth and ready to go, saving you from having to break out the steamer or iron before your next session.
A clean, smooth background is the foundation of an efficient workflow. Taking two minutes to roll the lint off your cloth before you shoot can literally save you thirty minutes of spotting tiny white specks in Photoshop later.
Shooting White or Dark Products on Black
It sounds counterintuitive, but you can absolutely make white or very dark products pop against a black background. The secret is all about creating separation with your lighting, a technique often called rim lighting or edge lighting.
When shooting a white product, light it from the front or side just like you normally would. Then, add a small, less powerful light from behind and off to the side, aimed squarely at the product's edge. This carves out a subtle, bright outline that cleanly separates it from the black backdrop. For something very dark, like a black leather wallet, the approach is a bit different. You'll want to use soft, diffused light from the sides to gently lift its texture and details, preventing it from melting into the background.
Yes, you'll still need to make final adjustments, but the process becomes incredibly fast. A great black background gives you the perfect canvas for minor tweaks like color correction and sharpening. This is where AI tools are most powerful—they can automate these final polishing steps, erase any remaining flaws, and ensure your final image is perfectly optimized for any platform you use.
Ready to skip the tedious manual editing and see your product photos transformed in seconds? With a clean shot on your black cloth background, ProdShot uses advanced AI to instantly create professional, high-converting images. Try it for free and see just how easy it is to elevate your brand.