
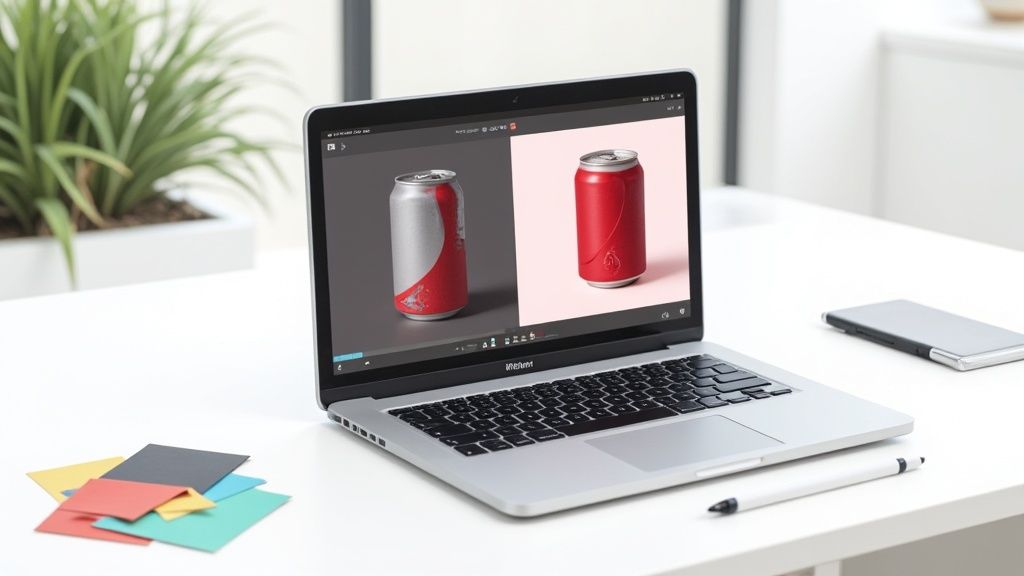
To really nail your product photos, you have to get the colors right. This isn’t just about making things look pretty; it's about making them look accurate. The process starts with the basics—fixing things like white balance and exposure—before you even think about playing with hue and saturation.
Getting this right turns a decent photo into a great one that actually sells your product, because it ensures what your customer sees on screen is what they get in their hands.
Why Color Accuracy in Product Photos Is Non-Negotiable
Before you touch a single slider in your editing software, you need to be crystal clear on your goal. When you’re editing product photos for an online store, your job isn't to make the image look "nice"—it's to make it look right.
Think about it. If a customer buys a "cerulean blue" sweater but receives one that’s closer to teal, they’re going to be disappointed. That disappointment often leads straight to a return. In fact, over 20% of all online product returns happen simply because the item looks different in person. That’s a huge, and preventable, problem rooted in poor color accuracy.
Correction vs. Grading: A Critical Distinction
First things first, we need to draw a line between two key concepts: color correction and color grading. They sound similar, but they serve completely different purposes.
- Color Correction is the technical part. It’s all about fixing errors and making the photo look true to life. This means adjusting the white balance to get rid of weird color casts, dialing in the right exposure, and making sure your whites are pure white and your blacks are deep black. It's about achieving realism.
- Color Grading is the creative part. This is where you apply a specific mood or style to an image, like the warm, golden tones in a summer fashion catalog or the cool, blue hues for a new tech gadget. This is purely about creating an emotional response after the image is already technically correct.
For e-commerce, correction always comes first. That cerulean blue sweater needs to look like the real thing. If you slap a heavy, warm filter on it (grading) before correcting the base colors, that blue could easily shift to green, guaranteeing a return and an unhappy customer.
The primary goal of product photography isn't just aesthetics; it's trust. Accurate colors build confidence with the buyer, assuring them that what they see online is exactly what they will receive.
To help clear things up, here’s a quick breakdown.
Color Correction vs Color Grading At a Glance
| Aspect | Color Correction | Color Grading |
|---|---|---|
| Goal | Realism & Accuracy | Mood & Style |
| Process | Technical & Objective | Creative & Subjective |
| Key Adjustments | White Balance, Exposure, Contrast | Hue Shifts, Saturation, Toning |
| When to Use | On every product photo, first | Optionally, after correction |
| E-commerce Priority | Essential | Secondary / Stylistic |
In short, correction is a must-have for building trust, while grading is a nice-to-have for building a brand vibe.
The Business Impact of Getting Colors Right
Getting your colors dialed in has a direct impact on your bottom line. A fashion brand absolutely has to show the exact shade of its new collection. A food company needs its products to look fresh and appetizing, which is impossible if there's a sickly yellow or green tint.
When you edit your photos correctly, you're not just tweaking pixels—you're protecting your brand’s reputation and cutting down on financial losses from returns.
On top of the edits themselves, it's also crucial to think about the technical foundation of your images. For instance, choosing the right image format can make a huge difference in preserving color fidelity and overall quality. Getting this right ensures that all your careful color work isn't lost the moment you upload your photos to your marketplace.
Alright, let's get down to business. This is where you roll up your sleeves and start turning a decent photo into a great one. Before you even think about fancy filters or creative effects, you have to nail the two absolute pillars of color editing: white balance and exposure.
Get these two things right from the start, and I promise you, the rest of the process will feel a thousand times easier.
Think of your camera as seeing the world through a pair of very slightly tinted sunglasses. White balance is how you take those glasses off. One of the most common problems I see is a nasty color cast—that annoying yellowish or bluish tint that washes over the entire photo. This usually happens with indoor lighting; a picture taken under a regular lightbulb almost always comes out looking too warm and yellow.
Your first mission is simple: make the whites in your photo look actually white. A quick and dirty trick I use all the time is to find something in the shot that's supposed to be a neutral gray or white. Grab the white balance tool in your software (it usually looks like an eyedropper) and click on that neutral spot. Boom. That one click tells the program, "This is true neutral," and it instantly recalibrates all the other colors in the image to match.
The Power of White Balance and Exposure
Once your whites are clean, it’s time to tackle exposure. Exposure is more than just a brightness slider; it fundamentally changes how colors look and feel.
Let's say you're shooting a simple white coffee mug. If the photo is underexposed, that crisp white ceramic will look like a sad, muddy gray. If it's overexposed, you'll completely lose the subtle shadows and highlights that give it shape, turning it into a flat, blown-out blob.
The goal is to find that sweet spot where you can see details in both the brightest areas (highlights) and the darkest areas (shadows). Playing with the exposure and contrast sliders together is how you give your colors a sense of depth and realism, making your product feel tangible.
I always tell people that getting the white balance right is like tuning a guitar. If it’s off, every chord you play afterward will sound wrong, no matter how good you are.
From Correction to Creative Grading
It's crucial to understand the workflow here. You always correct for accuracy first, and only then do you get creative and grade for style.
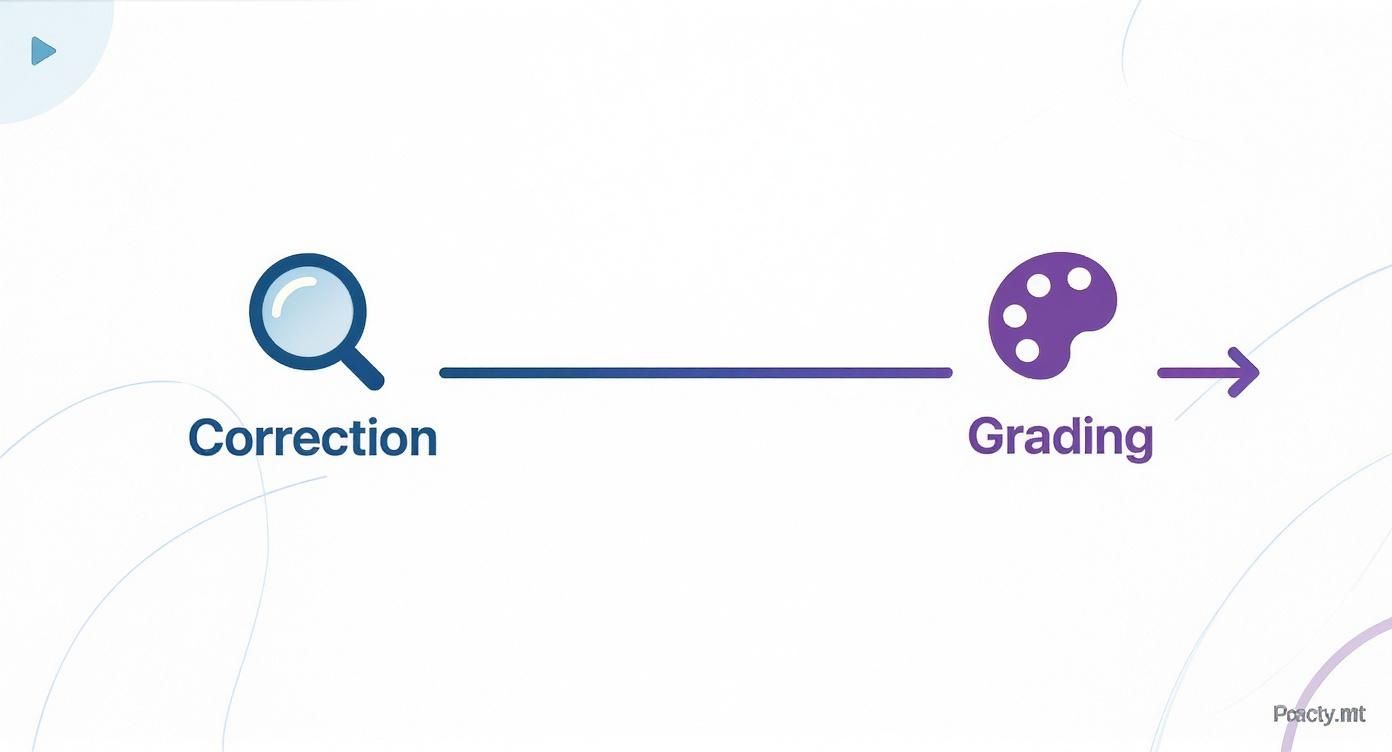
This workflow shows the essential two-step process: correction is the non-negotiable foundation built on realism, while grading is the creative layer you add on top to evoke a specific mood.
For anyone selling online, that first correction phase is 90% of the job. Your customers need to see the product exactly as it is to avoid returns and bad reviews. While pros love the granular control of software like Lightroom or Photoshop, most sellers need something faster. This is where tools built specifically for e-commerce can be a lifesaver. If you want to see how this can be streamlined, it's worth checking out the features of a good Shopify photo editor that can automate these foundational steps.
By focusing on a clean white balance and a solid exposure range, you’re creating the perfect canvas. From that point of accuracy, every other tweak you make is an intentional choice to make your product look its absolute best.
Fine-Tuning Your Hues with Advanced Color Tools
Okay, once you've nailed down the basics—your white balance is set and the exposure looks good—it's time to get into the fun stuff: selective adjustments. This is where you go from making broad, image-wide changes to having surgical control over specific colors. Think of it as switching from a paint roller to a fine-tipped brush. You're no longer just painting the whole wall; you're perfecting the tiny details.

This kind of detailed control is exactly why the market for photo editing software is booming. It was valued at around USD 2.37 billion in 2025 and is on track to hit USD 3.29 billion by 2032. The biggest slice of that pie, a whopping 44.6% share, belongs to prosumers—small business owners and enthusiasts who need professional results without a Hollywood budget. If you're curious, you can dig into the numbers in this report from Coherent Market Insights on photo editing software.
The Subtle Art of Vibrance vs. Saturation
Before you start tweaking individual colors, it's absolutely critical to understand the difference between two of the most misused sliders in any editing app: Vibrance and Saturation. They both make colors more intense, but they get there in completely different ways.
-
Saturation is a sledgehammer. It boosts the intensity of every single color in the photo, all at once. If you push it too far, you end up with a garish, over-the-top mess where skin tones look radioactive. Use with extreme caution.
-
Vibrance is much more intelligent. It focuses on lifting the more muted colors while leaving the already-vibrant ones alone. Crucially, it's designed to protect skin tones, keeping them from looking unnatural and orange.
My rule of thumb? Start with Vibrance to give your image a natural pop. I only touch the Saturation slider for tiny, targeted boosts if a specific color just isn't responding enough to Vibrance alone.
Mastering HSL for Pinpoint Accuracy
The real magic happens in the HSL (Hue, Saturation, Luminance) panel. This is where you can truly edit colors of a picture with absolute precision. HSL lets you grab one specific color range—like all the blues or all the greens—and change it without messing with anything else. For brand consistency, this tool is non-negotiable.
Let's say you're shooting a soda with a very specific, signature red can. But under your studio lights, the red looks a little… orangey. If you bumped up the global saturation, everything in the photo would look clownish.
Instead, you’d use the HSL panel to zero in on just the reds.
Here’s the game plan:
- Target the Red Channel: Isolate just the reds in your image.
- Adjust the Hue: Nudge the Hue slider away from orange until it matches that perfect, true brand red.
- Refine Saturation: Now, increase the saturation for only the reds to make that can pop off the screen.
- Control Luminance: Use the Luminance slider to make the red brighter or darker, matching the product in your hand.
This is a cornerstone technique for any serious product photo retouching. By getting comfortable with HSL, you ensure that every color in your photo is there for a reason, perfectly representing your product and solidifying your brand's visual identity.
Using AI for Smarter and Faster Color Edits
While manual editing gives you pinpoint control, let's be honest—it's not always the fastest way to get things done. This is especially true when you're staring down a folder of 50 new product photos that all need to be processed. This is where modern AI tools come in, acting as a smart assistant to handle the tedious, repetitive parts of color correction.
Think of it less as a replacement for your creative eye and more as a powerful shortcut. These tools can analyze your image, identify problems, and suggest intelligent adjustments in seconds. They’ll automatically fix tricky white balance issues, even out inconsistent lighting, and perform complex selective edits with just a few clicks. You’re freed up to focus on the final look and feel, not get bogged down in technical fixes.
How AI Streamlines Color Editing
An AI-powered editor doesn’t just make a blind guess; it uses context to make smart decisions.
Let's say you upload a photo of a blue t-shirt taken under warm, yellow-ish indoor lighting. The AI understands that the yellow cast is a lighting problem, not the actual color of the shirt. It will neutralize the background and bring that t-shirt back to its true blue hue without you having to manually mask or select a thing.
The whole process is incredibly simple:
- Upload your image: Just drop your raw product photo into an AI editor.
- Let the AI work its magic: The software instantly assesses lighting, color balance, and what the subject is.
- Apply enhancements: With one click, the AI applies a balanced correction, fixing exposure and zapping unwanted color casts.
- Fine-tune as needed: From there, you can make any small tweaks you want to perfectly match your brand’s style.
This automated approach is a massive time-saver. A task that might take 15 minutes of careful manual work in Photoshop can often be done in under a minute. For online sellers who need consistent, high-quality images on a deadline, that kind of efficiency is a total game-changer. If you're curious about how artificial intelligence is changing visual creation, it's interesting to see how AI render capabilities are also making image production faster and smarter.
The real win with AI isn't just speed; it's consistency. It applies a uniform, professional baseline to every single photo, making your entire product gallery look cohesive and polished.
The Rise of Context-Aware Adjustments
AI photo editing has gotten incredibly sophisticated in recent years. Modern tools provide context-aware corrections that were pure science fiction not long ago. They don't just swap colors; they harmonize lighting, shadows, and perspective to make sure every change looks completely natural.
This means if you use an AI tool to change a product’s background from a studio white to a lifestyle scene, it will also adjust the lighting on the product itself to match the new environment. It’s this level of intelligent editing that preserves realism and sells the shot.
Platforms built specifically for e-commerce, like an AI product photo generator, are built on this exact technology. They’re designed to turn simple smartphone pictures into stunning, marketplace-ready visuals that stop scrollers in their tracks.
Your Pre-Publish Color Checklist for Any Platform
You’ve tweaked every last hue and pushed every slider. The hard part’s over, right? Almost. Before you hit that "publish" button, there's one final, crucial step: the pre-publish quality check. This is where you make sure all your careful editing work actually looks good to your customers, no matter how they’re viewing your store.
First things first, and this is non-negotiable: check your edited images on multiple screens. The colors you see on your perfectly calibrated desktop monitor can look wildly different on a smartphone, which is often cranked up with higher saturation and contrast right out of the box. That subtle, earthy green on your laptop? It might just look like a jarring, radioactive neon on an iPhone.
This is such a common pitfall, and it can completely undo all your hard work. Always, always send the final images to your phone and tablet. It’s the only way to get a real-world preview of what your customers will actually see.
Tailoring Colors for Specific Marketplaces
Different platforms have their own visual language and, more importantly, their own rules. A one-size-fits-all approach to color editing just doesn't cut it. An image that looks fantastic on a visually chaotic Instagram feed might get flagged on an Amazon product listing.
Here’s a quick rundown of how to think about color for different platforms:
- Amazon & Major Retailers: Accuracy is everything here. These sites demand true-to-life colors, almost always on a stark white background. This is not the place for artistic flair. Focus 100% on perfect color correction to keep those return rates down.
- Instagram & Pinterest: This is your playground. Visual impact is the name of the game, so you have a lot more creative freedom. A little boost in vibrance or a consistent, subtle color grade across your feed can make your products pop and help you build a memorable brand aesthetic.
- Etsy & Shopify: Think of these as the middle ground. Product accuracy is still super important for building trust, but you can definitely inject more of your brand's personality into the visuals. A consistent color treatment across your storefront makes you look cohesive and professional.
Remember, the context in which your photo appears is just as important as the photo itself. A perfectly edited image can fail if it clashes with the platform's visual environment.
This demand for accessible, high-quality photo editing is driving some serious growth in the software world. The photo editing market is expected to grow by another USD 606.1 million between 2025 and 2029, a trend largely fueled by the explosion of smartphones. This points to a huge shift toward mobile-friendly apps and cloud tools that make it easier for sellers to edit colors of a picture, fundamentally changing what customers expect to see online. You can dig into more of this data on the growth of photo editing software at Technavio.
By running through this final checklist—checking on different screens and tweaking for each platform—you ensure your product photos don't just look good, they look right. It's a small final step that protects your brand, builds trust with your customers, and ultimately, helps you make more sales.
Got Questions About Editing Your Product Photos?
Even when you've got a handle on the basic tools, a few common questions always seem to pop up when you're deep in an editing session. Nailing these details is what separates a product gallery that looks slapped together from one that feels professional and builds real trust with customers.
Let's dive into some of the most frequent questions we hear from sellers, covering everything from making sure your colors look right on every device to dodging the classic blunders that can make your brand look cheap.
How Can I Make My Product Colors Look the Same on Every Screen?
This is the million-dollar question for anyone selling online, isn't it? You spend all that time getting the perfect shade of cherry red, only for a friend to tell you it looks like a dull maroon on their laptop. The key to fighting that inconsistency is to use the sRGB color profile.
Think of sRGB as the universal language of color for the internet. Pretty much every browser, monitor, and smartphone is built to display sRGB colors correctly. When you're ready to export your finished images, always—and I mean always—make sure you're saving them in the sRGB color space. It's the best shot you have at making your product colors show up as you intended, no matter what screen your customer is using.
You'll never have total control over how a customer's screen is calibrated, but exporting every image in sRGB is the single most important thing you can do to minimize those frustrating color shifts.
What’s the Biggest Mistake Beginners Make with Color?
Hands down, it's over-saturating the image. I see it all the time. It's so tempting to just crank that saturation slider all the way to the right to make the colors "pop," but it's a rookie move that almost always backfires.
When you overdo it, the colors look fake and plasticky, which cheapens the perceived quality of your product. It can even introduce ugly digital noise and artifacts.
Instead of reaching for the global saturation slider, try the Vibrance tool first. Vibrance is a much smarter tool; it gently boosts the intensity of the more muted colors while leaving the already-strong tones alone. This gives you a much more natural, professional-looking result. It’s the difference between a gentle nudge and a heavy-handed shove.
Can I Actually Edit Product Photos Professionally on My Phone?
The quick answer is yes, but there are some big "buts" involved. Modern phone apps like Adobe Lightroom Mobile have become incredibly powerful. They offer tools like selective color adjustments and RAW file editing that used to be strictly desktop-only features. For a quick fix or a social media post, they can be fantastic.
However, when you're doing serious e-commerce work, you'll hit some walls. That small screen makes it tough to spot subtle color casts or tiny blemishes that are obvious on a big monitor. More importantly, a professional workflow often means batch-editing dozens of photos at once, a task that’s just way more efficient on a computer.
So, while a phone is great in a pinch, a proper desktop editor is still the gold standard for creating a polished, high-volume product gallery that converts.
Ready to stop wasting time on manual edits? ProdShot uses AI to turn your simple photos into high-converting product images in seconds. Try it for free and see the difference.