
So, what exactly is a green screen photo? It's a clever technique where you shoot your product against a solid green background. Later, you use software to digitally remove that green and pop in any background you want. This process is called chroma keying, and it's the secret to placing your product anywhere—from a crisp white backdrop to a vibrant lifestyle scene.
It’s how you get professional-looking e-commerce images without the eye-watering cost of a full-blown studio shoot.
Your Path to Standout Product Photos Starts Here

Ready to create product photos that actually convert, but don't want to deal with a high-end studio price tag? This guide is for you. We'll walk you through how a simple green screen and your smartphone can completely transform your listings on Shopify, Amazon, and Etsy.
We’re cutting through the technical jargon to give you practical advice that works for online sellers. Once you grasp a few core concepts, you'll be producing images that hold their own against top brands, building customer trust and driving more sales.
Why Green Screen Photography Is a Game Changer
This method isn't just for Hollywood blockbusters; it's an incredibly powerful tool for e-commerce. It hands you total creative control, letting you switch up your product visuals for seasonal campaigns, different marketplaces, or A/B testing—all without having to reshoot everything from scratch.
For online sellers, the benefits are huge:
- Cost-Effectiveness: It slashes your expenses. Want to see just how much you can save? Check out our breakdown of the typical cost of professional product photography.
- Consistency: You can finally achieve that uniform, professional look across your entire product catalog. This is absolutely crucial for building a strong, recognizable brand.
- Flexibility: Easily swap backgrounds to match marketing campaigns, holiday promotions, or specific platform rules—like Amazon's strict pure-white standard.
This guide is all about a simple, repeatable workflow. You'll learn how to pick the right green screen, set up your lighting to kill shadows and that annoying green color spill, and capture clean images every single time.
To wrap it all up, we’ll show you how to use modern AI tools to instantly process those shots, turning them into polished, marketplace-ready images. This approach makes your products look incredible and, just as importantly, frees up your time so you can get back to growing your business.
Setting the Stage for a Flawless Green Screen Photo
The real secret to effortless post-production isn't about having the fanciest software—it's all in the setup. Getting things right before you even think about hitting that shutter button will save you a world of frustration later on. This means picking the right background, prepping its surface, and making sure your product looks absolutely pristine.
We call it a "green screen photo" today, but the technique has a surprisingly rich history that started long before our digital tools existed. The core ideas behind background replacement were really locked in with the invention of the three-color Technicolor process way back in 1932. That breakthrough created a huge demand for advanced visual effects and paved the way for the chroma keying methods we now take for granted. You can actually dive deeper into the journey of the first color moving pictures and their impact.
Choosing Your Green Screen Material
You don't need a Hollywood-level studio to pull this off. Honestly, the best green screen is the one that fits your space, your budget, and the kind of products you’re shooting. Each material comes with its own set of quirks, so it’s all about matching the tool to the job.
I've put together a quick comparison to help you figure out what makes the most sense for your product photography needs.
Choosing Your Green Screen Material
| Material Type | Pros | Cons | Best For |
|---|---|---|---|
| Fabric Screen | Reusable, portable, and available in large sizes. Can be steamed to remove wrinkles. | Can be prone to wrinkles and requires a stand or mounting system. | Sellers who need a large, flexible background for a variety of product sizes. |
| Paper Roll | Provides a perfectly smooth, non-reflective surface with no wrinkles. | Can be easily damaged (torn or dirtied) and is less portable. | Achieving a perfectly clean and even background for small to medium products. |
| Poster Board | Extremely cheap and readily available. Stiff material resists wrinkles. | Very small surface area, making it suitable only for tiny items. | Shooting very small products like jewelry or cosmetics on a tight budget. |
| Green Paint | Creates a permanent, perfectly smooth surface if you have a dedicated space. | Not portable and requires wall preparation. Can create reflective hotspots. | Creating a dedicated, permanent studio space for consistent, high-volume shooting. |
A seamless paper roll is often a fantastic starting point for most e-commerce products. It gives you that perfectly clean, even background right out of the box, which makes the editing process so much smoother.
Prepping Your Screen and Product
Once you've got your material, the next job is to make it perfectly smooth. I can't stress this enough: wrinkles and creases cast tiny little shadows that will absolutely trick your editing software, leaving you with a messy, unprofessional cutout.
If you’re using fabric, take a few minutes to steam or iron it. It’s a pain, but it’s worth it. For paper or poster board, make sure it’s taped down securely so there are no waves or bumps.
The goal is to create a single, uniform field of color. Any variation in the green—whether from shadows, wrinkles, or poor lighting—makes the background removal process significantly harder for AI tools.
Last but not least, get your product ready. Clean it meticulously to get rid of any dust, fingerprints, or smudges. These little imperfections become glaringly obvious in high-resolution shots. Pay extra attention to anything reflective, like glass or metal, because they love to pick up the green from the background. We’ll get into how to manage that reflection with lighting in the next section, but a clean starting point is totally non-negotiable for a professional green screen photo.
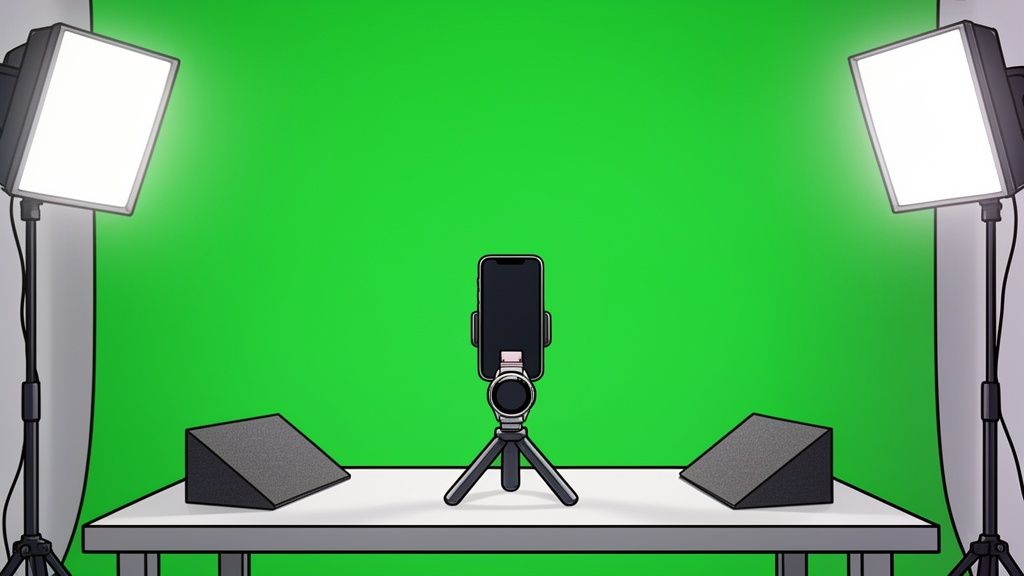
Mastering Lighting and Smartphone Camera Settings
Your lighting setup is, without a doubt, the most critical part of this whole process. It's the one thing that separates a clean, professional photo from a frustrating editing session trying to fix ugly shadows and weird color glows.
The two biggest villains you're up against are harsh shadows and that dreaded green color spill. Luckily, a smart lighting strategy defeats both, and you don't need a pricey studio kit to pull it off. A couple of simple LED desk lamps and a large piece of white foam board can work wonders.
The secret is to light your product and your green screen separately. This simple concept is what gives you a crisp, clean subject that practically jumps off the background, making it incredibly easy for any software to cut it out perfectly.
This diagram breaks down the basic flow for getting it right every time.

As you can see, it's a simple sequence: set the screen, place the product, and then arrange your lights to make sure everything is perfectly and independently lit.
The Two-Zone Lighting Method
I want you to think of your setup as two distinct zones: one for your product (the "product zone") and one for the green screen itself (the "background zone"). Each one needs its own dedicated light.
Light Your Green Screen First: Place one light on each side of the screen, aiming them straight at the material. The goal here is a perfectly flat, evenly lit field of green. You don't want any bright "hot spots" or dark, shadowy corners. A smooth, consistent color is exactly what editing apps need to perform a flawless background removal.
Then, Light Your Product: Now you can bring in your main light, often called a "key light." Position it to illuminate your product from the front and slightly to one side. To soften any hard shadows this creates, use that white foam board on the opposite side as a reflector. It will gently bounce light back onto your product, filling in the darker areas.
By lighting the background and the subject independently, you prevent the product from casting a shadow onto the green screen. This is one of the most common mistakes I see people make, and it creates a massive headache when you get to the editing stage.
Fine-Tuning Your Smartphone Camera
Modern smartphone cameras are incredibly powerful, but their automatic settings can sometimes work against you in a controlled setup like this. To get the best results, you need to take manual control over a few key functions.
Of course, knowing your phone's capabilities is just as important as the settings themselves. A little research into things like which iPhone has the best camera can give you a leg up before you even start shooting.
Once you’re ready to go, make sure you lock in these settings to keep your shots consistent.
Lock Focus and Exposure (AE/AF Lock): Before you take the picture, frame your product and then tap and hold on the screen. You should see a little notification pop up that says "AE/AF Lock." This is crucial because it stops the camera from automatically readjusting the focus or brightness if you move slightly, ensuring every photo in your series looks the same.
Adjust White Balance: Auto white balance often gets confused by the huge amount of green in the frame, which can throw off your product's colors. Don't let it! Manually set the white balance to match your light source (you'll see options like "Daylight" or "Tungsten"). This ensures your product colors are true to life.
Avoid Digital Zoom at All Costs: Seriously, never pinch to zoom. Digital zoom isn't a real zoom; it just crops the image from the sensor and blows it up, which absolutely destroys the photo quality. If you need a tighter shot, just physically move your phone closer. It's always worth the extra step.
From Smartphone Capture to Stunning Final Image
Alright, you’ve prepped the scene and nailed the lighting. Now for the fun part: taking the actual shot and turning that green-screen photo into something truly professional.

The main goal here is to get a clean, high-quality capture that makes the editing process a breeze.
Place your product a good distance from the screen—I’d say about 3-4 feet is the sweet spot. This little buffer is your best defense against that annoying green glow spilling onto the edges of your product. Snap photos from all the important angles a customer would want to see: front, back, side, and definitely a nice detail shot. Offering this complete view is crucial for building trust on platforms like Shopify and Amazon.
From Green to Gone: The Magic of AI Editing
Once you have your shots, it's time to get rid of that green background. There are plenty of tools out there that can get the job done, including some surprisingly powerful free graphic design software.
But for sheer speed and accuracy, nothing beats a dedicated AI tool. The workflow is incredibly simple. You just upload your green screen picture, and the AI immediately gets to work, identifying the green background with laser precision and cleanly removing it.
There's a good reason this works so well. Back when the film industry went digital in the 80s and 90s, they discovered that camera sensors are extra sensitive to green light. This allows them to capture a much cleaner signal with less electronic "noise" compared to other colors. That technical quirk is exactly what allows modern AI to separate your product from the background almost perfectly.
The AI doesn't just crudely delete the background. It intelligently refines the edges of your product, cleaning up any minor imperfections and ensuring the final result looks completely natural, not like a cheap cutout.
Optimizing Your Final Images for E-commerce
After the background is gone, you can drop your product onto a classic white background or even a custom lifestyle scene. The final step is to make sure these new images are optimized for whatever marketplace you're selling on. Each platform has its own rules for dimensions, file types, and sizes, and getting it right directly impacts how fast your page loads for customers.
Here are a few general rules of thumb I always follow:
- Resolution: Aim for at least 1000 pixels on the longest side. This is the minimum to allow for a good zoom function. Amazon, for example, often pushes for 2000×2000 pixels for the best quality.
- File Type: JPEG is your go-to. It’s the universal standard for product photos because it strikes a great balance between quality and small file size. Only use PNG if you absolutely need a transparent background for other marketing stuff.
- File Size: Keep your images under 500 KB if you can. Huge files will slow your page to a crawl, and that’s a surefire way to lose customers and drop in search rankings.
Before you start uploading, it's always a good idea to double-check the latest specs for the platform you're using.
Marketplace Image Specification Cheat Sheet
To make things a little easier, I've put together a quick reference table with the current recommendations for the big players. Think of this as your cheat sheet for getting your images ready for prime time.
| Platform | Recommended Resolution (pixels) | File Type | Max File Size |
|---|---|---|---|
| Shopify | 2048 x 2048 | JPEG, PNG | < 20 MB |
| Amazon | At least 1000px; 2000×2000 preferred | JPEG, PNG, GIF, TIFF | < 10 MB |
| Etsy | At least 2000px on the shortest side | JPEG, PNG, GIF | < 1 MB |
| eBay | At least 500px; 1600px recommended | JPEG, PNG, GIF, TIFF | < 7 MB |
These are great starting points, but remember that these platforms sometimes update their guidelines. A quick check of their seller documentation is never a bad idea.
Following these simple steps will help you create a consistent, high-converting visual catalog. If you're selling on Shopify and want a deeper dive, we have a whole guide on how to remove backgrounds for Shopify.
Troubleshooting Common Green Screen Photo Issues
Even with the most careful setup, you’re bound to run into a few snags. Think of this as your field guide for fixing the most common gremlins that pop up when shooting with a green screen. Getting a handle on these will save you a ton of time in editing later.
One of the most frequent offenders is green spill—that annoying green halo that clings to the edges of your product. This happens when the bright green background literally reflects or "spills" onto your subject.
The easiest fix? Just give your product some space. Move it further away from the screen. A distance of at least 3-4 feet is a solid starting point. This buffer zone dramatically cuts down on the amount of green light bouncing back onto your item.
Another common headache is casting shadows onto the green screen itself. These dark patches are poison for editing software, almost guaranteeing a messy, uneven background removal.
Banishing Shadows and Hotspots
Shadows on your green screen are almost always the fault of a single, harsh light pointed at your product. To solve this, you just need to soften that light. If you're using something like a desk lamp, try draping a thin white t-shirt or cloth over it. This instantly diffuses the light, spreading it out and erasing those hard-edged shadows.
On the flip side, you also need to watch out for hotspots, which are overly bright, blown-out areas on the screen. These are just as bad as shadows and tell you the background lighting is uneven. Adjust your lights so they hit the screen from both sides, creating a flat, consistent field of green.
Key Takeaway: Your goal for the background is total, boring uniformity. A perfectly even green surface, with zero shadows or bright spots, is the single best thing you can do to get a clean, one-click background removal later.
Managing Reflections on Shiny Products
Photographing anything reflective—jewelry, chrome, glass—is its own special kind of challenge. These surfaces are basically mirrors, and they will pick up the green from your background, no matter how far away you move them.
So, what’s the trick? It all comes down to creative positioning and blocking the light.
- Use Black Cards: Grab small pieces of black foam board or even just black paper. Position them just out of the camera's view to block the green reflection you see on your product's surface. You’ll have to fiddle with the angles, but you can literally watch the green disappear from the reflection in real-time.
- Tilt and Angle: Sometimes, a tiny tilt of the product is all it takes to change where the reflection is coming from. Experiment with different angles until the green reflection is either gone or has moved to a less noticeable spot.
Mastering these quick fixes will make a huge difference in your final images. Of course, for more stubborn issues, professional product photo retouching services can be a lifesaver when you're in a pinch.
Answering Your Green Screen Questions
Jumping into green screen photography for your products always brings up a few questions. I get it—I had the exact same ones when I was starting out.
Let's break down the most common things sellers ask so you can get started with confidence.
Can I Use a Blue Screen Instead of a Green One?
You absolutely can. Both green and blue screens work using the same technology called chroma keying, where software just looks for a specific, consistent color to digitally remove.
So why is green so popular? Modern digital camera sensors are actually most sensitive to green. This little detail means you get a cleaner signal with less digital noise, which makes the AI’s job of removing the background a lot easier.
But there’s a big exception: if your product is green, or has green in its packaging, a blue screen is your best friend. Sticking with a green screen in that case would cause the software to erase parts of your actual product.
What’s the Best (and Cheapest) Way to Light a Green Screen?
Hands down, the most effective and wallet-friendly setup is using natural light from a big window, paired with a simple reflector.
Set up your product so the window light hits it from the side—you're looking for soft, indirect light, not harsh sunbeams. Then, grab a piece of white foam board and place it on the opposite side. This bounces the light back, filling in any harsh shadows on your product.
You might also need one small, separate light aimed only at the green screen itself. Even a desk lamp with a thin t-shirt over it to soften the light will do the trick. The goal is to make the green background look perfectly even, with no bright hot spots or dark corners.
An evenly lit screen is the secret to a one-click edit. It saves you an unbelievable amount of time and frustration in post-production.
Do I Need to Buy Expensive Software to Edit These Photos?
Not anymore. It used to be that your only option was a complex, technical program like Adobe Photoshop, which comes with a massive learning curve.
Today, AI-powered tools have completely changed the game. Platforms built for e-commerce sellers are designed to do this one job perfectly. You just upload your green screen photo, and the AI does everything—it removes the background, cleans up the edges, and can even add realistic shadows for you.
These tools are faster, way more affordable, and built for people who need to create professional shots without becoming a professional photo editor.
How Far Should My Product Be From the Screen?
A good starting point is to place your product at least 3-4 feet (about 1 meter) away from the green screen. This isn't an arbitrary number; that distance is crucial for a couple of key reasons.
First, it stops the green color from reflecting onto the edges of your product. This reflection is called "color spill," and it leaves an ugly green halo that’s a nightmare to fix.
Second, it gives you enough space to light your product and the screen separately. If you're seeing a green tint on your item or a faint shadow behind it, the easiest fix is almost always just to move it further away from the screen.
Ready to transform your product photos in seconds? ProdShot uses AI to instantly remove backgrounds and create stunning, high-converting images right from your smartphone. Try it for free and see the magic for yourself.