

If you need to change a background in Photoshop and time is of the essence, the built-in AI tools are your best friend. They've gotten seriously good over the last few years. The fastest way to get it done is by using the Remove Background Quick Action or the Select Subject command. Both can automatically find your subject and prep it for a new backdrop in just a couple of clicks.
Quickly Change a Background with AI Tools
For most common scenarios, Photoshop's AI features are the perfect starting point. Think of a portrait shot against a plain wall or a product sitting on a clean surface—anything where the subject is pretty well-defined. In these cases, the AI does a fantastic job, giving you speed and efficiency without making your image look sloppy.
It’s a beautifully simple process. Just open your image and look for the Properties panel. Under the Quick Actions section, you’ll see a button that says "Remove Background." Click it. Photoshop’s brain goes to work, analyzes your photo, figures out what the main subject is, and automatically creates a layer mask to hide everything else. The best part? It's non-destructive, meaning your original pixels are still there if you need to go back and tweak things.
Your First AI-Powered Background Swap
Let's walk through a real-world example. Say you've got a great photo of a friend, but the background is a total mess—clutter everywhere. You want to drop them into a much cooler, scenic landscape.
This is where the 'Remove Background' Quick Action becomes your hero. It does all the tedious work for you in seconds.
This simple interface shows just how powerful modern Photoshop has become. Complex, time-consuming tasks are now handled with a single click. Once the background vanishes, you just drag your new background image into your project and make sure its layer is sitting right underneath your subject's layer. Easy.
With every update, these tools get more and more precise. The 2025 release of Adobe Photoshop CC brought a 'Remove Background' Quick Action that uses some pretty advanced AI to isolate subjects almost instantly. Adobe even estimates these AI features are boosting image editing productivity by around 25% year-over-year. For anyone doing this professionally, that's a massive amount of time saved.
Pro Tip: Before you do anything, get into the habit of duplicating your original layer. Just hit CTRL+J (or CMD+J on a Mac). This gives you a clean backup, so if you mess up or change your mind, you can always go back to the original, untouched image.
While Photoshop's tools are amazing for swapping out backgrounds, if you need to generate an entire scene from scratch, you might want to check out a dedicated AI product photo generator.
Getting Hands-On with Manual Background Removal
AI tools are incredible time-savers, no doubt. But let's be honest—they sometimes stumble on complex images. When you absolutely need a pixel-perfect result, it's time to roll up your sleeves and get your hands dirty with Photoshop's classic selection tools. Mastering these gives you the kind of granular control that automated features just can't match, ensuring a truly professional finish.
Think of it this way: a microwave gets the job done fast, but for a gourmet meal, you need a chef's knife. Learning these manual methods is what separates a quick-and-dirty edit from a seamless, believable composite. We're going to walk through the big three: finessing edges with Select and Mask, cutting sharp lines with the Pen Tool, and isolating tricky subjects with Channel Masks.
This quick visual guide can help you figure out if an automated tool will cut it or if you need to go manual.
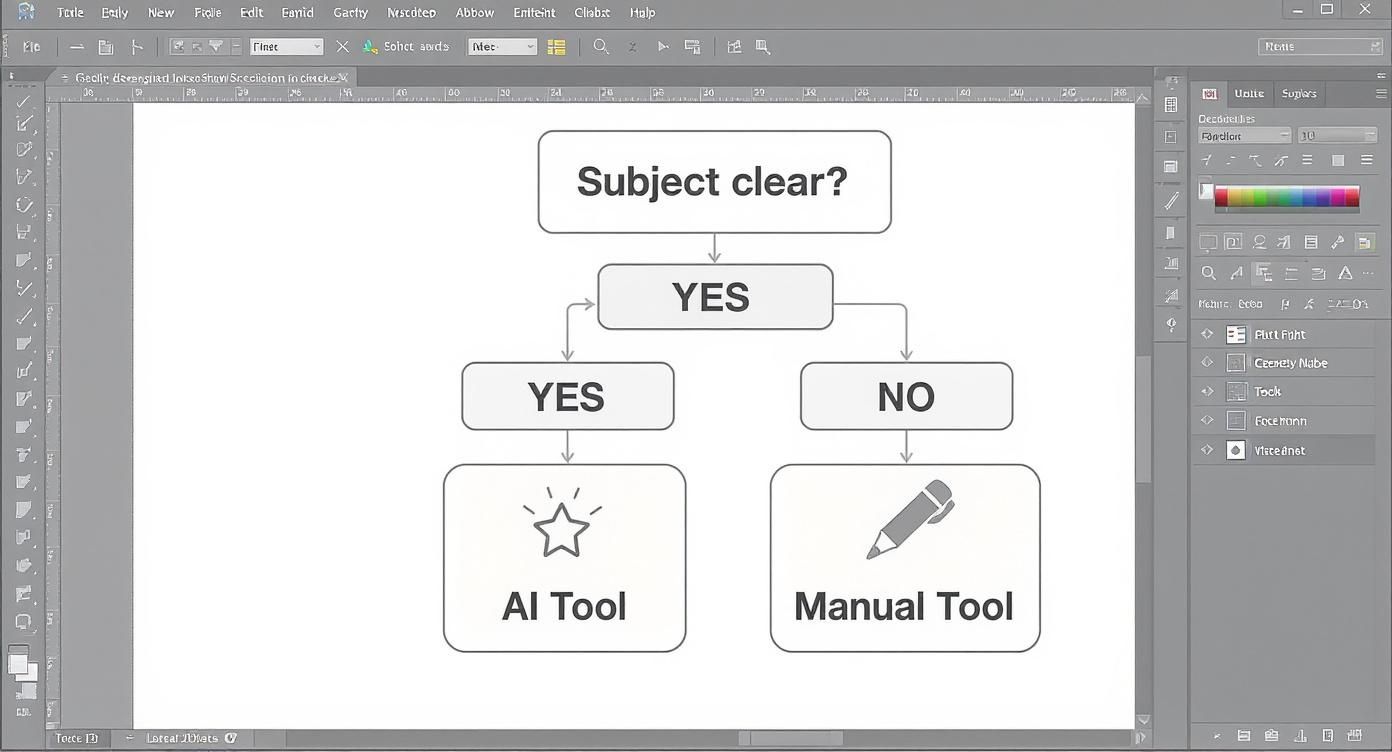
As you can see, it really boils down to how cleanly your subject stands out from its surroundings.
Finessing the Edges with Select and Mask
The Select and Mask workspace is your secret weapon for refining an initial AI selection. It’s the go-to for tackling notoriously difficult edges like hair, fur, or the soft fuzz on a favorite sweater. After running 'Select Subject,' you’ll often find the outline is a little too harsh or has missed all those fine details.
To jump in, just head to Select > Select and Mask. Inside, you'll find a few powerful brushes, but the star of the show is the Refine Edge Brush. Gently paint over those problem areas—like flyaway hairs in a portrait—and watch Photoshop work its magic, intelligently separating the wisps from the background. It’s pretty incredible to see in action.
A word of advice: subtlety is key here. Use small, careful strokes with the Refine Edge Brush for much better results than broad, sweeping motions. Don't forget to adjust your brush size as you move around different parts of the subject.
The Unbeatable Precision of the Pen Tool
For anything with hard, defined edges—like most product photography—nothing comes close to the Pen Tool. If you're shooting electronics, furniture, or accessories, this tool gives you surgically precise control. It creates clean vector paths that you can convert into a perfect selection. For many Shopify store owners, getting comfortable with the Pen Tool is a total game-changer. If you’re in that boat, our guide on how to remove the background for Shopify product images is a great next step.
The process involves clicking around your subject to create "anchor points." It definitely has a steeper learning curve, but the perfect results are well worth the effort.
- A single click creates a sharp corner, perfect for a box or a book.
- Clicking and dragging creates a smooth curve, ideal for a bottle or a piece of clothing.
Once you’ve traced the entire object, just right-click on your path and choose Make Selection. Voilà! Your path is now a flawless selection, ready for masking.
Isolating Complex Subjects with Channel Masks
Now for the really tough stuff. When you're dealing with a busy background or one that’s a similar color to your subject, Channel Masks are a powerful, if advanced, solution. This technique has you look at the red, green, and blue color channels of your image to find the one with the most contrast between your subject and the background.
Once you find the best channel, you duplicate it and use Levels or Curves to push the subject to pure white and the background to pure black. This creates an incredibly detailed mask. It’s a bit more involved, for sure, but for isolating something like a leafy tree from a bright sky, it’s often the only way to get a clean result without spending hours on it.
Refining Edges with Layer Masks
A clean selection is the foundation of a believable background swap, but Layer Masks are where the real magic happens. Think of a mask less like an eraser and more like a super-flexible stencil. Instead of permanently deleting pixels from your subject, a mask lets you hide or reveal parts of the layer without ever destroying the original image.
This non-destructive approach is the professional standard for a reason—it gives you complete control and the freedom to experiment. Once you've got your initial selection, just click the Layer Mask icon (the little rectangle with a circle inside) at the bottom of the Layers panel, and you're ready to start finessing those edges.
Painting on Your Mask
With the mask thumbnail selected, your go-to tool is the Brush Tool. The concept is incredibly simple yet powerful: painting with black hides parts of the layer, while painting with white reveals them. This is how you'll manually clean up all the little imperfections your selection tool missed.
Did your selection accidentally clip off the corner of a product? No problem. Grab a white brush and paint that area back into view on the mask. See a stubborn piece of the old background peeking through? Switch to a black brush and paint it away.
Key Takeaway: My single most important tip here is to use a soft-edged brush with a low opacity, somewhere around 20-30%. This lets you build up your adjustments gradually, creating a soft, natural transition between your subject and the new background instead of a hard, obviously-cut-out line.
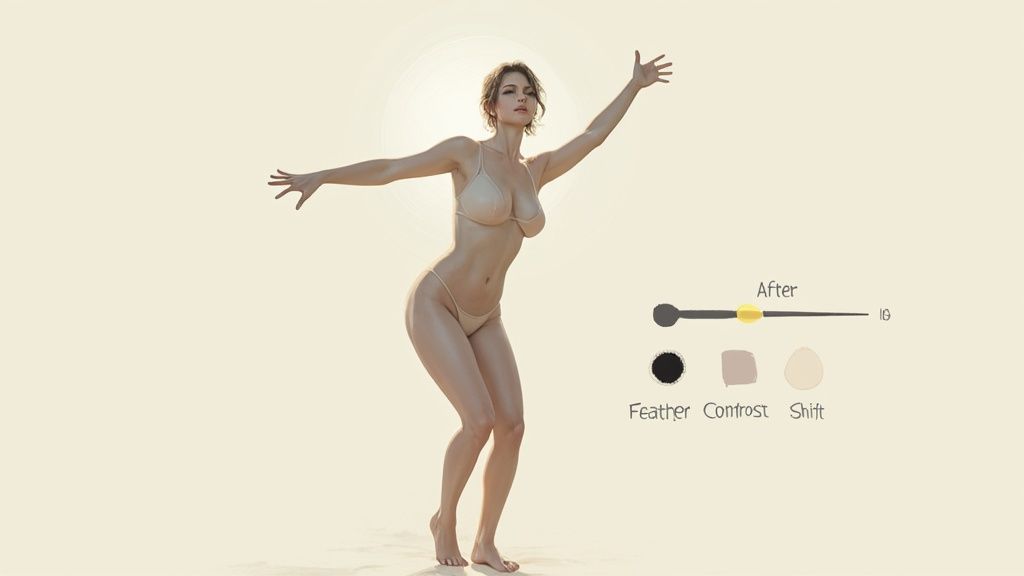
Using the Select and Mask Sliders
For even more granular control, especially with tricky subjects like hair or fur, you can jump back into the Select and Mask workspace by double-clicking your layer mask’s thumbnail. This is where you'll find a few sliders that can take your edges from good to perfect.
- Feather: This softens the entire edge of your selection. Even a tiny amount, like 0.5 pixels, can make a huge difference in helping your subject blend in.
- Contrast: This sharpens the edge, which is really useful for tightening up any fuzzy halos or soft glows left over from the old background.
- Shift Edge: This one is a lifesaver. It pulls the entire selection inward or outward. Shifting it inward by just a few percentage points is often the fastest way to eliminate those pesky background fringes.
While Photoshop’s AI has completely changed the game, manual skill is still what separates a decent composite from a flawless one. Most experienced editors I know use AI to get a solid head start and then dive into a layer mask for the detailed refinement. These AI tools can easily save 40%-50% of the time compared to the old-school methods, but they don't eliminate the need for a human touch to nail the final result. You can learn more about how pros mix AI and manual edits over at Photoshop Cafe.
Slapping your subject onto a new background is one thing, but the real magic happens when you make it look like it was actually there. This is where art meets technique. It's all about tricking the eye by carefully matching the color, lighting, and perspective to create a composite that feels natural and believable.
Get this part wrong, and even the most perfect cutout will stick out like a sore thumb.
Before you touch any tools, just look at your new background. What's the light doing? Is it a harsh, direct sunbeam, or is it soft and overcast? Is the color tone warm and golden, or cool and blue? The answers will be your roadmap for all the adjustments you're about to make. The quality of your original photo plays a huge role here, too. For example, when you're using an adjustable dressmaker form for garment creation, a well-lit, perfectly shaped starting image makes the Photoshop work downstream a whole lot easier.
Making Light and Color Work Together
This is where Adjustment Layers come into play. Think of them as your secret weapon for non-destructive editing, letting you experiment with color and light without permanently messing up your original pixels.
Here's my go-to starter pack:
- Color Balance: This is your best friend for tinting your subject. If you dropped your subject into a golden hour scene, you'll want to nudge the sliders toward the reds and yellows to make them feel like they're bathed in that same warm light.
- Curves: I live in the Curves panel. It's the ultimate tool for fine-tuning brightness and contrast. You can use it to make sure the shadows and highlights on your subject have the same punch as the ones in the new background.
To help you get started, here's a quick rundown of the most essential adjustment layers for this kind of work.
Key Adjustment Layers for Compositing
| Adjustment Layer | Primary Use Case | Pro Tip |
|---|---|---|
| Curves | Precisely controlling brightness, contrast, and color channels. The workhorse for matching light levels. | Use the "hand" tool to click and drag directly on your image to adjust tones. It's incredibly intuitive. |
| Color Balance | Shifting the overall color cast to match the ambient light (e.g., adding blue to match a shaded scene). | Focus on adjusting the Midtones first, as that's where the most visible shift will happen. |
| Hue/Saturation | Fine-tuning the intensity of colors or changing specific hues to better match the background palette. | Use the Targeted Adjustment Tool to select a specific color on your subject and adjust only that range. |
| Photo Filter | Quickly adds a warming or cooling filter to simulate different lighting conditions, like sunshine or shade. | A great first step to get your subject in the right color ballpark before making finer tweaks with other layers. |
Mastering these few layers will give you incredible control over how believable your final image looks.
Pro Tip: Don't forget to clip your adjustment layers! Hold Alt (or Option on Mac) and click on the line between your adjustment layer and your subject layer. A little arrow will appear, and now all your edits will only affect the subject, leaving your background untouched. It's a non-negotiable step for clean composites.
Finally, you need to ground your subject with a shadow. This is the detail that truly sells the illusion. Just create a new layer, grab a soft black brush, and drop the opacity way down to around 15-20%. Gently paint in a soft shadow where your subject would naturally block the light. It's amazing how this one tiny step can make the entire image click into place.
Solving Common Background Removal Problems
Even with the best tools, you’ll inevitably run into images that fight back. Learning how to change a background in Photoshop also means knowing how to troubleshoot when things don’t go perfectly. Let's dig into some of the most common frustrations I see all the time.
One of the biggest headaches? Wispy, fine hair. We've all been there. Automated tools often create a chunky, unnatural outline around a person's head that just screams "bad Photoshop." The real solution is hiding inside the Select and Mask workspace—specifically, the Refine Edge Brush. Just gently paint over the hair's edge, and you'll see Photoshop intelligently find those tiny strands for a much more realistic cutout. It takes a bit of practice, but the results are night and day.
Dealing with Halos and Color Spill
Another frequent problem is color spill, where a faint halo of the old background color clings to your subject’s edges. This is a classic issue, especially with photos shot against a green screen.
The fastest way to fix this is with a simple, built-in feature. Inside the Select and Mask panel, just tick the Decontaminate Colors checkbox. Photoshop will automatically neutralize those fringe colors, blending your subject into the new scene way more seamlessly. It's a lifesaver.
But what about tricky, semi-transparent objects, like a drinking glass or a piece of sheer fabric? Don't even try to get a perfect, hard-edged selection. Instead, lower the opacity of your eraser or brush on the layer mask itself. This lets you create a more gradual, see-through effect that actually looks believable.
Got Questions About Changing Backgrounds in Photoshop?
When you're deep into a Photoshop project, a few questions always seem to pop up, especially when you're trying to get that perfectly seamless, professional look. Here are some quick answers to the problems we see most often.
What's the Right File Format to Save My Image In?
While you're still working, always save your file as a .PSD (Photoshop Document). This is a non-negotiable habit. It keeps all your layers, masks, and adjustments intact, so you can jump back in and tweak things without losing any quality.
Once you’re happy with the final result and ready to share it, export a separate copy. Use .JPG for most web uses where file size is a concern, or choose .PNG if you need that transparent background to shine through.
How Do I Get Rid of Those Jagged, Pixelated Edges?
Ugh, the dreaded jagged edge. It's usually a dead giveaway that your initial selection was a bit too harsh. The best way to fix this is to revisit your layer mask.
Jump back into the Select and Mask workspace and find the Feather slider. You don't need much—often, just a tiny adjustment of 0.5 to 1 pixel is enough to smooth that transition and make your subject look like it truly belongs in its new environment.
Why Is There a Weird Color Halo Around My Subject?
That annoying fringe of color is called color spill. It’s what happens when light from the original background bounces onto the edges of your subject, and it's a common headache.
Your first line of defense is the Decontaminate Colors checkbox inside the Select and Mask properties. A single click can often work wonders. If the halo is a bit more stubborn, you might need some more advanced techniques, which we cover in our guide to professional product photo editing services. Getting this right is a big deal; clean, high-quality product shots have been shown to boost sales by 30%-40% in a global market projected to hit $1.4 billion by 2025. You can also discover more insights about background removal tools and how they're changing e-commerce.
Tired of manually editing every product photo? ProdShot uses AI to create stunning, studio-quality images in seconds. Get your free trial and see the difference at https://prodshot.net.