
Knowing your way around a photo background is a seriously powerful skill. A clean, polished background can take a picture from "just okay" to "wow," whether you're selling products, building a brand, or just tidying up a personal photo.
Why Editing Your Photo Background Matters
Getting the background right isn't just about making things look pretty—it's a strategic move.
For anyone in e-commerce, a simple white or branded background is a game-changer. It strips away all the distracting noise and puts your product on a pedestal, making it the undeniable star of the show. Just think about it: a product shot on a clean, white backdrop on Amazon feels so much more professional than the same item sitting on a cluttered kitchen table. That clarity builds buyer confidence and can absolutely nudge conversion rates upward.
It’s the same story for personal branding. A messy background on your LinkedIn profile picture can subtly undermine your credibility. By swapping it out, you take control of the story your image tells. Mastering this is a key piece of the broader scope of photo editing because it gives you so much more creative say over the final result.
Defining Your Visual Goals
Before you jump into any editing software, take a second to ask why you're doing this.
Are you aiming for a perfectly cohesive Instagram feed with a strict color palette? Or are you prepping hundreds of product shots for a new online store launch? Your end goal is what dictates your editing choices and helps you pick the most efficient tool for the job. Figuring this out first saves a ton of time and makes sure your final images actually support your brand.
This simple decision tree breaks down how different goals lead to different visual results.
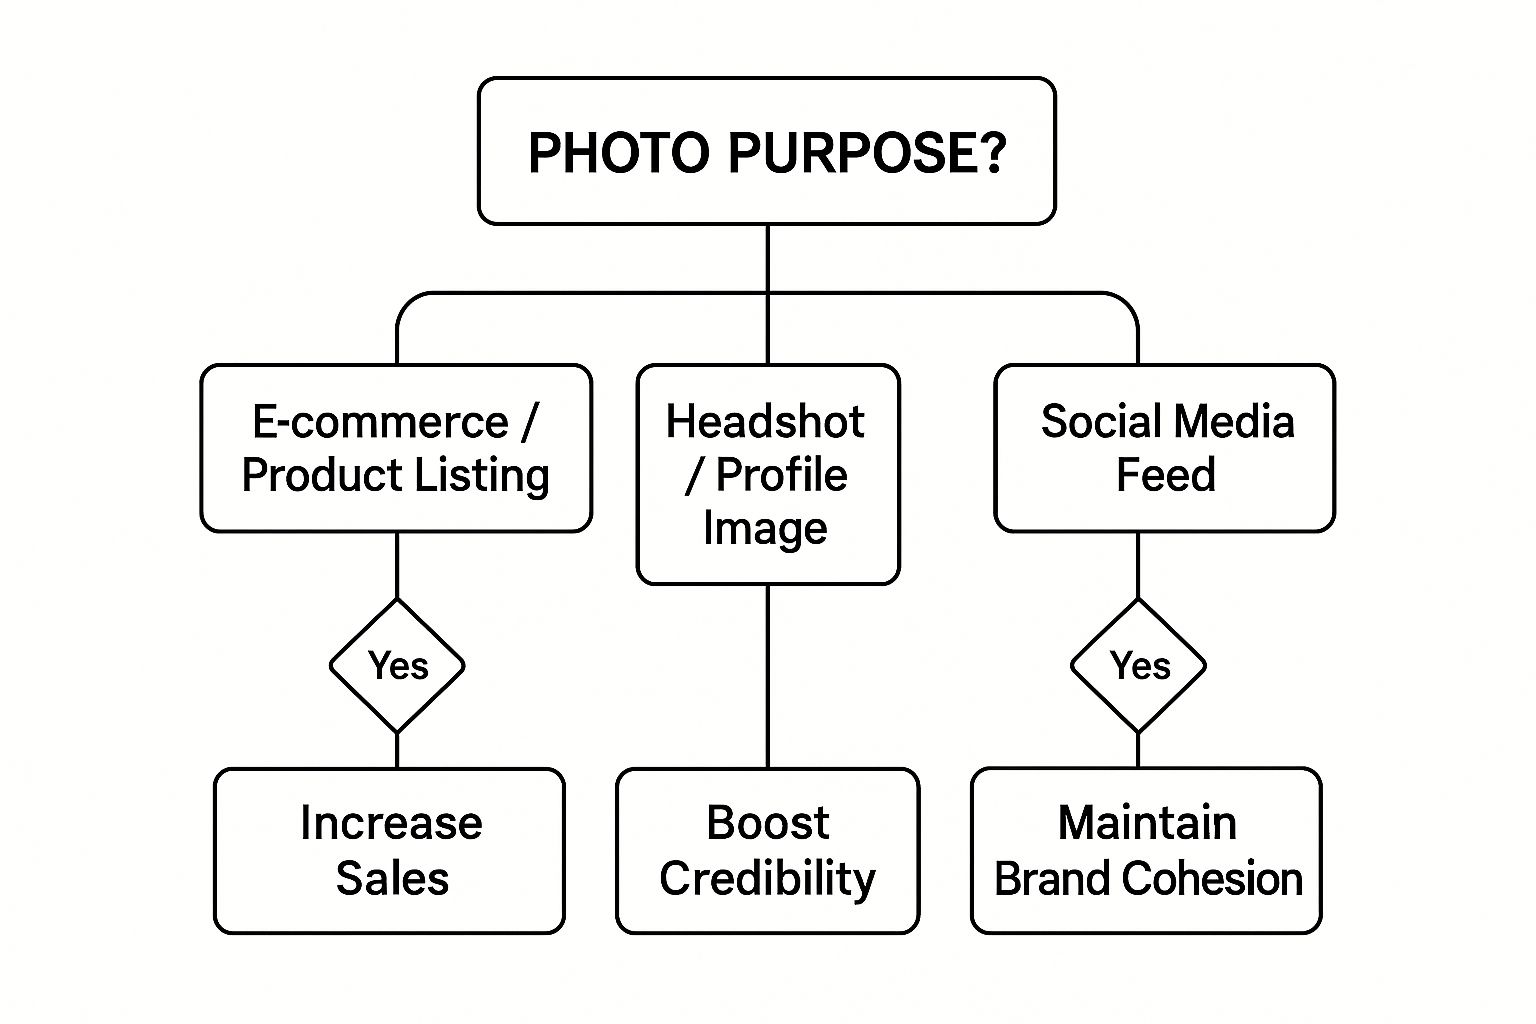
As you can see, editing a background for a product listing is all about driving sales. For a headshot, it's about boosting your professional image.
The right background doesn't just change the picture; it changes how your audience perceives the subject. It’s the difference between a casual snapshot and a professional statement.
The demand for high-quality visuals is only going up. The photography industry was valued at a massive $55.6 billion in 2023, and it's set to keep growing. Post-processing tasks like background removal are a huge part of that. If you're curious, you can check out our guide on the cost of professional product photography to get a sense of how these services are priced.
AI-driven editing tools are a massive part of this growth, making once-tedious tasks way easier for creators and businesses everywhere.
When it comes to swapping out the background of a picture, you’re basically looking at two paths: the instant gratification of AI or the meticulous control of doing it by hand. There’s no single "right" answer here. The best choice really boils down to your specific project, how much of a rush you're in, and your comfort level with editing software.
Think about an e-commerce owner who has to get a hundred new products online. Fast. Manually cutting out every single item would be a nightmare, taking days of tedious work. This is where an AI-powered tool is a total game-changer, churning out clean, consistent images in seconds. Speed is everything when you need to get products live and selling.
But on the flip side, imagine a photographer editing a high-fashion portrait. You’ve got wispy hair, delicate lace, and other tricky details that need a surgeon's precision. An automated tool might stumble here, leaving behind clunky, unnatural edges. For that kind of work, nothing beats manual software like Adobe Photoshop, where you have complete control over every last pixel.
AI vs. Manual Background Editing: A Quick Comparison
To help you decide which route to take, let’s break down the key differences. It’s a bit like choosing between an automatic and a manual car—both will get you where you’re going, but the experience and level of control are worlds apart. What you value most for the task at hand will point you in the right direction.
| Feature | AI-Powered Tools (e.g., ProdShot) | Manual Software (e.g., Photoshop) |
|---|---|---|
| Speed | Extremely fast—results in seconds. Perfect for bulk processing. | Time-consuming—requires careful, detailed work by hand. |
| Ease of Use | Very easy. Typically just upload and click. No real skills needed. | Steep learning curve. Requires knowledge of layers, masks, and tools. |
| Precision | Good for clear subjects, but can struggle with complex edges like hair or fur. | Pixel-perfect control. Unmatched for intricate details and professional results. |
| Best For | E-commerce, social media content, quick mockups, and any high-volume task. | High-end portraits, creative composites, and commercial advertising. |
At the end of the day, the best tool is simply the one that fits the job.
If your goal is to process 100+ product images before lunch, AI is your best friend. But if you need one flawless hero image for a magazine cover, rolling up your sleeves and doing it manually is the only way to guarantee perfection.
Editing Backgrounds Instantly with AI Tools
AI tools have been an absolute game-changer for editing photo backgrounds. The days of painstakingly tracing around a product's edges in complicated software are pretty much over. Now, you can get stunning, professional results with just a few clicks—a lifesaver for busy entrepreneurs and marketers.
Let's say you just snapped a great photo of a new handmade ceramic mug, but the background is your cluttered workbench. Not exactly the vibe you want for your online store. With an AI tool, this is no longer a big deal. You just upload the photo.
That's when the magic kicks in. The AI analyzes your image, figures out that the mug is the hero of the shot, and neatly snips it away from the background. No manual selections, no tedious outlining. This tech is surprisingly good, even with some tricky shapes.

Maximizing Your AI Editing Results
To get the cleanest possible cutout, a little bit of prep goes a long way. I’ve found that starting with a well-lit photo where your subject really stands out from its surroundings makes a huge difference. For example, a dark product against a light-colored wall is a piece of cake for the AI to process. A dark product in a shadowy corner? That’s a bit more challenging.
Once the AI has worked its magic and removed the background, you’ve got a few paths to choose from:
- Go with a solid color. A crisp white background is the classic e-commerce choice, but a bold brand color can make your products pop on social media.
- Generate a new scene. This is where things get really fun. Many tools can create entirely new backdrops, placing your mug on a sleek marble countertop or a rustic wooden table.
- Download a transparent PNG. This gives you a clean cutout of your product with no background at all—perfect for dropping into website banners, email newsletters, or other marketing materials.
For those of us who need to move fast, there are all sorts of instant background removal tools out there that can churn through images in seconds. This kind of speed is a massive advantage when you’re prepping a whole batch of product photos at once.
The real beauty of AI here is its efficiency. It can handle 80% of editing work in 20% of the time. You get high-quality, consistent images that are ready to go, which is essential in the fast-paced world of online retail.
If you’re focused purely on product shots, a specialized AI product photo generator like ProdShot can take things to the next level. These platforms don't just remove the background; they’re designed to add realistic lighting and shadows to create a true studio-quality look. They’re built from the ground up to create images that convert. The best part? It's incredibly simple. What once required a professional photographer and a studio full of gear, you can now achieve with just your smartphone and the right tool.
Mastering Manual Background Removal
AI tools are fantastic for speed, but when you need absolute precision, nothing beats getting your hands dirty with manual background removal. This is where you get pixel-perfect control, which is crucial for high-stakes images like your website's hero shot or a professional portrait.
This isn't about one-click magic. It’s a skill. The real secret to manual editing isn't following a rigid formula, but knowing which tool to grab for the specific job you're facing. Understanding the why behind each technique is what separates the amateurs from the pros.
Choosing Your Selection Tool
Your first move is always deciding how to select your subject. Programs like Adobe Photoshop or the open-source GIMP give you a whole arsenal of selection tools, and your choice will make or break the final result.
-
Magic Wand Tool: This is your best friend for simple, solid-colored backgrounds. Got a product shot against a plain white or green screen? The Magic Wand can grab the whole background in a single click, saving you a ton of time. Just know it gets confused by gradients or busy textures.
-
Lasso/Magnetic Lasso Tool: Think of this as freehand drawing an outline around your subject. The Magnetic Lasso is especially slick because it tries to "snap" to the edges of your object, making it a great choice for subjects with well-defined, but not perfectly straight, lines.
-
Pen Tool: Here it is—the undisputed champion for clean, professional edges. You create a vector path using anchor points, giving you total command over every curve and corner. It takes some practice, for sure, but the results are second to none for e-commerce photos where crisp, clean lines are everything.
For the cleanest and most professional results, especially on product images, investing time to master the Pen Tool is non-negotiable. It's the industry standard for a reason—it delivers flawless cutouts every single time.
The Power of Non-Destructive Editing
Once you've made your selection, step away from the delete key. Seriously. The professional workflow uses a layer mask. This is a core concept in photo editing that keeps your work flexible and non-destructive.
Instead of permanently erasing pixels, a layer mask lets you hide or reveal parts of a layer. If you clip a corner too tightly or need to refine an edge later, you just paint on the mask to bring back detail or hide a flaw.
This flexibility is a lifesaver, especially when you’re working with tricky details like fine hair or see-through objects. For anyone aiming for that truly polished look, checking out professional product photo retouching services can show you just how experts use these methods to nail every last detail. It’s a safety net that keeps your original photo intact, no matter how much you tweak it. It’s simply the smarter way to edit.
Alright, you’ve nailed the background removal. The tricky part is done. Now comes the fun part: deciding what goes in its place. This is where you move from just cleaning up an image to actually telling a story.
Think of that empty space not as a void, but as a blank canvas.

Instead of automatically dropping in a plain white background, try something with a little more personality. A subtle gradient, for instance, can add a surprising amount of depth. A gentle fade from light grey to a slightly darker shade can make a product photo feel sophisticated and polished, helping your subject pop without creating a distraction.
Beyond Basic Backdrops
For visuals that really grab attention, you need to think about context. Where would your product naturally live? A rugged backpack looks way more at home against a mountain landscape than it does floating in a white abyss. Placing your product in a realistic lifestyle scene instantly helps your audience connect with it.
Here are a few ideas to get you started:
- Brand-Aligned Colors: Is your brand bold and vibrant? Use solid colors from your brand’s palette. It’s a simple trick that creates eye-catching, scroll-stopping posts for social media.
- Textured Surfaces: Give your product a sense of touch by placing it on a digital surface like marble, weathered wood, or brushed metal. These textures instantly signal quality.
- Abstract Designs: For a more modern or artistic feel, experiment with geometric shapes or soft, out-of-focus blurs. It’s a great way to add visual interest without being too literal.
The secret to making a composite image look real? It all comes down to lighting and perspective. If your product is lit from the left, the background you add needs to be lit from the left, too. Mismatched lighting is the fastest way to make an image look fake.
This kind of attention to detail is what separates an amateur edit from a professional one. Thankfully, modern tools are getting incredibly good at helping with this. The global photo editing software market, valued at a massive USD 42.85 billion in 2024, is shifting heavily toward AI platforms that can automatically match lighting and perspective, taking the guesswork out of these once-tricky tasks. You can dig into more data on this market's growth and see just how much AI is changing the game.
Your Photo Background Questions, Answered
Even with great tools, a few tricky situations always pop up. Let's walk through some of the most common questions I hear about editing photo backgrounds and get you some quick, practical answers.
What's the Best Free Tool Out There?
For a quick, no-fuss edit, you really can't beat the web-based AI background removers. They do the heavy lifting in seconds.
But if you need to get your hands dirty and have more precise control, I always recommend GIMP. It’s a seriously powerful, open-source program that gives you many of Photoshop’s advanced tools without the price tag. It takes a bit of learning, but it’s worth it for the control you get.
How Do I Stop the New Background from Looking Fake?
It all comes down to light and shadow. Seriously, this is the secret sauce. Take a hard look at your original product shot—where is the light coming from? Is it soft or harsh?
Once you know that, find a new background where the lighting matches. If the light on your product is coming from the top left, a new background with a light source on the bottom right will immediately look wrong.
Pro Tip: The one thing that will instantly make your image look more believable is a subtle drop shadow. It grounds your product in the new scene, making it feel like it's actually sitting there. It’s a tiny step that makes a world of difference.
Can I Actually Do This on My Phone?
Absolutely. It’s amazing what you can pull off with a phone these days. Mobile apps have gotten incredibly good at background removal, making it easy to get professional results on the go.
A few of my go-to's are:
- Adobe Photoshop Express: It packs a lot of power into a mobile-friendly package.
- Photoleap by Lightricks: Really intuitive and has some great creative AI features.
- Canva: Perfect if you're removing a background to drop your product right into a social media graphic or ad.
These apps put some serious editing power right in your pocket.
How Do I Handle Tricky Edges Like Hair or Fur?
Ah, the classic problem. Hair and other fuzzy edges are the ultimate test of a good cutout. For this, you’ll want to step away from the automatic tools and jump into something like Photoshop and its "Select and Mask" feature.
This workspace has a tool called the Refine Edge Brush, which is built specifically for this nightmare scenario. It lets you paint over the edges, and the software is smart enough to figure out what's hair and what's background. It’s how the pros get those clean, realistic cutouts around even the most complex subjects.
Ready to skip the manual work and get stunning, studio-quality product images in seconds? ProdShot’s AI instantly removes backgrounds and generates beautiful, on-brand visuals that are ready to sell. Give it a try for free.