
Getting rid of shadows in your photos really comes down to two main approaches: you can either tackle them at the source during the photoshoot or clean them up later with editing software.
I’ve always found that getting the light right from the start is the best way to get a clean shot. But let's be realistic—sometimes the light just doesn't cooperate. That's where having some solid editing skills, or a great tool, becomes your secret weapon for creating consistently professional photos, especially for e-commerce.
Why Shadows Can Hurt Your Product Photos
Let’s be blunt: unwanted shadows are more than just a little imperfection. They can actively sabotage your online sales.
Think about the crowded visual world of platforms like Shopify, Amazon, and Etsy. Your product photos are everything. They're what makes a customer stop scrolling and click "buy." Harsh, distracting shadows can make a beautiful, high-quality product look cheap, hide important details, and worst of all, make a potential buyer feel uncertain.
This is especially true for small businesses and independent sellers. Maybe you're selling handmade jewelry on your Etsy store. If those dark shadows from your kitchen light make a gorgeous silver ring look dull and flat, you're not just dealing with a minor inconvenience—you're losing money.
The impact is real. Some data shows that bad shadows can slash sales by as much as 30%. Another staggering statistic? 42% of online shoppers will simply click away from a product listing if the photos have poor lighting. If you want to dig into the numbers, there are some great reports on visual merchandising stats that break it all down.
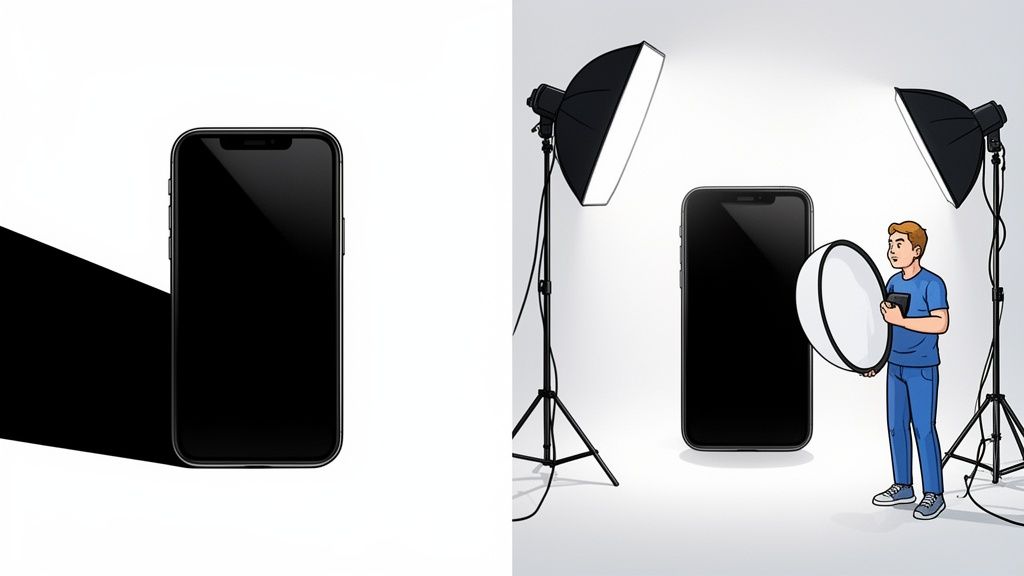
Shooting vs. Editing: Understanding Your Options
When you're staring at a photo with a pesky shadow, you have two paths forward: prevention and correction.
Prevention (In-Camera): This is all about setting up your shot to minimize or eliminate harsh shadows from the get-go. We're talking about using soft, diffused light, positioning your product just right, and using simple reflectors to bounce light back into dark spots. This is the gold standard because it saves you a ton of time on the backend.
Correction (Post-Production): This is your cleanup phase. After the photo is taken, you can remove shadows using editing software. This can be as simple as moving a few sliders in a basic photo app or as complex as diving into Adobe Photoshop or Lightroom. There are also fantastic AI tools like ProdShot that can automate the whole process.
Honestly, the best results usually come from a combination of both. You start with good lighting during the shoot and then use smart editing to add that final layer of polish.
And it’s not just about making things look pretty. Making sure your images are optimized is a huge part of your site's overall performance and how you show up in search results. If you want to go deeper into getting your images web-ready, you can learn a lot from guides on Image Optimization for Web Performance SEO. Mastering these skills is a key step in turning casual browsers into loyal customers.
Shadow Removal Methods At a Glance
So, should you focus on getting it perfect in-camera or rely on editing magic? Both have their place. Here’s a quick breakdown to help you decide which approach is best for you in any given situation.
| Method | Best For | Pros | Cons |
|---|---|---|---|
| Prevention (In-Camera) | Studio setups, controlled environments, and anyone wanting to save editing time. | – Results in cleaner, more natural-looking files – Saves significant time in post-production – Teaches you the fundamentals of lighting |
– Requires more setup time and equipment – Can be difficult in unpredictable outdoor lighting – May not be practical for quick, on-the-fly shots |
| Correction (Post-Production) | Quick shots, fixing unexpected shadows, e-commerce product shots needing a perfectly uniform look. | – Offers complete control over the final image – Can save photos that would otherwise be unusable – AI tools make it incredibly fast and easy |
– Can be time-consuming if done manually – Risk of looking unnatural if over-edited – May require learning software like Photoshop |
Ultimately, knowing how to do both will make you a much more versatile and effective photographer. You'll be ready for any situation, whether you have a full studio at your disposal or just your phone and a sunny window.
Controlling Light to Prevent Shadows During Your Shoot
The best way to get rid of shadows in your pictures? Stop them from showing up in the first place.
While you can always fall back on editing software, getting your lighting right during the shoot saves a ton of time and delivers a much more natural, professional result right out of the camera. It’s all about being proactive instead of reactive.
You don’t need a fancy, expensive studio to pull this off, either. Some of the most effective tools are completely free or dirt cheap. The whole idea is to create a large, soft light source that wraps around your subject, smoothing out the harsh edges that create those deep, distracting shadows.
Mastering Natural Light
Believe it or not, your best friend for soft, beautiful light is often just a big window on an overcast day. Direct, blazing sunlight is your enemy—it creates hard, dark shadows. But the diffused light from an overcast sky is like a massive, free softbox. It gives you even, flattering light that’s perfect for product photos.
Try positioning your product near the window, but just out of the path of any direct sunbeams. Take a look at how the light hits one side. You’ll probably see a soft shadow forming on the opposite side. This is where your next simple tool comes into play.
Pro Tip: A simple piece of white foam board, or even just a sheet of white printer paper, makes a fantastic reflector. Hold it on the side opposite your main light source (the window) to bounce light back into the shadowy areas. This "fills" the shadows, making them much softer without completely erasing them, which helps your product keep its sense of depth.
Play around with the angle and distance of your reflector. Moving it closer will brighten the shadows more, while pulling it away creates a more subtle effect. It’s a simple trick, but it gives you an incredible amount of control.
At its core, the workflow for fixing shadows involves two main stages: what you do in-camera and what you fix in post-production.

This process really drives home the point that your first, and best, chance to manage shadows happens long before you even think about opening an editing app.
DIY and Budget-Friendly Lighting Gear
If natural light isn’t reliable or you need to shoot at night, you can easily create your own affordable lighting setup.
DIY Lightbox: Grab a cardboard box and cut large windows into the sides and top. Cover those openings with white tissue paper or a thin white cloth. This will diffuse any light source you shine through it, giving you that soft, even illumination you’re after.
Household Diffusers: No professional diffuser? No problem. A plain white bedsheet or even a shower curtain liner can do the job. Just drape it between your light source (like a powerful lamp) and your product to soften the light and dial back those hard shadows.
When you're ready to invest a little cash, some entry-level gear can make a world of difference. A ring light is great for eliminating face shadows in portraits or for small product shots because it provides even, head-on light. For a bit more flexibility, a basic softbox kit with one or two lights will give you incredible control to shape your lighting for a more polished look. Consistency is everything when you're shooting a lot of products. For anyone tackling high volumes, knowing how to manage product photography for 1000 items in a batch can completely transform your workflow.
So, you’ve done everything right behind the camera, but a few pesky shadows still managed to sneak into your shot. It happens. This is exactly where post-production editing software comes to the rescue, letting you polish your images until they shine. The big names in the game are, of course, Adobe Lightroom and Photoshop, and they're industry standards for good reason—their toolkits for shadow removal are incredibly deep.

Be warned, though—going the manual route can be a serious time sink. For many small retailers on Etsy or Amazon who are working without a full studio setup, fixing shadows in Photoshop can take a staggering 5-10 hours per image. If you hire a freelancer, you could be looking at $50-100 for each photo. This massive investment of time and money is precisely why so many sellers start looking for better, faster methods.
Your First Stop: Lightroom Adjustments
For most basic shadow problems, Lightroom is the perfect place to start. It’s incredibly intuitive. The single most powerful tool you’ll find is the Shadows slider, located right in the "Basic" panel.
Just by sliding it to the right, you can brighten up the darkest parts of your photo, lifting those shadows without overexposing the brighter areas. It’s a fantastic global adjustment for shots that are already pretty good but just need a little help in the dark spots. A word of caution: don't push it too far. Overdoing it can make the image look flat and unnatural, and it might even introduce some grainy digital noise.
Pro Tip: Need more precision? Grab the Adjustment Brush. With it, you can literally paint over a specific shadow and then tweak the "Shadows" or "Exposure" sliders just for that area. It gives you incredible control without messing with the rest of your image.
Going Deeper with Advanced Photoshop Techniques
When a simple slider just won’t cut it, it's time to open up Photoshop. This is where you can get surgical, seamlessly removing even the most stubborn and distracting shadows.
The best way to start is by adopting a non-destructive workflow. What this means is that you’ll make all your edits on separate layers. This way, you can always go back and fine-tune your changes without ever permanently damaging your original photo.
Here are a couple of essential tools for the job:
- Dodge Tool: Think of this as a digital brush for lightening specific areas. You can set its "Range" to target only "Shadows" and then, using a soft brush with low opacity, gradually paint over the shadow. It’s perfect for subtly brightening areas without creating harsh, obvious edits.
- Clone Stamp Tool: When you need to completely obliterate a shadow, the Clone Stamp is your best friend. It works by letting you copy pixels from a clean, well-lit part of your image and paint them over the shadow. Just hold down Alt/Option to select your source area, then start painting over the shadow to replace it.
This process definitely requires some patience, especially if you're working on textured surfaces, but it gives you absolute control over the final result. If you're ready to master these skills and more, diving into a detailed guide on product photo retouching can provide a much deeper, step-by-step look. Honing these techniques is invaluable for anyone serious about getting rid of shadows in pictures and achieving truly flawless results.
Using AI to Instantly Get Rid of Shadows in Pictures
While manual editing gives you total control, it’s a luxury most of us in the e-commerce trenches just don't have. When you're juggling inventory, running marketing campaigns, and handling customer service, spending hours tweaking a single photo is completely off the table. This is exactly where AI-powered tools have totally changed the game for fixing shadows in pictures.
Instead of meticulously painting over every dark spot or fumbling with adjustment sliders, you can now let smart algorithms handle the heavy lifting. This new wave of photo editing is built on sophisticated models that analyze your image, figure out the lighting and context, and intelligently wipe out shadows in just a few seconds.
The Power of Automated Shadow Removal
For any busy entrepreneur, the biggest wins from an AI tool are speed and consistency.
Picture this: you've just snapped a hundred product photos with your phone. Editing each one by hand to get that clean, white-background look for Amazon or Shopify would take days. An AI tool can blow through that entire batch in minutes.
The solution is AI-driven shadow removal, which is fueling the AI product photography market's incredible growth—projected to jump from $450 million in 2026 to $5 billion by 2035. Tools like ProdShot automate this tricky task, analyzing light sources and using generative AI to fill in the shadowed areas. It essentially mimics a perfect studio setup without the massive price tag.
This technology doesn’t just brighten shadows; it reconstructs the area underneath. The AI identifies the product's texture and color, then generates new pixels that blend seamlessly, preserving detail that would be lost with manual brightening.
This ensures every single product in your online catalog has that same uniform, high-end look. That kind of consistency is critical for building brand trust and actually competing with the bigger players.
How AI Photo Editors Like ProdShot Work
The whole process is designed to be incredibly simple, no technical skills required. Tools like ProdShot empower you to turn a casual smartphone picture into a polished, sales-ready image.
Here’s a peek at a typical AI editing interface. It's built for speed and simplicity.
The workflow is usually just a simple drag-and-drop. You upload your image and get a professional-looking result almost instantly. This accessibility is what makes AI such a game-changer for sellers of all sizes.
The typical workflow boils down to a few simple steps:
- Upload Your Image: Just start by uploading a product photo straight from your phone or computer.
- AI Analysis: The tool's algorithm immediately scans the image to identify the product, background, and any harsh or unwanted shadows.
- Automatic Enhancement: It automatically removes the background, corrects the lighting, and gets rid of the shadows, placing your product on a clean, professional backdrop.
The result is a studio-quality image that's ready for any marketplace. This automated approach is a lifesaver for sellers who need to pump out high-quality visuals at scale. If you're curious to see how this works with different kinds of products, you can play around with an AI product photo generator to see it in action.
By automating the most tedious parts of photo editing, you get to focus your time and energy where it really matters—growing your business.
Solving Common Shadow Problems in Product Photography

Even after you've set everything up just right, some pesky shadow issues always seem to creep in. It's a universal frustration for product photographers, but the good news is that these common problems have equally common solutions—both on set and in editing.
One of the classic headaches is uneven lighting, which leaves one side of your product looking dark and forgotten. This usually happens when your main light is too direct and you don't have anything bouncing light back to fill in the dark spots.
Another tough one is when shadows fall across products with beautiful textures, like a cozy knit sweater or a piece of rustic wood. A harsh shadow can completely flatten those details, hiding the very thing you're trying to sell. Getting a handle on these scenarios is a huge part of mastering your product shots.
Tackling Shadows on Textured Surfaces
When a shadow slices across a detailed surface, just cranking up the brightness in post-production is a recipe for a washed-out, unnatural-looking mess. The texture just vanishes.
The In-Camera Fix: Your best line of defense here is soft, diffused light. Think big. Use a large softbox or bounce your light off a white wall or a piece of foam board. This wraps the light gently around your product, softening those hard shadow edges while keeping the texture front and center.
The Editing Fix: If you're stuck with a shadow you've already shot, you need a more delicate touch. In Photoshop, I like to create a new layer and grab the Dodge Tool. The key is to set it to a very low opacity—think 5-10%—and gradually paint over the shadow. This brightens it without completely destroying the texture underneath.
The goal isn't to erase the shadow entirely, but to soften it so it's no longer a distraction. A little bit of soft shadow is actually good; it helps define the product's shape and gives it dimension.
Correcting Multiple Overlapping Shadows
If you’ve gone a bit overboard with multiple hard light sources, you can end up with a tangled web of shadows. It looks messy, unprofessional, and can seriously confuse the eye.
The In-Camera Fix: Go back to basics and simplify your lighting. Start with one good main light. If you see areas that are too dark, don't just add another lamp. Instead, use reflectors to bounce your single light source back into those spots. This approach delivers a much cleaner, more natural look every time.
The Editing Fix: Honestly, this is a real pain to fix in post-production. The most reliable method is using the Clone Stamp Tool in Photoshop. You'll have to patiently sample from a clean, non-shadowed area nearby and paint over the extra shadows. It takes a steady hand, especially if your background is anything but plain.
Handling Colored Shadows from Reflective Items
Ever photographed a blue glass bottle and noticed a weird blue tint in its shadow? This happens all the time with reflective or colored items like jewelry and glass. On a clean white background, these colored shadows just look off.
The fix here is all about desaturation. In Lightroom or Photoshop’s Camera Raw filter, grab the Adjustment Brush. Paint a mask directly over the colored shadow, then just slide the Saturation slider all the way to the left. This zaps the color from the shadow without touching the rest of your image. Problem solved.
Your Burning Questions About Shadow Removal
Even with a detailed guide in hand, a few specific questions always pop up. Let's dig into some of the most common ones I hear from photographers and e-commerce sellers trying to master their images.
What Is the Fastest Way to Remove a Shadow from a Photo?
Hands down, the quickest method is using an AI-powered photo editor. These tools can automatically pinpoint and wipe out shadows in a matter of seconds. It's a massive time-saver compared to the painstaking, pixel-by-pixel work you’d have to do in a program like Photoshop. You just upload your image, and the AI does all the heavy lifting.
This speed is a total game-changer for e-commerce sellers. Ever since the massive spike in online shopping back in the 2020s, retailers who haven't embraced AI editing have seen a 15-20% drop in market share. Their competitors are just faster and more polished. As you can see from insights on AI photography stats, AI helps level the playing field, making sure every product looks its best without a huge time sink.
Can I Remove Shadows from a Photo on My Phone?
Yes, you absolutely can. Most modern smartphones have built-in editing tools that get you part of the way there. Both the iPhone's and Android's native Photos apps have a "Shadows" slider that's perfect for brightening up dark spots in a pinch, especially if the original photo was pretty good to begin with.
For those really stubborn shadows or when you need a truly professional finish, AI-driven web tools are your best friend. They’re designed to work flawlessly with phone pictures. You can snap a photo, upload it straight from your phone’s browser, and get a studio-quality shot back in moments.
How Do I Avoid Creating Harsh Shadows in My Photos?
This is where the real magic happens. Preventing shadows in the first place is always the best strategy. The secret? Use a large, soft light source.
Go Natural: An overcast day is your best friend—it’s like a giant, free softbox in the sky. If it's a sunny day, find a large window and place your subject near it, but just out of the direct, intense sunbeams.
Soften Your Lights: If you're using a lamp or a flash, you need to diffuse it. You can use a professional softbox, or just get creative and hang a plain white bedsheet between the light and your subject. It works wonders.
Fill It In: Grab a piece of white foam board or even a sheet of printer paper and use it as a reflector. Bouncing light back into the shadowed side of your product "fills" the darkness and immediately softens the whole look.
Is It Better to Prevent Shadows or Edit Them Out Later?
You should always, always try to get the lighting right during the photoshoot. Preventing harsh shadows from the start saves you a mountain of time in post-production and gives you a much higher-quality, more natural-looking photo to work with. Good lighting captures details and textures that are incredibly difficult, if not impossible, to fake or recover later.
That said, editing is still a vital part of the process. Even with the most perfect lighting setup, tiny imperfections can sneak in. Think of it this way: prevention gets you 90% of the way there, and editing is that final 10% of polish that makes your image shine.
Ready to eliminate shadows from your product photos in seconds? ProdShot uses powerful AI to instantly create flawless, studio-quality images from simple smartphone pictures. Try it for free and see how easy it is to make your products shine.