
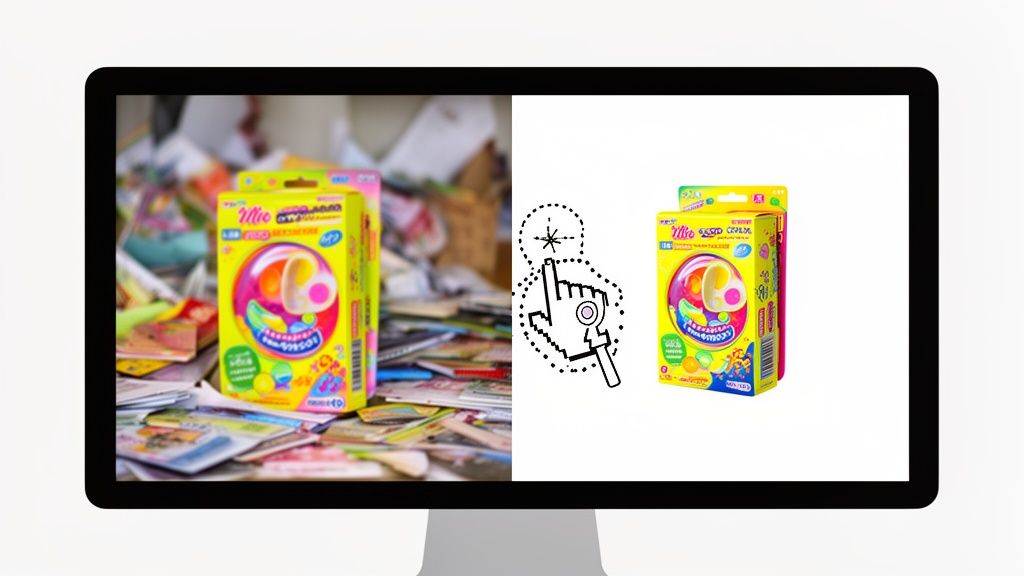
When you need to get rid of a background in Photoshop, the fastest way is usually with its AI tools. Features like Remove Background or Select Subject can do about 90% of the work for you in just a few seconds, intelligently finding your product and wiping the background clean.
Your Quick Guide to Flawless Background Removal
So, you're ready to make your product photos pop and get them ready for your online store. This guide cuts right to the chase, focusing on the most effective ways to remove backgrounds in Photoshop, especially for e-commerce sellers. We'll start with the one-click wonders that deliver great results almost instantly.
Think of this as your cheat sheet for picking the right tool for the job. Whether you’ve got a simple, high-contrast product or something more complex with fuzzy edges, Photoshop has you covered. My goal is to get you from a cluttered photo to a clean, compelling image as fast as possible, without getting bogged down in jargon.
Choosing Your Method: AI vs. Manual
The first decision you'll make is your approach: do you need sheer speed, or do you need absolute precision? For most e-commerce shots—especially clear products on simple backgrounds—Photoshop’s AI is a fantastic choice. It’s built for efficiency.
But when you're dealing with fine details like jewelry chains, fuzzy sweaters, or anything semi-transparent, a manual touch is often the only way to get a truly professional result. This is where you trade a few extra minutes for complete control over the final look.
It's amazing how far we've come. Back when Photoshop first launched in the early 1990s, removing a background was a painstaking manual job that could easily take a designer 45 minutes per image. Now, the AI-powered Remove Background Quick Action does it in seconds, with shockingly good accuracy on the right photos. You can discover more about Photoshop's background removal features and how they've evolved over time.
This simple decision tree shows when to reach for a quick AI tool versus when a more precise, manual method is the smarter play.

The key takeaway here is pretty clear: for well-defined products, let the AI do the heavy lifting. For everything else, the manual tools are your best friends for tackling the tricky stuff.
Knowing which path to take right from the start will save you a ton of time and frustration. Let's break down the main tools at your disposal.
Choosing the Right Photoshop Tool for Your Product
Here’s a quick comparison to help you decide which tool is best for your specific product photo.
| Tool | Best For | Skill Level | Speed |
|---|---|---|---|
| Select Subject | Simple, well-defined products | Beginner | Very Fast |
| Quick Selection + Mask | Soft or complex edges (fur, hair) | Intermediate | Moderate |
| Pen Tool | Hard-edged products (boxes, bottles) | Advanced | Slow |
| Channels | Extremely fine details (hair, glass) | Expert | Slow |
Each tool has its place, and mastering a couple of them will prepare you for almost any challenge.
AI-Powered Tools: These are your go-tos for speed. Think Select Subject and the Remove Background Quick Action. They're perfect for straightforward product shots or when you're processing images in bulk.
Manual Selection Tools: These offer surgical precision for tough images. The Pen Tool is unbeatable for creating clean, crisp lines on hard-edged products, while the Quick Selection Tool combined with the Select and Mask workspace is a game-changer for refining soft edges like fabric or hair.
Understanding the strengths of each will help you build a flexible workflow that can handle any photo you need to edit for your Shopify or Etsy store.
The One-Click Wonders for Instant Results
Let's be honest, sometimes you just need that background gone—now. You don't have hours to trace intricate details with the Pen Tool. You have products to list, and time is money. This is where Photoshop’s AI-powered, one-click tools come in.
Think about that perfect shot of a handmade mug you took, but it's sitting on your cluttered work desk. Or maybe you’ve got a great photo of a model, but the busy background is stealing all the attention from the shirt you’re trying to sell. These are the exact scenarios these tools were built for. They’re designed to intelligently find your subject and separate it from its surroundings in a single click.

The "Remove Background" Quick Action
For the fastest possible result, look no further than the Remove Background button. Photoshop has put this right where you need it, in two easy-to-find spots. With your image layer selected, you’ll see it in the Properties Panel. It also pops up on the Contextual Task Bar—that slick little floating menu that anticipates your next move.
Give it a click, and Photoshop’s AI immediately jumps into action. It scans your image, figures out what the main subject is, and automatically applies a layer mask. The magic here is that it's non-destructive. Your background isn't deleted, it's just hidden, so you can always go back and tweak things. Just like that, you have a clean cutout on a transparent background.
Using Select Subject for a Bit More Control
A close cousin to Remove Background is the Select Subject command. I often prefer this method because it gives me a moment to check the AI's work before committing. You’ll find it in the main Select menu, but it's much faster to just click it on the Contextual Task Bar.
Unlike the all-in-one "Remove Background" action, this command simply draws a selection around your subject—you'll see the classic "marching ants." This is your chance to pause and see if the AI nailed it.
If the selection looks spot-on, the Contextual Task Bar gives you the next logical step: click the "Create Mask" icon. Done. You can also invert the selection to delete the background yourself if you prefer. That extra step is a great little checkpoint, especially with more complex images.
Since Adobe first introduced Select Subject back in 2017, its accuracy has improved dramatically. While it was initially best for people, recent updates have made it incredibly effective for product photos, chewing through huge image files in seconds. It isn't perfect, though. If you're working with a really busy scene, you might still get the dreaded "no subject found" error. It's a common bump in the road when you're learning how to remove a background in Photoshop.
What to Do When the AI Gets It Wrong
So, what happens when the one-click wonder isn't quite wonderful? It happens. The AI might get confused if your product and the background have similar colors, leaving a bit behind or cutting out a piece it shouldn't have.
Don't worry, this is an easy fix. Because these tools use a layer mask, you can simply paint on it to refine the selection.
- Select the layer mask thumbnail (the black and white box) in your Layers panel.
- Grab the Brush Tool (shortcut: B).
- Paint with white to bring back any part of your subject the mask accidentally hid.
- Paint with black to hide any leftover bits of the background.
This little touch-up process is your secret weapon. You get the speed of AI combined with the precision of a final human touch, and it usually takes less than a minute. While Photoshop gives you plenty of powerful tools, other specialized AI tools can also offer quick solutions. For instance, you can learn to easily change background color on AI headshots for different looks.
For entrepreneurs and small business owners who need to process dozens of photos, these AI features are a lifesaver. If you find yourself doing this over and over, you might even consider a dedicated AI product photo generator that can automate this entire workflow. These tools can get you 90% of the way there in a fraction of the time, letting you focus on what really matters: growing your business.
Mastering Manual Selections for Absolute Precision
So, the one-click AI tools got you 90% of the way there, but you’re staring at a fuzzy edge or a weird artifact. This is where the real work begins—and where you get results that look truly professional.
When you need absolute control, you have to roll up your sleeves and get hands-on. We're talking about the kind of pixel-perfect cutouts that make a product photo look like it was shot in a high-end studio from day one. I'm going to walk you through my two go-to methods: the Quick Selection Tool combined with the Select and Mask workspace, and the legendary Pen Tool. The trick isn't just learning how to use them, but knowing when to use them.

Mastering these will prepare you for any background removal challenge you can imagine.
The Quick Selection Tool for Complex Textures
Let’s say you’re trying to cut out a fuzzy sweater or a model with flowing hair. These subjects have soft, tricky edges where a hard line from the Pen Tool would just look wrong and artificial. This is the perfect job for the Quick Selection Tool (Shortcut: W).
Think of this tool as a smart paintbrush. As you click and drag over your product, Photoshop intelligently hunts for the edges based on contrast and texture. It's way faster than tracing by hand and almost always gives you a more natural-looking starting point for softer objects.
Once you’ve got a rough selection, the real refinement starts in the Select and Mask workspace. With your selection active, just hit the “Select and Mask…” button in the options bar up top.
Refining Edges in the Select and Mask Workspace
This workspace is your command center for perfecting tricky selections. The very first thing I always do is head to the Properties panel and change the View Mode. Setting it to "On Black" or "On White" immediately reveals any imperfections, like stray background pixels or spots where the selection bit off too much.
Here are the tools I lean on most in this workspace:
- Refine Edge Brush Tool (R): This is the undisputed star of the show. Just gently paint over those soft or complex edges—think fur, fabric, or hair. The brush works its magic, analyzing the pixels to expertly separate the fine details from the background.
- Brush Tool (B): This is your manual override. It works just like painting on a layer mask. Use it to add large chunks back to your selection (painting with white) or remove them (painting with black).
- Global Refinements: Don’t ignore the sliders in the Properties panel. Feathering can soften the entire edge for better blending, and Shift Edge is fantastic for pulling the selection inward to kill any stubborn background halo.
My most critical final step is always checking the Decontaminate Colors box. This thing is a lifesaver. It finds any color spill from the old background along your selection edge and replaces it with the colors of your subject, instantly cleaning up those ugly fringes.
Before you leave, make sure your Output To setting is on "Layer Mask" and click OK. This keeps your original image intact and gives you a clean, non-destructive cutout you can edit later.
The Pen Tool for Unbeatable Sharpness
Now, let's switch gears. What about a product with clean, defined edges, like a smartphone, a watch, or a glass bottle? For these, there is simply no substitute for the razor-sharp precision of the Pen Tool (Shortcut: P).
Unlike brush-based tools, the Pen Tool creates a vector path—a mathematical line you can edit with perfect smoothness. It definitely takes some practice to get the hang of, but the crisp, clean results are absolutely worth the learning curve.
You start by clicking along your product's edge to place anchor points. For straight lines, it's just a click-click-click process. For curves, you click and drag to pull out "handles" that let you control the bend.
Here are a few pro tips that will make the Pen Tool feel less intimidating:
- Fewer points are better: The key to a smooth, professional path is using as few anchor points as you can. Try to place points only at the start and end of a curve, then adjust the handles.
- Adjust on the fly: Hold Ctrl (or Cmd on Mac) to temporarily switch to the Direct Selection Tool. This lets you move an anchor point or tweak its handles without ever having to switch tools.
- Close the path: After you trace all the way around your object, click back on your very first anchor point to close the path. A small circle icon will pop up next to your cursor, letting you know you’re about to complete the loop.
Once your path is done, open the Paths panel (Window > Paths). With your path selected, just click the "Load path as a selection" icon at the bottom of the panel—it looks like a little dotted circle. This turns your perfect vector path into a perfect selection. From there, pop over to the Layers panel and click the Add Layer Mask icon to finish the job.
This method is the gold standard for high-end commercial product photography. It guarantees every edge is flawlessly crisp, which is non-negotiable for making products like jewelry and electronics look premium.
Advanced Techniques for Tricky Subjects and Fine Details
Alright, let's get into the tricky stuff. We’ve gone through the quick AI-powered tools and the more hands-on manual methods. But what about those images that make you want to throw your mouse across the room?
I'm talking about flyaway hair against a busy background, the tiny links of a silver chain, or the fuzzy edges of a new blanket. These are the details that separate an okay background removal from a truly great, believable one.
When the automated tools just can't cut it and even the Pen Tool feels too clunky, you need a different game plan. This is where we have to dig into the more advanced side of Photoshop, using methods that give you absolute control over those impossible elements. Mastering this is what will really make your product photos stand out.
Unlocking the Power of the Channels Panel
For years, the Channels panel has been the secret weapon for pros who need to make incredibly complex selections, especially for things like hair or semi-transparent objects. It might look a little intimidating at first, but the idea behind it is actually pretty straightforward. It just breaks your image down into its core color data: Red, Green, and Blue.
Your mission is to find the channel with the biggest difference in contrast between your subject and its background. For example, if you're trying to select blonde hair against a blue sky, the Blue channel will probably make the hair look almost black while the sky looks bright white. That high-contrast view is the perfect canvas for an ultra-detailed selection.
- First, pop open the Channels Panel (you can find it under Window > Channels).
- Click through the Red, Green, and Blue channels one by one. You're looking for the one with the most dramatic contrast.
- Once you find it, duplicate that channel by dragging it to the "New Channel" icon at the bottom of the panel. This creates a separate alpha channel where you'll build your mask.
- Now, bring up Levels (Ctrl/Cmd + L) or Curves (Ctrl/Cmd + M). Your goal is to crush the blacks and blow out the whites, pushing the contrast to the extreme until your subject is almost solid black and the background is pure white.
After you've created this high-contrast black and white image, you can load it as a selection and apply it as a layer mask. It’s a classic technique that, even today, delivers some of the best results for impossibly fine details.
A common mistake is trying to make the channel perfect using only Levels or Curves. Don't be afraid to grab a soft black or white brush and paint directly on your alpha channel. Clean up any gray areas inside your subject or background to get a solid, clean mask before you load it as a selection.
When to Use the Background Eraser Tool
The Background Eraser Tool is one of those highly specialized tools that people often misunderstand. It doesn't work like a normal eraser. Instead, it samples the color directly under your cursor the moment you click, and then it only erases that specific color as you drag your mouse.
This makes it incredibly useful for cleaning up stubborn color halos or weirdly complex edges where other tools just make a mess.
Imagine you've cut out a model wearing a green shirt, but there's a faint green glow on her hair from the original background. The Background Eraser is the perfect tool for this fix.
- Set its Limits to "Find Edges" to help protect the sharp lines of your subject.
- Tweak the Tolerance. A lower number, maybe around 20-30%, is perfect for getting rid of subtle color casts without eating into the subject itself.
- Carefully trace along the problem edge. You'll see the tool intelligently remove the background color while leaving the fine hair details intact.
Just be aware, this tool is destructive, so I always, always work on a duplicated layer. It's not the tool for making your main selection, but it's a lifesaver for that final, targeted cleanup where you need surgical precision.
Combining Techniques for Flawless Results
The truth is, a real professional workflow almost never relies on just one tool. The best way to handle a complex image is to combine a few different techniques, using layer masks to blend all the results together without permanently changing your image.
Let's say you have a photo of a person with sharp clothing lines but also soft, windswept hair. Here’s how I would tackle it:
- The Base: I’d start with Select Subject to get a decent base selection and create a layer mask from it. It won't be perfect, but it's a great starting point.
- The Hard Edges: Next, I'd grab the Pen Tool to trace the sharp edges of the clothing. I'll load that path as a selection and, on the layer mask, fill it with white to lock in that perfectly crisp edge.
- The Soft Edges: Now for the hair. I'd jump into the Select and Mask workspace and use the Refine Edge Brush specifically on the hair to pick up all those fine, wispy strands.
- The Final Polish: Finally, I'd zoom way in and use the Background Eraser on a duplicated layer to gently dab away any leftover color fringe that the "Decontaminate Colors" feature might have missed.
By layering these methods, you're using the right tool for the right job. You get the crispness of the Pen Tool for the solid parts and the delicate touch of Refine Edge for the hair. The result is a seamless, professional cutout that no single tool could ever achieve on its own.
Finishing Your Product Photos for E-commerce Success
So, you’ve mastered removing the background. That’s a massive step, but the job isn't quite done. Now comes the polish—the final touches that transform a simple cutout into an image that actually sells. This is where we make your product look like it truly belongs, ready to shine on any e-commerce marketplace.

Once you know how to remove a background in Photoshop, placing your product on a clean white background is standard practice for sites like Amazon. But just pasting the cutout can make it look like a cheap sticker floating in space. The secret to making it look real is grounding it with a believable shadow.
Creating a Natural-Looking Drop Shadow
A good shadow gives your product weight and makes it feel tangible. My advice? Steer clear of Photoshop’s default "Drop Shadow" layer style. It usually looks flat, generic, and screams "I was made in Photoshop!" Creating one manually gives you total control and a much more realistic result.
A simple way to do this is to create a new layer right underneath your product layer. Grab a soft, black brush and set the opacity low—around 15-20% is a good starting point. Then, just paint a small, subtle shadow where the product would naturally touch the surface. Build it up slowly for a soft, diffused look.
For an even more convincing effect, try this: duplicate your product layer, fill it with black, and use the Transform tool (Ctrl/Cmd + T) to skew and warp it into the shape of a cast shadow. After that, just add a Gaussian Blur to soften the edges and lower the layer’s opacity until it looks just right. This method takes a minute longer but the result is incredibly professional.
Exporting Your Images for the Web
How you save your file is just as critical as how you edit it. The right export settings ensure your images look sharp and load fast—a key factor in keeping potential customers from bouncing. Get it wrong, and you risk slow page speeds or pixelated photos.
For all your exporting needs, your best friend is the Save for Web (Legacy) dialog (File > Export > Save for Web). It gives you a fantastic side-by-side preview of your original image next to the optimized version, so you can see the quality changes and the final file size in real time.
A common question I get is whether to use JPG or PNG. The rule is simple: if you need a transparent background, you must use a PNG. If your product is on a solid background (like white), a high-quality JPG will give you a much smaller file size.
The move toward clean, professional product photos has a real, measurable impact. Since e-commerce blew up in the 2010s, study after study has confirmed the power of great presentation. One report even found that product listings with white backgrounds converted 23% higher than those with busy, distracting ones.
JPG vs. PNG: Which Is Best for Your Store?
Let’s break down exactly when to use each file type for your online shop.
- Use PNG-24 When: You need to preserve transparency. This is non-negotiable for placing your product on different colored backgrounds on your site or in marketing ads. Just make sure the "Transparency" box is checked when you export.
- Use JPG When: Your image has a solid background, like pure white. You can play with the "Quality" slider to find that perfect balance between file size and image sharpness. A quality setting between 60-80 is usually the sweet spot for web use.
Once your backgrounds are gone, presenting your products professionally is what drives sales. You can improve Shopify conversion rate with other proven strategies, but it all starts with the visuals. Also, remember that having the right dimensions is just as important as the file type; you can use a quality image resizer to get your photos perfectly sized for any marketplace without losing quality.
Common Questions About Photoshop Background Removal
Even with the best tools, you’re bound to hit a few snags. We’ve all been there—staring at the screen, wondering why a tool just isn’t cooperating when a deadline is breathing down your neck.
Learning how to remove backgrounds in Photoshop is as much about troubleshooting as it is about technique. Let's tackle the questions that pop up most often so you can get back to creating.
Why Does Photoshop's Remove Background Tool Fail?
This is a classic. You click the button, and… nothing happens, or you get a jumbled mess. Low contrast between your subject and the background is almost always the culprit. If your white product is sitting on a light gray table, Photoshop's AI gets confused.
Other common issues are overly busy backgrounds or having your product be too small in the frame. The AI just doesn't have enough information to make a good decision.
A quick fix is to give the AI a hint. Grab the Object Selection Tool and draw a rough outline around your product before you hit "Remove Background." This little bit of guidance is often all it needs. If that still doesn't cut it, it's time to fall back on a more manual method like the Quick Selection Tool.
It's easy to think AI tools should just work perfectly, but they're more like powerful assistants than magic wands. A little bit of human guidance, like a quick pre-selection, can be the difference between a one-click success and total failure.
What Is the Best Way to Handle Hair or Fur?
Ah, hair and fur—the ultimate test of any background removal skill. For anything with soft, complex edges, the Select and Mask workspace is your best friend. It’s non-negotiable for this kind of work.
After you’ve made a rough initial selection, pop open that workspace and find the Refine Edge Brush. Gently paint along the fuzzy edges of the hair or fur. You'll see Photoshop work its magic, intelligently separating those fine strands from the background with stunning accuracy.
A couple of pro tips to nail it every time:
- Switch Your View Mode: Toggle the view to "On Black" or "On White." This makes any lingering halos or missed spots jump right out at you.
- Use Decontaminate Colors: Before you finish, always check this box. It’s crucial for removing that subtle color bleed from the old background, giving you clean, natural-looking edges.
How Do I Save an Image with a Transparent Background?
To preserve that transparency you worked so hard for, you have to save your image in the right format. PNG is the web standard for a reason. If you try to save an image with a transparent background as a JPG, Photoshop will automatically fill the background with solid white.
The best practice is to go to File > Export > Save for Web (Legacy). From there, choose the PNG-24 preset from the dropdown menu and make absolutely sure the "Transparency" box is checked. This ensures your product photo can be placed on any website or marketing graphic without that dreaded white box.
Is There a Faster Way for Hundreds of Product Photos?
Yes, but the answer probably isn't inside Photoshop. While you can build "Actions" to automate tasks, they're notoriously brittle. They tend to fail the moment an image has slightly different lighting, positioning, or even a different product type.
For high-volume e-commerce work, a dedicated AI tool is infinitely more efficient and reliable. If you're wrestling with a large inventory, our professional product photo editing services are built to handle this exact problem at scale. These kinds of specialized tools are designed for bulk processing, churning through hundreds of images in minutes with consistent, high-quality results.
For a truly automated workflow that transforms simple smartphone photos into studio-quality images in seconds, ProdShot is the answer. Skip the manual editing and get consistent, conversion-ready product photos for your e-commerce store instantly. Discover how ProdShot can save you time and money.