
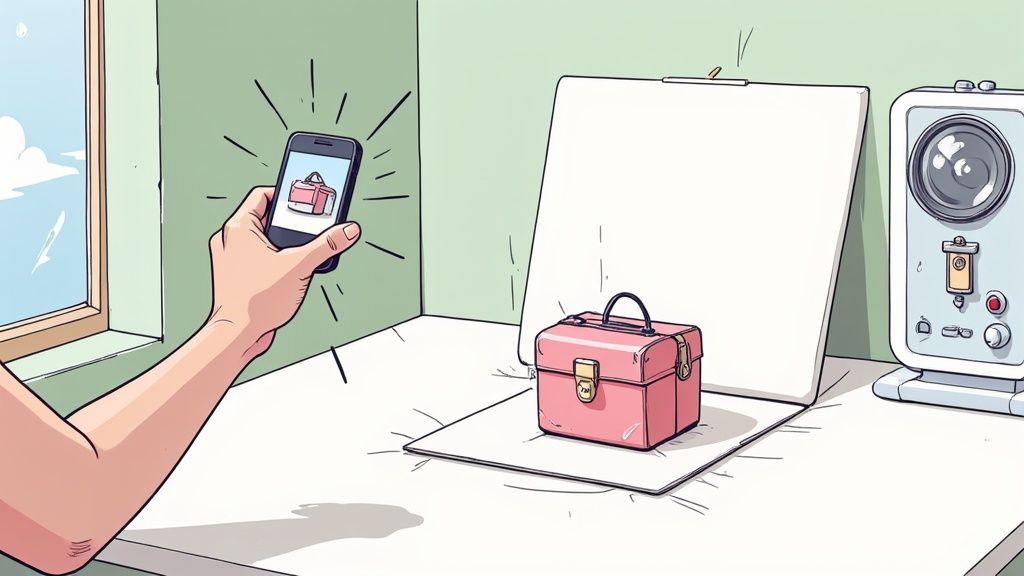
Forget about your camera for a minute. The real secret to taking amazing product photos happens before you even think about hitting the shutter button.
If you can nail just three things—soft, natural light from a window, a clean, non-distracting background, and a spotless, well-prepped product—you're already 80% of the way to a professional shot. Get these fundamentals right, and everything else falls into place.
Preparing Your Scene for Picture-Perfect Shots
We've all seen them: product shots that just look… off. More often than not, the problem isn't a bad camera, it's bad prep. The work you do now is what separates amateur-looking photos from the crisp, clean images that actually drive sales.
Skipping these steps means you'll be fighting an uphill battle in the editing phase, trying to fix problems that were completely avoidable. Let's break down the setup into three core areas: mastering your light, choosing the right background, and making your product look absolutely pristine.
This simple flowchart lays out the entire process. Think of it as your foundation.
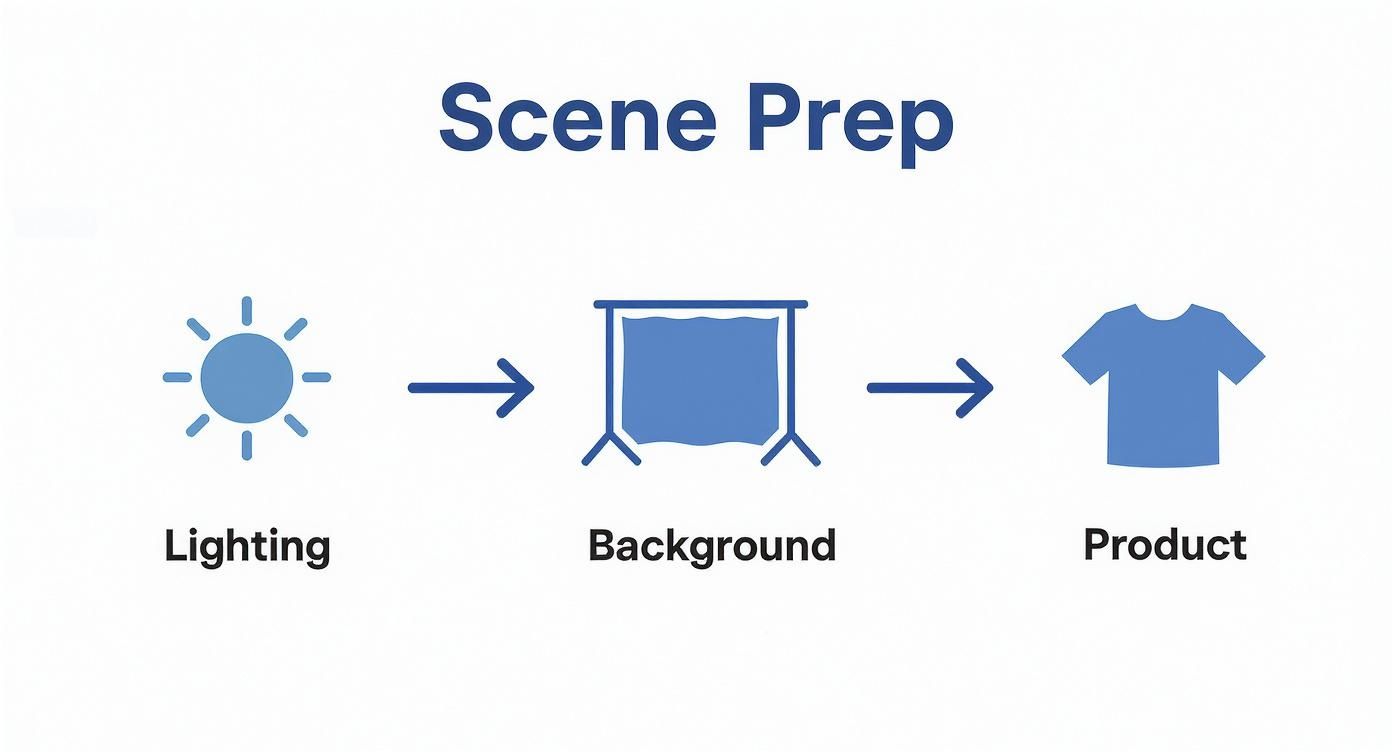
Each step builds on the last, creating the perfect stage for your product to shine.
Master Your Lighting Setup
Good lighting is everything in product photography, and thankfully, you don't need a pro studio to get it. Your most powerful tool is right in your home: a large window with plenty of indirect sunlight.
Set up your shooting surface next to the window, but make sure it's not in the path of harsh, direct sunbeams. What you're after is soft, diffused light that gently wraps around your product. An overcast day is your best friend here—the clouds act like a massive, free softbox, evening out the light and killing harsh shadows.
Pro Tip: Grab a cheap white foam board from any craft store. This will be your reflector. Just prop it up on the side of your product opposite the window. It will bounce light back into the shadows, instantly making your photo look more balanced and professional. It’s the single best trick in the book.
Choose a Clean and Consistent Background
Your background should make your product the hero, not steal the show. For most e-commerce sites like Amazon or Shopify, a clean white background is the gold standard.
An easy way to do this is with a "sweep." Just take a large piece of white poster board and curve it from the wall down and under your product. This creates a seamless, infinity-style backdrop without any distracting corners or harsh lines.
If you're shooting lifestyle photos, the background becomes part of the story. A rustic wooden surface might be perfect for handmade soap, while a sleek marble slab could elevate a luxury cosmetic. If you need some ideas on how to create compelling scenes, our guide on shooting home decor product photos has plenty of inspiration.
Meticulously Prep Your Product
This last step is so simple, but it’s amazing how many people skip it. No amount of editing can easily fix fingerprints, smudges, or dust. Before you place your product down, give it a final, thorough cleaning.
- For hard goods: Wipe everything down with a microfiber cloth. A can of compressed air is fantastic for blasting dust out of tiny nooks and crannies.
- For clothing: It absolutely must be steamed or ironed. Wrinkles scream amateur. Run a lint roller over it one last time right before you shoot.
- For jewelry: Always handle it with cotton gloves to prevent smudges, and give it a final polish so it really gleams.
This level of detail directly impacts how customers perceive your brand's quality. Remember, an incredible 90% of online shoppers say photo quality is the most important factor in their decision to buy. It's not just about making things look pretty; it's about building trust and driving sales.
To help you keep track of everything, here's a quick checklist you can run through before every shoot.
Essential Product Photography Prep Checklist
This table breaks down the crucial prep work into simple, repeatable steps. Follow it every time, and you'll build the muscle memory for creating a perfect shooting environment.
| Preparation Step | Why It Matters | Pro Tip |
|---|---|---|
| Set Up Near a Window | Provides soft, natural, and free lighting that makes products look their best. | Shoot during the day on an overcast day for the most diffused, flattering light. |
| Use a White Reflector | Fills in dark shadows, creating a more balanced and professional-looking image. | A simple white foam board or even a piece of printer paper can work in a pinch. |
| Create a Clean Background | Keeps the focus entirely on your product without any visual clutter or distractions. | For a seamless white background, use a paper "sweep" that curves up behind the product. |
| Clean Your Product | Removes dust, smudges, and fingerprints that are difficult and time-consuming to edit out later. | Use a microfiber cloth for surfaces and canned air for hard-to-reach spots. |
| Steam/Iron Apparel | Wrinkles and creases look unprofessional and can distract from the product's quality and fit. | Have a lint roller handy and give the item a final once-over right before shooting. |
Committing these simple steps to memory will dramatically improve the quality of your raw photos, making the rest of the process—from shooting to editing—faster, easier, and far more effective.
Using Your Smartphone Camera Like a Pro
That powerful camera sitting in your pocket is an incredible tool. But right out of the box, its default settings are designed for snapping casual photos of friends and sunsets, not for creating images that actually sell products. To get results that look truly professional, you have to ditch the "point-and-shoot" mentality and take a little manual control.
Don't worry, this is easier than it sounds. Mastering just a few key settings will completely transform your phone into a legitimate business tool.

These simple techniques don't require any special apps. They'll immediately elevate the quality of your shots, giving you the sharp, consistent look you need for a killer online storefront.
Activate Gridlines for Better Composition
The first and easiest tweak you can make is to switch on your camera's gridlines. This simple feature overlays a 3×3 grid on your screen, and trust me, it’s a game-changer for composition.
The grid instantly helps you keep your product perfectly centered and your shots level. No more that slightly crooked, amateur look. It’s also your secret weapon for applying the Rule of Thirds. This classic photography principle shows that placing your subject along the gridlines or at their intersections often creates a more dynamic and visually interesting photo than just sticking it in the middle every time. For your main "hero" shot, centered is often best, but for lifestyle or detail photos, the Rule of Thirds adds a professional touch.
Lock Your Focus and Exposure
Ever line up the perfect shot, only for the lighting or focus to shift unpredictably the second you tap the shutter button? That's your phone’s camera trying to be "helpful" by constantly auto-adjusting. For product photography, where consistency is king, this is a total disaster.
The fix is incredibly simple: tap and hold on your product on the screen. After a moment, you'll see a little box or a message like "AE/AF Lock" pop up. This locks the Auto Exposure (AE) and Auto Focus (AF) right where you want them. Now you can move the phone slightly to perfect your framing, and the brightness and focus point won't budge. This one trick is absolutely essential for shooting a consistent series of photos.
By locking focus and exposure, you take creative control back from the camera's algorithm. This ensures every photo in your product gallery has the same brightness and sharpness, which is essential for building a cohesive and professional brand aesthetic.
Never Use the Digital Zoom
This is a hard and fast rule. When you pinch to zoom on your phone, you aren't using a real optical lens to get closer. You’re just telling the software to crop the image and blow up the pixels, which absolutely destroys the image quality. The result is always a grainy, pixelated photo that screams unprofessional.
If you need a closer shot, physically move the camera closer to the product. It's that simple. This preserves the full resolution of your camera's sensor, giving you a crisp, clear image that you can crop later in editing if you really need to. Starting with high-quality raw data is non-negotiable.
Experiment with Different Camera Angles
The angle you choose dramatically changes how a customer sees and understands your product. Sticking to one boring, head-on shot is a huge missed opportunity to tell a complete visual story. You need to capture your product from several key perspectives to give shoppers the confidence to click "buy."
Here are the essential angles you should master:
- Eye-Level Shot: This is your classic, straightforward view, showing the product as if it were sitting on a table in front of you. It’s perfect for your main hero image.
- High Angle (45-Degree): Shooting from slightly above the product is incredibly flattering and often reveals important details about its surface, shape, and top.
- Top-Down (Flat Lay): Also called a "bird's-eye view," this is fantastic for arranging items like clothing, accessories, or kits in an artistic composition. It’s a clean, modern look that performs great on social media.
- Low Angle: Shooting from slightly below can make a product feel more significant, impressive, or "heroic." This works wonders for things like sneakers, electronics, or anything you want to portray as powerful.
Once you get these fundamental camera controls down, you’ll be able to capture your products with the clarity and professional appeal needed to stand out and compete in any online marketplace.
Building a Product Photography Shot List That Sells
Having a consistent setup and solid camera technique is only half the battle. The other half is strategy. Just snapping a few random pictures and hoping for the best won’t cut it; you need a plan. A well-thought-out shot list is your roadmap to capturing every angle and detail a customer needs to see, answering their questions before they even think to ask them.
Think of your product gallery as your best, most reliable salesperson—the one who works 24/7. Its job is to build trust, showcase the quality of your work, and help the customer truly visualize the product in their own life. If you just wing it, you'll end up with an inconsistent gallery that doesn't tell a complete story, which is a fast track to hesitation and lost sales.
This strategic approach is how you turn good photos into images that actively move products off your shelves.
The Essential Hero Shot
First things first: every single product needs a "hero shot." This is your main image—the one that shows up in search results and acts as the thumbnail on your product page. It needs to be a crystal-clear, perfectly lit photo of your product against a clean, non-distracting background. Most of the time, pure white is your best bet.
The hero shot has one simple, crucial job: show the entire product accurately and attractively. Keep it simple, keep it centered, and leave out any props that might create confusion. This is the image that makes the first impression, so it has to be flawless.
Showcasing Details with Close-Up Shots
Okay, so they've clicked. Now they want to get a closer look and inspect the quality. This is where your detailed close-up shots (sometimes called macro shots) earn their keep. These images are your chance to highlight the specific features that justify your price point and set you apart from everyone else.
- Selling clothes? Get in close on the fabric's texture, the quality of the stitching, or the detail on a button.
- Listing jewelry? Show off the intricate metalwork, the clarity of a gemstone, or the design of the clasp.
- Got electronics? Zoom in on the ports, the feel of the buttons, or any unique design elements.
These shots build a massive amount of trust because they prove you have nothing to hide. You're letting the customer virtually "touch" the product and examine its craftsmanship up close.
Your product photos should preemptively answer every question a customer might have about its size, texture, and features. The more visual information you provide, the lower the barrier to purchase and the less likely a customer will be to return the item.
Creating Context with Lifestyle Photos
While clean background shots are non-negotiable for clarity, lifestyle photos are what forge an emotional connection. These are the images that show your product in a real-world setting, helping customers actually imagine themselves using it.
A photo of a ceramic mug on a plain white background is informative, sure. But a photo of that same mug filled with steaming coffee, sitting on a cozy wooden desk next to a book? That tells a story. It sells an experience, not just an object.
These in-context shots are absolute gold for social media and email marketing because they feel more authentic and relatable.
Capturing Multiple Angles and Scale
A single hero shot just isn't enough to give a customer a complete picture. You have to shoot your product from multiple angles to provide a full 360-degree understanding.
Essential Angles to Capture
- Front: This is your primary hero shot.
- Back: Don't forget to show what's on the reverse side.
- Sides (Left and Right): These reveal the product's profile and depth.
- 45-Degree Angle: A classic, flattering view that often shows the top and side at once.
- Top-Down (Flat Lay): This is perfect for things like apparel, accessories, and product kits.
Just as important is the scale shot. This image visually communicates how big or small the product is. You can do this by placing it next to a universally recognized object (like a quarter for tiny items) or, even better, by showing it in someone's hand. This one simple shot dramatically reduces customer uncertainty and can slash your return rates from "it was bigger/smaller than I thought" complaints.
Top e-commerce brands use an average of 8 images per product to give this comprehensive view, often mixing in model shots and flat lays for a complete picture. You can dig into more e-commerce image trends on pixelphant.com to see what's working for the big players.
Polishing Your Shots with Modern AI Tools
Taking the picture is just the first half of the battle. The real magic—the part that turns a decent smartphone photo into a professional, sales-driving image—happens in the edit. This is where you clean up imperfections and create a polished, consistent look that builds trust with your customers.
You can get started with some quick fixes right on your phone, but the real power move for e-commerce sellers is combining those basic tweaks with a smart AI photo editor. This hybrid approach saves a ton of time and delivers killer results, no graphic design degree required.
Let's walk through it, starting with the simple stuff on your phone before diving into the AI workflow.
Quick Fixes on Your Phone
Before you even transfer your photos, your phone's built-in editing app has a few essential sliders that can make an immediate difference. We're not talking about adding cheesy filters; this is about subtle corrections for clarity and accuracy.
Zero in on these three settings first:
- Brightness (or Exposure): If your shot is a little too dark or blown out, a gentle adjustment here is your first stop. The key is to be subtle. Go too far, and you'll lose important details in the highlights or shadows.
- Contrast: This slider controls the difference between the light and dark parts of your image. Bumping it up just a bit can make your product "pop," adding a sense of depth by making the brights brighter and the darks darker.
- White Balance (often called Temperature or Tint): This might be the most important adjustment for product photos. If your "white" background has a yellow or blue tint from your lighting, this tool is how you fix it. Your goal is to make the whites look truly white, so your product colors are accurate.
Getting these basics right gives you a clean, solid foundation to work from, which makes the next step with AI tools even more powerful.
Supercharge Your Workflow with an AI Photo Editor
Not long ago, tasks like cutting out a background or perfecting the lighting were a massive headache. It meant hours of tedious work in complex software like Photoshop. Today, AI-powered tools like ProdShot have completely changed the game, automating the entire process so you can get professional results in seconds.
These platforms are built for one purpose: helping e-commerce sellers create images that actually convert. And that matters. The e-commerce product photography market is exploding for a reason—great images sell more stuff. In fact, 50% of online shoppers say they're more likely to buy products that are shown with large, high-quality images. AI makes that level of quality accessible to everyone, not just big brands with big budgets.
AI editors automate the grunt work—like background removal and shadow creation—so you can focus on what actually moves the needle: growing your business. You get the look of a professional studio shoot without the studio, the photographer, or the pricey software.
One-Click Background Removal and Replacement
For most sellers, the single biggest time-saver is instant background removal. Marketplaces like Amazon and Shopify don't just prefer a clean white background; they often require it.
Instead of trying to trace your product with a clunky selection tool, you can just upload your photo and let the AI handle it. The technology is smart enough to identify the product and erase the background with incredible precision, even around tricky spots like fuzzy sweaters or intricate jewelry. From there, you can drop in a perfect white background or even generate a custom lifestyle scene. If you want to see it in action, you can play around with an AI product photo generator and see for yourself.
This is a perfect example of how an AI tool can take a simple photo and instantly make it look like a high-end catalog shot.
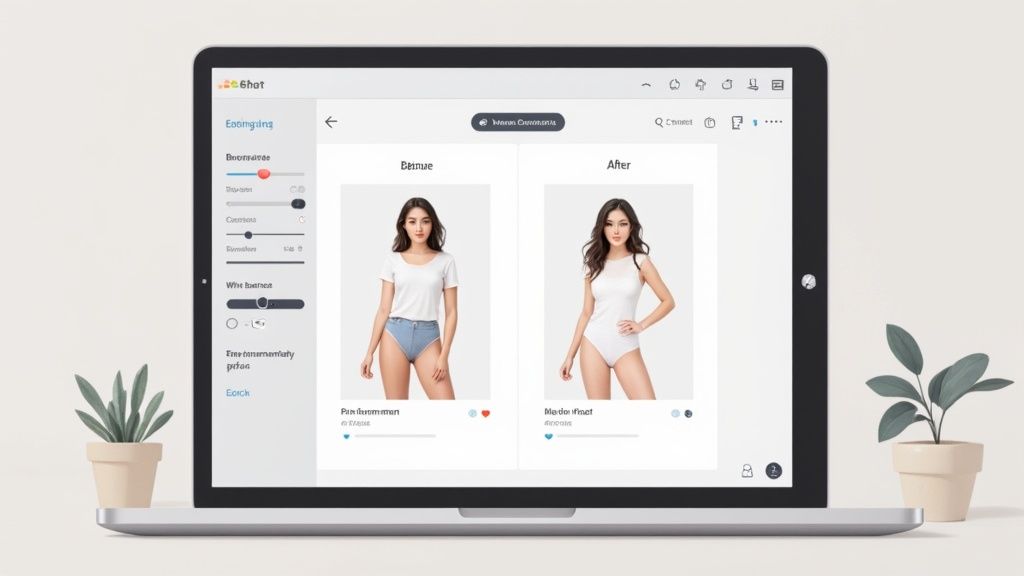
You can see how the AI didn't just remove the background—it also subtly corrected the lighting and made the colors pop, creating a much more appealing final image.
Intelligent Lighting and Shadow Enhancement
Great lighting is what separates amateur photos from professional ones, but it’s tough to nail in a DIY setup. This is another area where AI shines. These tools can analyze your photo and apply smart lighting adjustments to make it look like it was shot by a pro.
Here’s what these tools can do in a click:
- Fix Uneven Lighting: Smooth out any distracting bright spots or lighten up dark corners for a clean, balanced look.
- Enhance Colors: Correct any color casts to ensure the product in the photo perfectly matches the product in real life. This is huge for reducing returns.
- Add Realistic Shadows: A product just floating on a white background can look fake and flat. AI can generate soft, natural-looking drop shadows that give the item a sense of weight and make it feel grounded in the space.
This kind of polishing used to take serious skill and a lot of time. Now, you can do it automatically, ensuring every single product in your store looks consistent and high-end. And if you're looking to streamline your entire marketing workflow, you can find more tips on AI social media content creation to see how these tools can help beyond just product photos.
Final Checks Before Publishing Your Images
You’ve done the hard work. You shot, edited, and polished your images until they shine. They look amazing on your screen, but that "publish" button is the final moment of truth.
This last-minute review is your best defense against those tiny mistakes that can sink your sales—from photos that look blurry on a phone to getting flagged by a marketplace for a technical violation.
Taking a few minutes for a quick pre-flight check ensures every photo is optimized, compliant, and ready to turn shoppers into buyers. Think of it as quality control for your most important sales tool. It protects your brand’s reputation and saves you the headache of re-uploading everything later.
Verify Marketplace Image Requirements
Every e-commerce platform plays by its own rules, and product images are no exception. If you ignore their guidelines, you risk having your listings buried or even taken down. Before you upload a single file, you absolutely have to confirm your images meet the standards for where you're selling.
These rules usually boil down to a few key things:
- Resolution: Marketplaces insist on high-resolution photos so customers can zoom in and see the details. The common minimum is 1000 pixels on the longest side, but I always recommend aiming for 2000 pixels or more just to be safe.
- Aspect Ratio: This is just the shape of your image—the ratio of width to height. While some platforms are flexible, many prefer a classic square (1:1) or a slightly taller rectangle (like 4:5 for Instagram).
- File Type: JPEG (.jpg) is the gold standard here. It gives you a great balance of image quality and a small file size that loads quickly. PNGs are useful if you need a transparent background, but for your main product shots, stick with JPEG.
- Background: This one is a big deal. Amazon, for example, has a non-negotiable rule for a pure white background (#FFFFFF) on all main "hero" images. No exceptions.
After getting your images looking just right, it’s a great idea to pair them with powerful eBay listing optimization tactics to make sure they grab attention. If you find your images don't quite meet the size requirements, don't panic. You can learn more about how an online image resizer can quickly get your files perfectly formatted.
Marketplace Image Specification Quick Guide
Navigating the different rules for each platform can be a pain. Here’s a quick-reference table to help you keep the main ones straight.
| Platform | Minimum Resolution (pixels) | Recommended Aspect Ratio | Background Requirement |
|---|---|---|---|
| Amazon | 1000px on the longest side | 1:1 (Square) | Pure white for main image |
| eBay | 500px on the longest side | 1:1 (Square) | Clean, uncluttered |
| Shopify | Up to 4472 x 4472px | 1:1 (Square) recommended | Varies by theme |
| Etsy | 2000px on the short side | 4:3 or 5:4 | No strict requirement |
Remember, these are just general guidelines. Always double-check the latest requirements directly on the platform, as they can and do change.
The Final Quality Assurance Checklist
Once you've confirmed your images are technically compliant, it's time for one last look with a critical eye. Run through this checklist for every single product to catch any issues that might have slipped through.
Consistency Across the Set
- Do all the images share the same lighting and color tone?
- Is the cropping and framing consistent from one photo to the next?
- Does the product look like it's the same size and in the same spot in similar shots?
A cohesive product gallery isn't just about looking pretty—it builds subconscious trust. When your photos look like they belong together, it tells the customer you’re a professional who cares about quality, and they'll transfer that feeling to your product.
Color Accuracy and Product Representation
- Does the color of the product in the photo perfectly match the real thing? This is huge. Mismatched colors are one of the biggest reasons for returns.
- Are all the important features, details, and textures clearly visible?
- Is there anything in the photo that could be misleading? Watch out for props that a customer might think are included.
Mobile and Desktop Viewing Experience
- Pull up your images on a big desktop monitor and on your smartphone. How do they look on both?
- Is the product still clear and easy to identify when it's shrunk down to a tiny thumbnail on a mobile search page?
- Does the image load quickly? A file that's too large will cause lag and make people click away.
Going through this final review is what separates amateur sellers from the pros. It guarantees that every customer, on every device, sees your product in the best possible light—and that’s the entire point of learning how to take great product pictures that actually sell.
Got Questions? We've Got Answers.
Even with the best guide in hand, you’re bound to hit a few snags. It's just part of learning something new. Getting straight answers to common sticking points is the fastest way to build your skills and, just as importantly, your confidence.
Let's walk through some of the most frequent questions I hear from sellers who are just starting to shoot their own products. These are the hurdles almost everyone stumbles over, and knowing the fix will save you a world of frustration.
What's the Best Lighting if I Don't Have Pro Gear?
Hands down, the best and cheapest light source is the one coming through your window. You don't need a single piece of fancy equipment to get beautiful, soft, diffused natural light.
Just set up your product near a large window. The ideal time is on a slightly overcast day or when the sun isn’t blasting directly through, which creates harsh, distracting shadows and hot spots. If the sun is too strong, just hang a thin white bedsheet over the window. Seriously. You’ve just made a giant, free softbox that will wrap your product in gentle, flattering light.
Here's a pro tip that costs next to nothing: Grab a white foam board or even a clean sheet of printer paper. Prop it up on the side of your product opposite the window. It will bounce light back, filling in the shadows. This one tiny move makes a massive difference, giving you a much more balanced and professional-looking shot.
How Do I Get That Pure White Background?
This is a big one. That perfect, crisp, #FFFFFF white background you see on major marketplaces is almost always achieved in post-production, not in-camera. While you should absolutely start with a physical white background like a poster board or seamless paper sweep, trying to light it to pure white in your shot will almost always overexpose your actual product.
The most efficient way to handle this is with software. Once you’ve taken a clean photo, upload it to an AI-powered tool. These programs are brilliant at detecting the subject and swapping out the real-world background for a perfect, compliant white one in seconds. It's faster, more consistent, and will save you from pulling your hair out.
How Many Photos Should I Take of Each Product?
You're aiming for a sweet spot of 5-8 photos per product. A single "hero" shot just doesn't cut it anymore. Your goal is to give the customer a complete visual tour that answers their questions before they even think to ask them.
A solid shot list for every item should look something like this:
- The Hero Shot: A clean, full view of the product, front and center.
- Multiple Angles: Show the front, back, both sides, and a nice three-quarter (45-degree) angle.
- A Detail Shot: Get in close. Show off the texture, the quality of the stitching, a specific feature—whatever makes it special.
- An In-Context Shot: Help the customer visualize it in their life. Show your product being used or styled in an appealing scene.
- A Scale Shot: This is crucial for managing expectations. Show the product in someone’s hand or next to a common object (like a coin or phone) so its size is immediately obvious.
Providing this level of detail has been proven to slash return rates from customers who said the item "wasn't as described." You're giving them all the visual info they need to click "buy" with total confidence.
Ready to skip the tedious editing and create stunning, marketplace-ready images in seconds? ProdShot uses powerful AI to automatically remove backgrounds, enhance lighting, and generate professional product photos from your simple smartphone pictures. Try ProdShot for free and see how easy it is to elevate your brand.