
Getting your product photos right comes down to four key things: a strategic setup, flattering lighting, compelling angles, and efficient editing. Nail these, and even your smartphone can produce images that drive sales and build serious customer trust.
It’s a simple formula, but it works.
Why Great Product Photos Are Non-Negotiable
Let's be real—in a packed online marketplace, a blurry, poorly lit photo is an instant dealbreaker. Your product images are your digital storefront window. They're often the first, and maybe only, chance you get to grab someone's attention and convince them your product is the one.
This isn't just about looking pretty. It's about building immediate trust.
High-quality visuals bridge that gap between the screen and real life. They let shoppers zoom in on details, get a feel for the size, and picture the product in their hands. What used to be a "nice-to-have" is now a core part of selling online. In fact, a whopping 90% of online shoppers say photo quality is the single most important factor when they’re deciding to buy.
The Myth of the Expensive Studio
So many sellers get stuck thinking they need a fancy DSLR, complicated lighting rigs, and a dedicated studio to get that professional look. This is one of the biggest myths holding e-commerce brands back.
While the cost of professional product photography can add up, the truth is the powerful camera you already carry in your pocket is more than capable of producing incredible, sales-driving images.
The secret isn’t in the gear; it's in the technique. Once you understand the fundamentals of lighting, composition, and editing, you can create a repeatable system for capturing amazing photos without breaking the bank.
This guide is your roadmap. We’ll break down the entire process, showing you exactly how to take professional-quality pictures with just your smartphone.
Here's a quick look at what we'll cover to get your photos looking sharp and professional.
Core Elements for Professional Smartphone Product Photos
| Element | Why It Matters | Quick Tip |
|---|---|---|
| Planning & Styling | Creates a consistent look and tells a compelling story about your product. | Create a simple shot list before you start to ensure you capture every important angle. |
| Lighting & Composition | Good lighting highlights product features, while strong composition draws the eye. | Shoot near a window during the day for soft, natural light that's super flattering. |
| Camera Settings & Shooting | The right settings ensure your photos are sharp, clear, and perfectly exposed. | Always tap your phone screen on the product to lock focus and adjust the brightness. |
| Editing & Optimization | Polishing your photos makes them look professional and ready for any marketplace. | Use an AI tool to instantly remove the background for a clean, consistent look. |
By mastering these four areas, you’ll have the skills and confidence to turn your product listings from amateur to absolutely irresistible.
You’ll learn how to:
- Plan and Style: Put together a shot list that tells a complete product story and choose props that add value, not clutter.
- Master Lighting and Angles: Use natural light and a few simple tricks to make your products look their absolute best.
- Shoot Like a Pro: Tweak key smartphone camera settings to make sure every shot is crisp, clear, and perfectly lit.
- Edit Efficiently: Use AI-powered tools like ProdShot to handle background removal, lighting tweaks, and marketplace optimization in just a few clicks.
By the end, you'll be ready to create images that don't just look good—they'll drive traffic, boost your conversion rates, and help you grow your business.
Planning Your Photoshoot for E-Commerce Success
Here’s a little secret from the trenches: a killer product photo happens long before you even touch your phone’s camera. The real magic is in the prep work. This is what separates a professional, money-making image from a quick snapshot that gets ignored.
Before you start worrying about lights and angles, you need a solid game plan. What story are you trying to tell with your images? What specific shots do you need to tell it well? A bit of forethought here will save you from the massive headache of having to do reshoots later.
Think of this planning phase as building the foundation for a product gallery that walks your customer from "Ooh, what's that?" straight to checkout.
Build a Practical Shot List
First things first, you need a shot list. This isn't just a boring to-do list; it's the blueprint for your product's visual story. A good shot list makes sure you capture every single angle and detail a customer would want to see if they were holding the product in their own hands.
Remember, one photo can't do all the work. Your entire gallery needs to work together to answer every potential question a buyer might have. For most online stores, aiming for 5-8 images per product is the sweet spot.
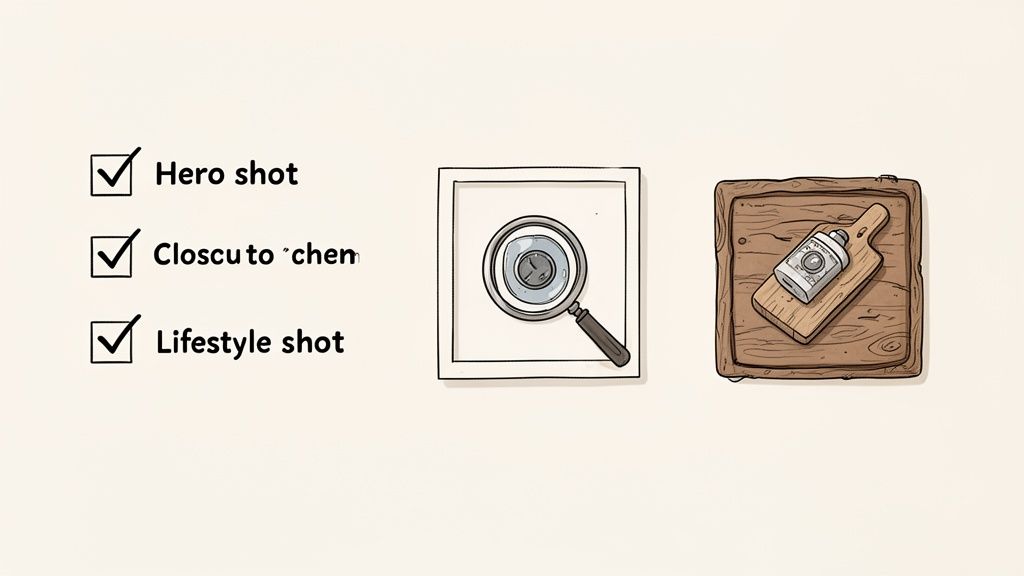
Here’s what your shot list absolutely must include:
- The Hero Shot: This is your main event, the star of the show. It’s a crystal-clear, perfectly lit photo of your entire product, almost always on a clean white background. No distractions, just the product.
- Alternate Angles: You need to show the product from the side, the back, the top, and maybe a nice 45-degree angle. This gives customers a true 360-degree feel for the item.
- Close-Up Shots: Get in there and zoom in on the good stuff—the texture of the fabric, the quality of the stitching, a unique logo, or the materials used. This is how you scream quality.
- Scale Shot: Give people an instant sense of size by placing the product next to something universal, like a coffee mug, a coin, or even in someone's hand.
- Lifestyle or In-Context Shot: Show your product in the wild! A necklace being worn, a skillet on a stovetop, or a backpack on a hiking trail. This helps customers imagine it in their own lives.
A well-planned shot list is your roadmap. It saves you from that sinking feeling when you realize you forgot to take a picture of the back of the product and have to set everything up all over again.
Choose Backgrounds and Props That Elevate
With your shot list locked and loaded, it’s time to think about styling. Your background and any props you use are there to make your product look even better, not to steal the spotlight. The goal is to create a scene that fits your brand and makes the product irresistible.
For your main hero shots, a simple, seamless white background is the industry standard for a reason. It’s what marketplaces like Amazon require, and it works because it puts 100% of the focus on your product. You can pull this off easily with a big sheet of white poster board curved up against a wall.
When it comes to your lifestyle and detail shots, you can get a little more creative.
- Shooting artisan bread? A rustic, weathered wooden board adds warmth and an organic vibe.
- Selling luxury skincare? A slab of cool marble or slate instantly communicates sophistication.
- Photographing handmade jewelry? A soft piece of linen or velvet can create a gentle, textured backdrop.
The main rule is to keep it simple. Props should add context, not clutter. A few coffee beans scattered near a bag of gourmet coffee? Perfect. A random, out-of-place succulent? Not so much. Every single thing in the frame needs to have a purpose. This is a huge part of learning how to take professional product pictures that actually sell.
And if you’re dealing with a massive catalog, check out our guide on batch processing product photography for 1000 items to keep your styling consistent and efficient.
Mastering Your Smartphone Camera and Lighting
Okay, the planning is done. Now it's time to get your hands dirty and start shooting. You don't need to read a dense DSLR manual or have a photography degree to pull this off. It's all about understanding the powerful little camera in your pocket and learning how to work with the light around you.
The single biggest thing separating an amateur snapshot from a professional photo is lighting. And lucky for us, the best light source you can find is completely free: a window.
Create a Foolproof Lighting Setup
If you want that soft, flattering light you see in high-end product listings, you have to avoid harsh, direct sunlight. It creates ugly, sharp shadows that hide important details and blow out your colors. Your real goal is to find soft, diffused natural light.
The sweet spot? A table set up right next to a large window, ideally on a slightly overcast day. If the sun is beaming, no problem—just soften that light by hanging a thin white sheet or a sheer curtain over the window. This instantly turns your window into a massive diffuser, spreading the light evenly over your product.
Now, let's talk about those shadows.
- Position Your Product: Place your product on its background so the window light hits it from the side, at roughly a 90-degree angle. You'll immediately see one side is beautifully lit, but the other is cast in shadow.
- Bring in a Reflector: This is where a simple piece of white foam board from a craft store becomes your secret weapon. Position the board on the shadow side of your product, keeping it just out of the camera's view.
- Bounce the Light: Angle that foam board to catch the light from the window and bounce it right back into the shadows. You'll see it happen in real-time—those dark areas will brighten up, giving your product a much more balanced look with gentle shadows that create depth, not distraction.
This simple "window plus reflector" setup is a timeless technique that pros use every day. It creates a dynamic, three-dimensional look that makes products pop, and it doesn't require a single piece of expensive equipment.
Master Your Smartphone Camera Settings
Your phone's camera app is incredibly smart, but leaving it on full auto is a recipe for inconsistent photos. To get sharp, perfectly exposed images every single time, you need to grab the wheel and take control of a few key settings.
First things first: turn off the flash. Seriously. The built-in LED flash is harsh, creates nasty glare, and will make your products look cheap. Natural light is always the better choice.
Next, find the setting to turn on your camera's gridlines. This overlays a simple 3×3 grid on your screen and it's a game-changer for composition. It helps you keep your product perfectly centered and your lines straight, and it's the foundation for applying the rule of thirds in your lifestyle shots.
Here are the most critical settings you need to master:
- Lock Focus and Exposure (AE/AF Lock): Don't just tap the screen to focus. Instead, tap and hold on your product for a second or two. A yellow box should pop up, often with "AE/AF LOCK" text. This locks both the focus and the exposure, meaning the brightness and sharpness won't suddenly shift, even if you move the phone a little.
- Adjust Exposure Manually: Once you've locked focus, a little sun icon usually appears. You can slide your finger up or down on the screen to manually brighten or darken the shot. This is how you get precise control and make sure your white background actually looks white, not a dull gray.
- Never Use Digital Zoom: Pinching to zoom is the fastest way to ruin a photo. It drastically degrades the image quality, leaving you with a pixelated, blurry mess. If you need a closer shot, just move your phone physically closer to the product.
Capture the Most Critical Angles
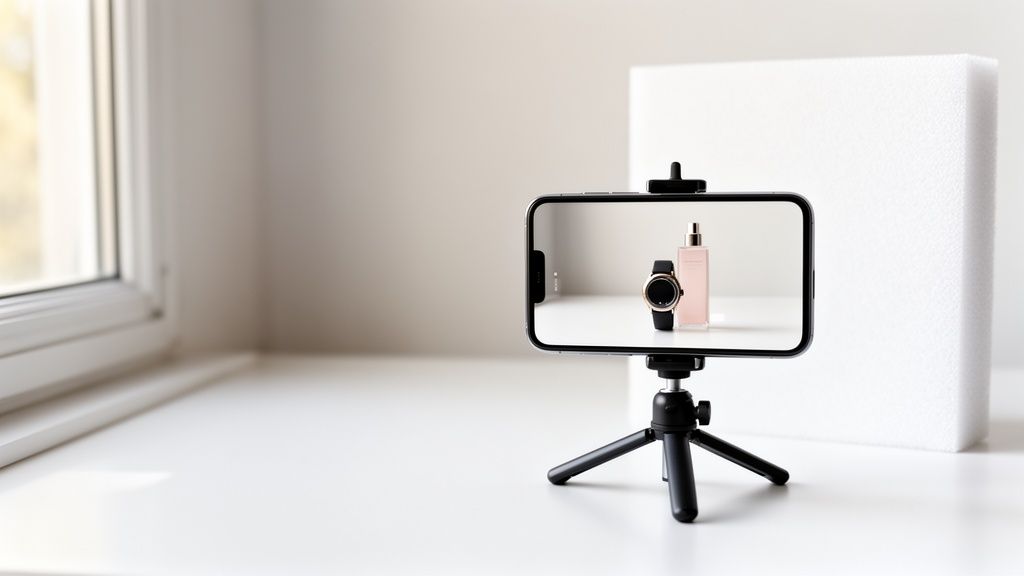
Your customer can't pick the item up and look it over, so your photos have to do that work for them. To build trust and answer their questions visually, you need to show your product from several key viewpoints. Using a tripod here is a great idea to keep your angles consistent from shot to shot.
Make sure your shot list covers these essential angles:
- The Straight-On Angle: Your classic "hero" shot. This is taken at eye-level with the product, showing it head-on.
- The 45-Degree Angle: This shot shows the front and side of the product at the same time, giving a much better sense of its shape and depth.
- The Top-Down (Flat Lay) Angle: Perfect for items best viewed from above, like shoes, folded apparel, or kits with multiple pieces arranged together.
- The Detail Shot: Get your phone in close. Highlight the texture of the fabric, a clean logo, the quality of the stitching, or any other unique feature that proves its value.
By getting your lighting and camera settings dialed in, you can consistently capture these key angles and produce a gallery of images that look clean, professional, and ready to turn shoppers into paying customers.
The AI-Powered Editing Workflow That Saves Hours
Snapping great photos with your phone is really only half the battle. The real magic—the part that turns a decent snapshot into a professional, sales-driving image—happens in the edit. But this is exactly where most sellers get stuck, sinking hours into manually removing backgrounds, fussing with lighting, and trying to get the colors just right.
There’s a much smarter, faster way to do this.
An AI-powered workflow cuts out all the tedious, repetitive parts of editing. This gives you back precious time while still delivering consistently professional results. We're not just talking about slapping on a generic filter. This is about using smart tools to handle the heavy lifting so you can get back to what matters: growing your business.
From Raw Photo to Marketplace-Ready in Seconds
Imagine you took a photo against a slightly wrinkled poster board. Now imagine, with just one click, that background is gone, replaced by a perfectly clean, pure white background that meets Amazon’s strict requirements. That’s the kind of power you get with AI editing tools like ProdShot.
Instead of painstakingly tracing your product's outline with a clumsy selection tool, the AI instantly recognizes the subject and slices away the background with incredible precision. This is a total game-changer for anyone who needs to create images for dozens—or even hundreds—of products.
Key Takeaway: The whole point of an AI workflow isn't to replace your creative eye. It's to automate the boring, technical tasks that eat up all your time. This frees you up to focus on styling, shooting, and selling.
This infographic breaks down the essential steps for a solid smartphone photography setup. It covers the big three—lighting, angles, and settings—to make sure your raw images are prepped and ready for the editing stage.
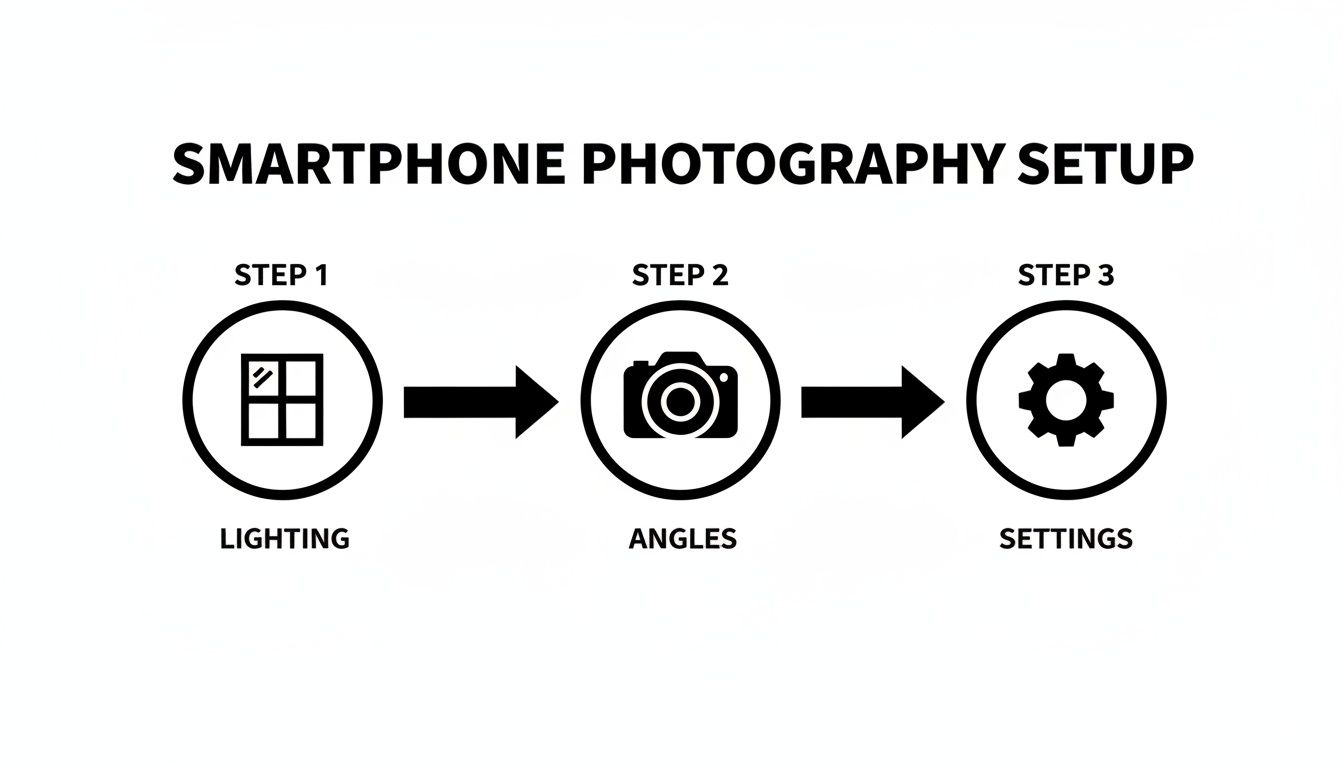
As you can see, a great final shot starts by mastering a few core fundamentals long before you even think about post-production.
This move toward automated editing is part of a huge trend in e-commerce. The global e-commerce product photography market was valued at around USD 0.85 billion in 2025, and it's projected to hit USD 2.38 billion by 2034. AI-powered tools are a major reason for this growth, empowering small sellers to get studio-quality results without the studio price tag.
Intelligent Lighting and Color Enhancement
Even when you nail the lighting, your smartphone camera can sometimes miss the mark on capturing colors and brightness perfectly. A white background might come out looking a bit gray, or your product's vibrant red might look a little flat.
This is another spot where AI really shines. Instead of you manually fiddling with sliders for exposure, contrast, and saturation, an AI tool can analyze your image and make smart enhancements automatically.
- Shadow and Reflection Removal: AI algorithms can spot and soften harsh shadows or tone down distracting glare from shiny surfaces, creating a much more balanced and professional look.
- Color Correction: The tool can automatically fix the white balance, making sure your product’s colors are true-to-life and exactly what the customer should expect.
- Smart Lighting: It can brighten up the whole image while keeping the details sharp, making your product pop without looking blown out.
These automated tweaks ensure every photo in your gallery has a consistent, polished feel, which is absolutely vital for building a trustworthy brand.
The Power of Batch Processing
Editing one photo? Totally manageable. But what happens when you’ve got 50 new products to launch, each needing six different angles? That's when manual editing becomes a complete nightmare.
A modern AI workflow is built for this kind of scale. You can upload an entire photoshoot—dozens or even hundreds of images—and apply the same edits to all of them at once.
- Upload Your Photos: Just drag and drop all the images from a single product shoot.
- Apply Your Edits: Choose your settings, like background removal, shadow enhancement, and color correction.
- Process and Export: The AI gets to work on the entire batch, and in minutes, you have a folder full of perfectly edited, marketplace-ready images.
This method guarantees consistency across your entire product catalog. Every hero shot will have the exact same pure white background, and every detail shot will have the same brightness and clarity. This kind of uniformity is a hallmark of professional e-commerce and does wonders for boosting customer confidence. You can also explore options with an AI product photo generator to drop your products into entirely new scenes and backgrounds.
To really dial in your post-production, check out this guide on the best AI tools for content creators, which can help improve your entire workflow. By adopting these tools, you're not just learning how to take professional product pictures; you're building an efficient, scalable system for your whole e-commerce business.
Optimizing Your Images for Top E-Commerce Platforms
Taking a great photo is a huge win, but your work isn't done just yet. A stunning picture can fall flat if it’s cropped awkwardly, loads at a snail's pace, or gets rejected for not meeting a marketplace’s specific rules.
Every platform—from Amazon to Shopify to Etsy—has its own playbook. Think of this final step as the professional polish that ensures all your hard work translates into a high-converting listing. Getting these details right is what separates amateur sellers from the pros.
Meeting Marketplace Technical Requirements
Marketplaces have specific guidelines for a reason: they want a consistent, high-quality shopping experience for their customers. Ignoring the rules can get your listings flagged or, even worse, taken down entirely. The big three to watch are image dimensions, background color, and file type.
Amazon, for instance, is famously strict. Your main "hero" image must have a pure white background (RGB 255, 255, 255). No ifs, ands, or buts. This is where AI background removal tools like ProdShot are an absolute lifesaver, sparing you the headache of manual editing.
Shopify and Etsy are a bit more relaxed, especially with secondary lifestyle shots, but following best practices for a clean, professional look is always a good idea. Once your photos are ready, it's also worth learning how to optimize images for SEO to make sure they load fast and show up in search results.
Here’s a quick rundown of the rules for the major players.
Image Requirements for Major E-Commerce Platforms
This table breaks down the essential technical specs you need to know for the big three platforms. Keep it handy when you're exporting your final images.
| Platform | Minimum Resolution (Longest Side) | Background Requirement | Recommended File Type |
|---|---|---|---|
| Amazon | 1000px (1600px recommended for zoom) | Pure White (RGB 255, 255, 255) | JPEG |
| Shopify | 800px (2048px recommended) | Flexible, but white is standard | JPEG or PNG |
| Etsy | 2000px recommended | Flexible, encourages styled backgrounds | JPEG, PNG, or GIF |
A quick pro-tip: always shoot for the recommended resolution, not just the bare minimum. This makes your images look sharp and enables the all-important zoom feature, which can seriously boost conversions.
The Simple SEO Trick Hiding in Your File Names
Before you even think about uploading, you have a golden opportunity to improve your search visibility. Most phones and cameras spit out generic file names like IMG_8472.jpg. This tells search engines absolutely nothing about your product.
Take a few extra seconds to rename every single file with descriptive, relevant keywords. This simple action helps Google and marketplace algorithms understand what your image is about, helping you rank higher in relevant searches.
A great file name structure looks like this:
YourBrand-ProductName-KeyFeature.jpg
So instead of a random string of numbers, you'd have:
ProdShot-Handmade-Leather-Wallet-RFID-Blocking.jpgArtisan-Ceramics-Blue-Speckled-Coffee-Mug.jpg
It’s a tiny bit of effort that pays off big time in the long run.
Arranging Your Images to Tell a Compelling Story
The order of your photos is just as important as their quality. Your image gallery should take your customer on a visual journey, answering their questions before they even have to ask and building their confidence with every click.
Think of your image sequence as your visual sales pitch.
- Lead with the Hero. Your first image has to be your absolute best shot. The entire product, perfectly lit, on a clean, distraction-free background. This is your digital handshake.
- Show Off Every Angle. Next, give them the full tour—back, sides, top, maybe a 45-degree angle. Let the customer inspect it as if they were holding it in their hands.
- Zoom In on the Details. Now's the time for a close-up. Show off that high-quality stitching, the texture of the material, or a unique design element. This is how you build trust in your craftsmanship.
- Provide Context and Scale. Use a lifestyle shot to show the product in action. An image that shows scale (like a mug next to a phone) is also incredibly helpful for managing customer expectations.
- Share Key Info Visually. If it makes sense for your product, add an image with key dimensions, a list of features, or care instructions. This can cut down on customer questions and prevent returns.
When you optimize your images for each platform and arrange them with a clear strategy, you turn a simple product listing into a powerful, trust-building experience that makes shoppers excited to click "add to cart."
Common Questions About Smartphone Product Photography
Even with a clear plan, it's totally normal to have questions when you're just starting out. Let's tackle some of the most common ones I hear from sellers. Getting these sorted out will give you the confidence to stop second-guessing and start shooting.
Here are some straight-to-the-point answers to the questions that pop up most often.
Do I Really Need a Tripod for My Phone?
You can get by without one, but a simple smartphone tripod is probably the smartest, cheapest investment you'll make in your product photography. It's not just about stopping your hands from shaking and getting blurry photos (though it definitely fixes that).
The real game-changer is consistency. A tripod locks your phone in place, which means every angle and every shot is framed exactly the same. This kind of consistency is what separates amateur product galleries from professional ones. It makes your whole store look more polished and trustworthy. Seriously, even a basic, inexpensive tripod will make a huge difference.
A tripod is your secret weapon for consistency. It eliminates camera shake for sharper photos and, more importantly, ensures every single shot is framed identically. This is a non-negotiable for a professional-looking storefront.
What's the Best Background for Product Photos?
For your main product image—the one that shows up in search results and is often called the "hero" shot—the answer is almost always a pure white background. It's the undisputed industry standard for a reason. It’s clean, puts all the focus on your product, and is a requirement on major marketplaces like Amazon.
You could rig this up with a big piece of white poster board, but honestly, it’s much easier to just let an AI tool like ProdShot handle it. It can remove your original background perfectly in seconds, which saves you a ton of time trying to get the lighting just right.
For your other photos, you can get more creative. The key is to pick backgrounds that match your brand's vibe.
- Selling natural or organic products? Think about raw wood grain, slate, or a textured linen fabric.
- Showcasing a luxury item? A clean marble slab or soft suede can work wonders.
- Have a colorful product? Sometimes a simple, solid-colored background in a complementary shade is all you need to make it pop.
Just remember the golden rule: the background should always make your product look better, not steal the spotlight.
How Many Photos Should I Have for Each Product?
For most e-commerce platforms, the magic number is somewhere between 5 and 8 photos per product. That gives you enough room to show the customer everything they need to see without overwhelming them.
Think of your photo gallery as a visual story. A great lineup usually includes:
- The Hero Shot: Your main image, crisp and clean on a white background.
- Different Angles: Show the sides, the back, the top, and maybe a nice 45-degree angle shot.
- A Close-Up: This is where you show off the quality—the texture, the fine details, the craftsmanship.
- A Scale Shot: Show the product next to something familiar (like a phone) or in someone's hand. This gives customers an instant sense of its real-world size.
- Lifestyle Images: One or two shots showing the product being used or in a natural setting. Help them picture it in their own life.
This mix of images answers customer questions before they even have to ask, building the confidence they need to click "add to cart."
Can't I Just Use My Phone's Flash?
Please don't. In a single word: no. Using your phone's built-in LED flash is probably the single biggest mistake new sellers make, and it will instantly sabotage your photos.
The light from that little flash is harsh, direct, and completely unflattering. It creates ugly, sharp shadows, blows out the natural colors of your product, and causes nasty glare on anything even slightly shiny.
Soft, diffused natural light from a window is your absolute best friend. If you have no choice but to shoot in a dark room, grab a lamp and place it off to the side—never pointing directly at your product. You can soften its light by bouncing it off a white wall or even shining it through a thin white bedsheet. Whatever you do, just turn that phone flash off.
Ready to turn those smartphone snaps into professional, marketplace-ready images? With ProdShot, you can remove backgrounds, perfect the lighting, and get stunning results in seconds. Try ProdShot for free and see just how easy it is to level up your product photography game.