
Want to know the secret to incredible jewelry photos? It’s not about having the most expensive camera.
It really boils down to three things: meticulously cleaning every piece, controlling your lighting to kill reflections, and choosing a background that makes the jewelry pop, not distract from it.
If you can master just these three foundational elements, you'll see an immediate, dramatic jump in quality. Your shots will go from looking like amateur snapshots to professional, captivating images that actually drive sales.
Your Foundation for Flawless Jewelry Photos
Before you even think about picking up your camera, the real work of jewelry photography begins. This isn't just about taking a picture; it's about translating the intricate, tangible beauty of a piece into a digital image that makes someone need to own it.
But let's be honest, it comes with some unique headaches. Polished metals are basically tiny mirrors, reflecting everything in the room—including you and your camera. Gemstones, with all their complex facets, need incredibly precise lighting to show off their sparkle without looking flat and lifeless.
And don't even get me started on dust. Under a macro lens, every single fingerprint, smudge, or speck of dust becomes a glaring imperfection, instantly cheapening the look of your beautiful piece.
Setting the Stage for Success
This is why the pre-shoot phase is where you win or lose. A pro photographer never, ever skips this groundwork. Why? Because a few minutes of prep saves hours of frustrating reshoots and tedious editing later on. Your initial setup is what truly dictates the final quality of your images.
This simple workflow is the starting point for every professional jewelry photoshoot.
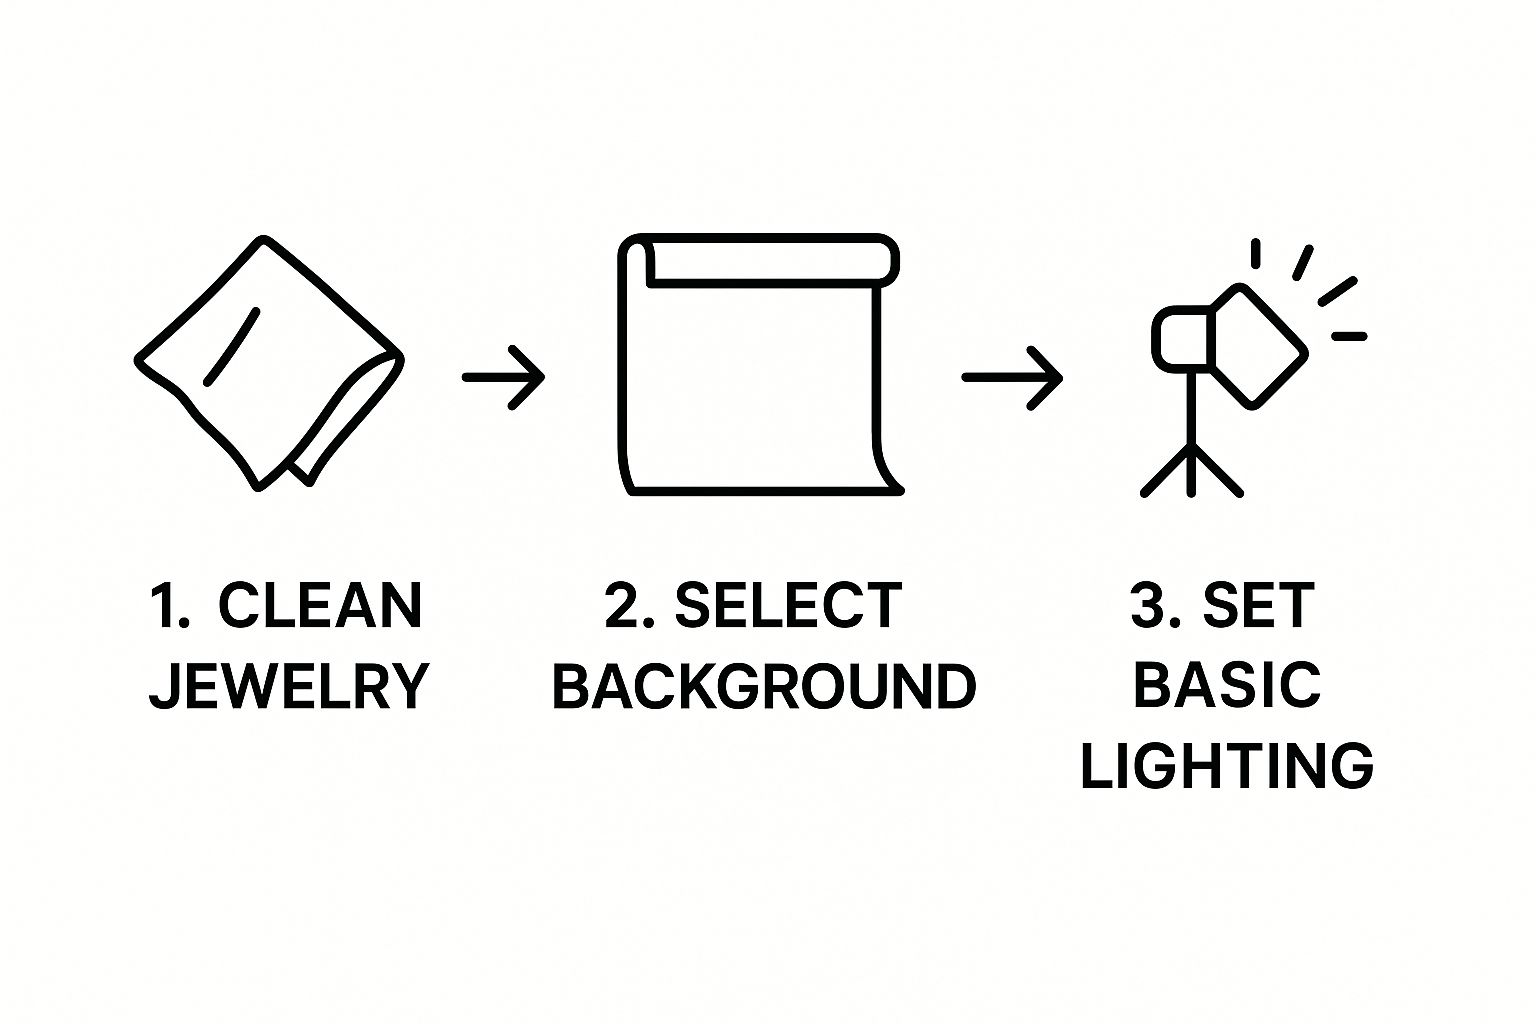
Nailing these three steps—cleaning, background selection, and basic lighting—creates the clean, controlled environment you absolutely need for high-quality shots.
Getting this right isn't just a "nice-to-have." With the global jewelry market projected to hit around $348 billion in 2025, standing out is everything. In such a crowded space, your visuals are your single most powerful tool.
Key Takeaway: Your prep work is just as critical as your camera. A perfectly clean piece on a smart background, under controlled light, is 90% of the battle for a stunning shot.
Before any shoot, running through a quick mental checklist can make all the difference. Think of it as your pre-flight inspection to ensure everything is ready for takeoff.
Essential Jewelry Photography Checklist
| Category | Key Action | Why It Matters |
|---|---|---|
| The Piece | Meticulously clean with a microfiber cloth and air blower. | Removes distracting dust, smudges, and fingerprints that are magnified by the camera. |
| The Surface | Choose a non-reflective, complementary background. | Prevents distracting glares and ensures the jewelry is the star of the show. |
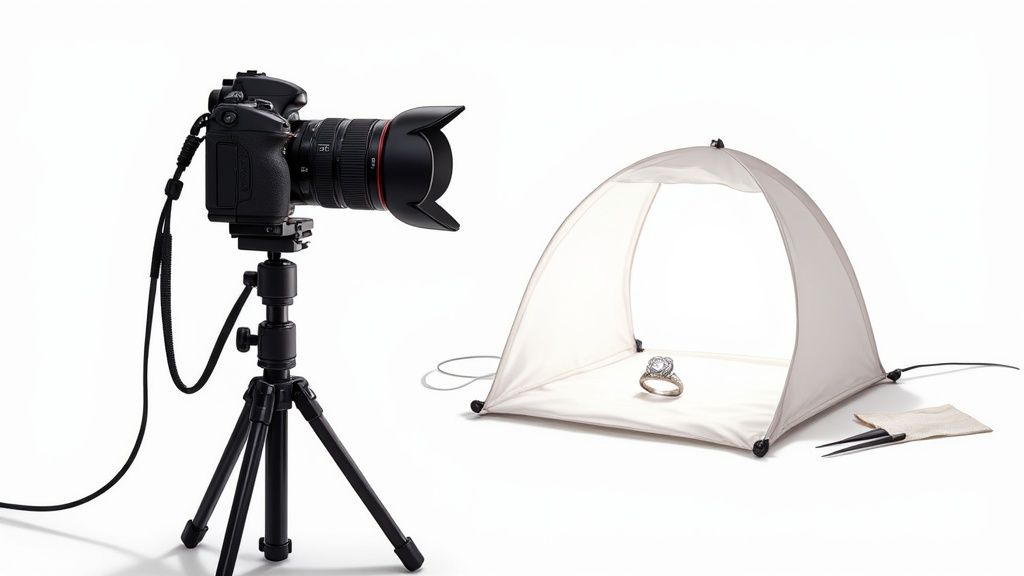
| The Lighting | Set up a soft, diffused light source (like a light tent). | Creates even lighting, minimizes harsh shadows, and reduces metallic reflections. |
| The Camera | Mount it on a stable tripod. | Eliminates camera shake, ensuring your images are perfectly sharp and in focus. |
This checklist isn't just a list of tasks; it's a recipe for consistency. By making these actions a habit, you build a solid foundation that allows you to get creative without worrying about the technical basics.
From Technical Skill to Sales Strategy
Ultimately, learning how to photograph jewelry is about more than just a pretty picture; it's about creating a powerful business asset. Every photo you take has a job to do, whether it's for an e-commerce listing, an Instagram post, or a paid ad.
The time you invest in creating great images pays you back directly through higher customer trust and better conversion rates. Understanding the cost of professional product photography gives you great context for the value you're creating by mastering these skills yourself.
Beyond just the photo, thinking about how your expert shots fit into effective e-commerce content strategies is what turns a good photographer into a great online seller. That’s how you bridge the gap between taking a nice photo and creating a powerful sales tool.
Choosing Your Gear Without Breaking the Bank
Let’s get one thing straight right away: you don't need a Hollywood-sized budget to create gorgeous jewelry photos. It's a common myth that holds a lot of people back. The real secret isn’t spending a fortune; it’s about making smart choices in gear that solve the unique challenges of shooting small, reflective objects.
Your primary goal is to gain total control over three things: light, detail, and stability. And the good news is, you can build an incredibly effective and affordable kit, starting with the pieces that will give you the most bang for your buck.
The Camera and Lens You Actually Need
While you can get started with a modern smartphone, stepping up to a camera with manual controls is where the magic really happens. A DSLR or mirrorless camera gives you the power to tell the camera exactly what to do, which is absolutely essential for professional-looking shots.
This control lets you dial in settings like aperture to get an entire ring in focus from front to back. But more importantly, it unlocks the ability to use the single most important piece of equipment for jewelry: the macro lens. A true macro lens lets you get incredibly close, capturing the tiny details, the sparkle of a gemstone, and the fine metalwork that makes a customer fall in love.
- Camera Body: Don't obsess over megapixels. An entry-level or even a used DSLR or mirrorless model will do the job perfectly, as long as it has a full Manual Mode.
- The Lens: This is where you should invest. A dedicated macro lens, typically in the 90mm-105mm range, is the hero of any jewelry photography setup. It’s built for one thing: getting razor-sharp, distortion-free images up close.
Building a Rock-Solid Foundation
Camera shake is the number one enemy of sharp photos. Even a tiny, invisible vibration can turn a potentially stunning shot into a soft, unusable mess. Since you'll often be using slower shutter speeds to soak up light and capture detail, a sturdy support system isn't just nice to have—it's mandatory.
A reliable tripod is your first line of defense. It will hold your camera perfectly still, shot after shot, eliminating any chance of blur. Look for one that’s solid enough not to wobble but gives you the flexibility to position your camera at different angles with ease.
Want to take it to the next level? Get a remote shutter release or just use your camera's built-in self-timer. Physically pressing the shutter button on the camera can introduce a tiny bit of shake. A remote completely removes that variable, guaranteeing the sharpest possible image every time.
Smart Lighting Choices on a Budget
Lighting is where you can get really creative without spending a ton of money. The goal is always the same: create soft, diffused light that wraps around the jewelry, eliminating those harsh, glaring reflections and ugly shadows.
Forget about giant, expensive studio strobes for now. For something as small as a ring or a pendant, they're often overkill. Continuous LED panels are a fantastic, affordable option that I’ve used for years. The best part is you can see exactly how the light is hitting your piece in real-time—what you see is what you get.
I see this mistake all the time: using a single, harsh light source. It just creates distracting white hotspots and deep, black shadows. The secret is always in the softness and diffusion of your light.
Here are a few practical lighting options, from completely free to a modest investment:
- Natural Window Light: Free, beautiful, and effective. Set up near a large window on an overcast day for some of the best, softest light you can find. Grab a cheap white foam board from a craft store to bounce light back into the shadowy areas.
- DIY Light Tent: This is a classic for a reason. You can build a surprisingly effective light box with a simple cardboard box, some white tissue paper, and a couple of desk lamps. It’s a fantastic, low-cost way to surround your jewelry with diffused light.
- Affordable LED Panels: This is my top recommendation for anyone ready to move past a DIY setup. A pair of small, dimmable LED light panels gives you incredible control and consistency for a very reasonable price.
By focusing your budget on a decent camera body, a true macro lens, and a solid tripod, you’re setting yourself up for success. You can start with simple lighting techniques and then build out your kit over time as your skills and needs grow.
Mastering Light to Make Every Piece Shine

If there’s one secret ingredient in professional jewelry photography, it’s light. It's not just about making things bright; it's about controlling and sculpting light to flatter every single curve, facet, and texture.
Get this part right, and you'll transform an average snapshot into a luxurious masterpiece.
The biggest headache with jewelry is just how reflective it is. Polished gold, shimmering silver, and cut gemstones are basically tiny, complex mirrors. If you hit them with direct, harsh light, you get glaring white hotspots and deep, ugly shadows that hide the very details you’re trying to sell.
Our goal here is to create soft, diffused light. Think of the gentle glow on a slightly overcast day, not the harsh glare of the noon sun. This is the kind of light that wraps around your subject, kills nasty reflections, and shows the true colors of the piece.
Creating Soft Light The Go-To Method
The most reliable way to get that beautiful, soft illumination is by putting something called a diffusion material between your light source and the jewelry. This material scatters the light, spreading it out evenly and dialing down its intensity. It’s the core technique behind pretty much all high-quality product photography.
You have a few great options to make this happen, from DIY hacks to affordable pro gear.
- A Light Tent: This is my top recommendation if you're just starting. A light tent (or light box) is basically a cube made of translucent white fabric. You place your jewelry inside and shine your lights through the fabric walls, which act as giant diffusers. The result is incredibly soft, even light from all sides.
- Diffusion Panels: These are standalone sheets of diffusion material held in a frame. They give you way more flexibility than a light tent, letting you position your lights and diffusers at different angles to create more specific effects and moods.
- DIY Solutions: Working with zero budget? No problem. You can make your own diffusion panels using a white bedsheet, parchment paper, or even a few pieces of white printer paper taped to a frame. It might not look fancy, but the physics of light diffusion works just the same!
This is a skill worth learning. The global photography services market, which has a huge niche for jewelry, was valued at $55.6 billion in 2023 and is only getting bigger. For a deeper dive, check out this in-depth analysis of photography industry statistics to see just how much commercial demand there is.
Sculpting Light with Reflectors
Once you have your main, diffused light source set up, you’ll probably notice some soft shadows on the side of the jewelry opposite the light. These are much better than harsh shadows, but we can do even better by bouncing a little light back into them. This is where reflectors come in.
A reflector—often just called a bounce card—is any surface used to bounce light back onto your subject. It’s a simple tool, but it's the key to making your jewelry pop and sparkle.
Pro Tip: Never underestimate the power of a simple white card. I often use a small piece of white foam board, or even a folded business card, propped up just out of the camera's view. It's perfect for bouncing a tiny highlight onto a specific gemstone or a metal edge to make it sing.
Here’s a quick rundown on using reflectors:
- Set up your main diffused light on one side of the jewelry.
- On the opposite side, place a white reflector. This can be foam board, a piece of paper, or a professional silver reflector.
- Angle the reflector until you see it "kick" light back into the shadows. Watch the piece closely as you move the card; you'll see the shadows visibly lighten up.
- Play around with different reflector colors. A silver card creates a bright, sharp highlight (amazing for adding sparkle), while a gold card can add a beautiful warm glow to yellow gold pieces.
This technique is all about finesse. You're not trying to kill the shadows completely—shadows are what create depth and make the piece look three-dimensional. Instead, you're just "filling" them enough to bring out the details without making the photo look flat.
By mastering the combo of soft main lighting and strategic reflector use, you gain total control. You can guide the viewer’s eye, highlight the most important features of a design, and capture that brilliant fire inside a gemstone. It's this careful sculpting of light that separates good jewelry photography from the truly exceptional stuff.
Nailing Your Camera Settings and Composition

Okay, your gear is in place and the lighting is looking soft and beautiful. Now for the fun part: dialing in the camera settings to actually capture the magic. This is where all that prep work pays off, translating into a stunning, crystal-clear image. It's a delicate dance between technical precision and creative composition.
First things first: forget your camera's automatic mode. For professional jewelry photography, shooting in Manual Mode is non-negotiable. It’s the only way to get total control over the "exposure triangle"—the three core settings that make or break a photo.
Understanding The Exposure Triangle for Jewelry
These three pillars—aperture, ISO, and shutter speed—are the foundation of every single great shot. Getting a feel for how they interact is absolutely essential for making jewelry look its best.
- Aperture (f-stop): This setting controls how much of your photo is in focus, a concept we call depth of field. For jewelry, the goal is almost always to get the entire piece tack-sharp, from the very front of a ring's band to the prongs holding the stone.
- ISO: Think of this as your camera's sensitivity to light. A low ISO number means less sensitivity, which gives you a clean, crisp, and totally grain-free image. For product shots, this is the gold standard.
- Shutter Speed: This is simply how long the camera's sensor is exposed to light. Since your camera is locked down on a tripod, you can use much slower shutter speeds to soak in all that beautiful light without a hint of blur from shaky hands.
Once you master these three, you have complete command over the final look and feel of your images.
Dialing in Your Settings for Maximum Sharpness
Let's get practical. To achieve that coveted edge-to-edge sharpness on a piece like a ring or a detailed pendant, you need what’s called a "small" aperture. The tricky part? A small aperture is represented by a large f-stop number.
My starting point for most jewelry is an aperture between f/11 and f/16. This creates a deep depth of field, ensuring that from the closest point to the farthest, your entire piece stays perfectly in focus.
Next, you'll want to lock down your ISO. Set it to the lowest native setting your camera has, which is usually ISO 100 or ISO 200. This is the secret to getting that smooth, professional look without any of that distracting digital noise or graininess.
Because you’re using a small aperture and a low ISO, your camera is going to need more light to get a proper exposure. No problem. Since your camera is on a tripod, you can just use a slower shutter speed to compensate. It might be 1/15s, 1/2s, or even a full second—it doesn't matter. With a tripod and a remote shutter, everything will remain perfectly still and sharp.
To make things easier, here's a quick cheat sheet with some starting points.
Recommended Camera Settings for Jewelry Types
This table gives you a great baseline for different types of jewelry shots. Remember, these are starting points—you'll still need to adjust based on your specific lighting and the piece itself.
| Setting | E-commerce (White Background) | Lifestyle (Creative Shot) | Macro (Detail Shot) |
|---|---|---|---|
| Mode | Manual | Manual / Aperture Priority | Manual |
| Aperture | f/11 – f/16 | f/4 – f/8 (for soft background) | f/16 – f/22 |
| ISO | 100 | 100-400 | 100 |
| Shutter Speed | Adjust to meter (e.g., 1/15s) | Adjust to meter (e.g., 1/125s) | Adjust to meter (e.g., 1s) |
| Focus | Manual (use Live View zoom) | Manual / Single-Point AF | Manual (use Live View zoom) |
Think of these settings as recipes. You might need to add a little more of this or a little less of that to get it just right, but they will put you squarely in the right ballpark from the get-go.
The Art of Composition and Styling
With your technical settings locked in, it’s time to shift to the creative side: composition. The way you arrange the jewelry within the frame tells a story and guides your customer's eye. Your goal is simple: make the piece the undeniable hero of the shot.
Here are a few tried-and-true composition techniques that work wonders:
- For Rings: I love shooting them straight-on from a low angle. It makes them feel grand and important. You can also stand them up with a tiny dab of museum wax for that classic, elegant look.
- For Necklaces: Flat lays are your best friend here. Just make sure to arrange the chain in a soft, natural curve rather than a perfectly rigid circle—it gives the shot a much more graceful, organic feel.
- For Earrings: Always photograph them as a pair. You can position them symmetrically for a clean, e-commerce look, or stagger them just slightly to create a bit of depth and dynamism.
Don't be afraid to use simple props to add context, but be careful. A silk ribbon or a small stone can add a lovely touch of texture, but they should never overpower the jewelry. Your composition must always serve the ultimate goal: making the customer fall in love and envision themselves wearing that beautiful piece.
The Final Polish: Post-Processing and AI
Getting the shot is only half the job. The real magic—the step that turns a great photo into a truly breathtaking one—happens in post-processing. This is where you get to polish the final image, correct tiny imperfections, and make your jewelry look as incredible on a screen as it does in your hand.
Even with a perfect setup, your camera's sensor just can't capture the world exactly as your eyes see it. A tiny tweak in color balance can make yellow gold look richer and warmer. A subtle boost in contrast can make a diamond's fire practically jump off the page. Think of it less like "fixing" a photo and more like enhancing its natural beauty.
Your main goals here are consistency and perfection. You want every single image in your product catalog to look like it belongs to the same professional family. That means correcting colors, zapping those microscopic dust specks you missed, and applying just the right amount of sharpening to make every facet and detail pop.
The Must-Have Editing Skills
Before you start exploring advanced tools, you need to nail the fundamentals. These are the core skills that form the bedrock of good editing, no matter what software you end up using. Funnily enough, many basic video editing tips for beginners about refining raw footage apply just as well to still photos.
Here are the non-negotiables:
- Color Correction: Your whites need to be pure white, and your metals have to look true to life. A simple white balance tool or a color checker can help you eliminate any weird color casts from your lighting.
- Spot Healing: This tool is your absolute best friend for digital cleanup. Zoom in close—really close—and meticulously remove any dust particles, fingerprints, or tiny scratches you see on the metal or gemstone.
- Sharpening: Apply a final sharpening pass to make the details crisp. But be careful not to overdo it. The idea is to enhance detail, not create harsh, pixelated edges.
These manual tasks get the job done, but they can be incredibly tedious and time-consuming, especially when you’ve got a mountain of products to get online. This is exactly where modern technology steps in to offer a much faster path.
The Rise of AI in Photo Editing
The entire editing process is in the middle of a massive shake-up. AI-powered tools are completely changing the game by automating tasks like background removal, lighting adjustments, and even enhancing gemstone clarity. For photographers, this means a huge jump in both efficiency and consistency.
This is a game-changer for anyone learning how to shoot jewelry and get professional results without spending years learning the ins and outs of complex software.
Key Insight: AI editing tools aren't just about saving time; they're about achieving a level of consistency across your entire product line that's almost impossible to replicate by hand. This consistency builds brand trust and makes your online store look seriously professional.
AI software can analyze an image and perform tasks in seconds that would take a skilled human editor minutes, or even hours, to finish. Think about removing the background from a hundred photos with just a few clicks instead of painstakingly tracing each one.
This screenshot shows just how simple the interface of an AI tool built for product photos can be.
You can upload a raw photo and instantly see it on multiple backgrounds, showing how quickly you can create professional, on-brand visuals without breaking a sweat.
Platforms like ProdShot were designed specifically for this. They take all the technical complexity out of creating stunning product shots. You can use an AI product photo generator to produce clean, high-converting images without needing a single design skill. It handles all the tedious work, freeing you up to focus on shooting and growing your business.
Common Jewelry Photography Questions
Even with a solid game plan, you're going to run into questions in the middle of a shoot. That's just the nature of the beast. Learning to photograph jewelry is really about learning to troubleshoot on the fly. This section hits on some of the most common snags photographers face, giving you quick fixes to keep your session moving.
Think of this as your "what do I do when…" cheat sheet. Nailing these little details is what really separates the good shots from the great ones.
How Do I Shoot Highly Reflective Jewelry Without Seeing Myself?
This is, without a doubt, the number one challenge in jewelry photography. Polished gold, silver, and platinum are basically tiny, perfectly curved mirrors. They'll reflect everything in the room: you, your camera, your shirt, the ceiling light. The goal isn't to kill all reflections, but to control what gets reflected.
The best way to handle this is by creating what's called a "cone of light" around the piece. This is exactly what a light tent is built for. By wrapping the jewelry in white, diffused walls, the only thing the metal can reflect back is clean, soft, white light.
No light tent? No problem. You can build a similar setup using large white foam boards. Just position them strategically around and above the piece to block out your studio environment. Sometimes, you'll want to add a tiny bit of definition. A small, carefully placed black card can create a thin, dark line that gives a beautiful sense of shape to curved metal surfaces.
Why Do My Gemstones Look Dull and Lifeless?
Here’s a classic mistake: using only soft, diffused light for everything. While that buttery smooth light is perfect for metals, it can make faceted gemstones look completely flat and muddy. That incredible sparkle you see in a diamond or a sapphire comes from the way it catches and refracts direct, hard light.
To bring that sparkle back to life, you have to introduce a small, direct light source into your setup.
- Grab a Snoot: This is a simple cone-shaped attachment that fits over your light and funnels the beam into a tight, focused circle.
- Make a Pinhole: Take a piece of black cardstock, poke a tiny hole in it with a pin, and hold it in front of one of your lights.
Aim that tiny, focused beam of hard light right at the main facet of the gemstone. As you move it around, you'll literally see the stone ignite with inner fire and brilliance. It's not uncommon for the final image to be a composite of two separate shots—one lit with soft light for the metal, and another lit with this hard light specifically for the stone.
A single, well-placed pinpoint of light is the secret to making a gemstone sparkle on camera. It mimics how a stone catches direct sunlight, which is what creates that dazzling effect your eyes see in person.
How Can I Get Consistent Color Across All My Photos?
There's nothing worse for an online store than inconsistent color. If a gold ring looks warm and yellow in one photo but has a weird greenish tint in the next, it immediately erodes customer trust. The fix is to set a custom white balance on your camera before you start shooting.
Don't ever rely on your camera's auto white balance. It's easily fooled by different backgrounds or even the color of the jewelry itself. Instead, get a simple grey card. Place the card in your setup, right where the jewelry will be, and take a photo of it. Then, dive into your camera's menu and use that photo to set the custom white balance. This tells your camera exactly what neutral gray looks like under your specific lights, guaranteeing every single photo from that session will have perfect, consistent color.
For more complex color correction across a whole product line, professional product photo editing services can be a lifesaver, ensuring your entire catalog is perfectly color-matched.
What Is the Best Way to Keep Jewelry in Place for a Shot?
Trying to get a ring to stand up perfectly or an earring to hang just so can drive you crazy. The secret weapon in every professional's kit is a little product called museum wax or dental wax.
It’s a clear, tacky putty that holds items securely without leaving any gunk behind. A tiny, pinhead-sized ball of it is usually all you need to prop up a heavy ring or hold a pendant at that perfect, flattering angle. It's cheap, effective, and an absolutely essential tool for styling your shots.
Ready to skip the tedious editing and get straight to stunning, professional images? ProdShot uses AI to instantly remove backgrounds, enhance lighting, and create conversion-optimized product photos in seconds. Try ProdShot for free and see how easy it is to elevate your online store.