
If you're selling anything online, learning how to switch out your photo backgrounds for a crisp, clean white is one of the most valuable skills you can have. It’s hands-down the quickest way to create professional-looking images that make your products pop, which has a huge impact on how customers see your brand and, ultimately, whether they click "buy."
Why a White Background Is a Game Changer for Your Photos
Before we get into the how, let’s talk about the why. A clean white background isn't just about making things look tidy; it's a legitimate marketing tool that taps into buyer psychology and can seriously lift your sales.
This isn’t just an aesthetic preference. There’s a reason huge platforms like Amazon and Shopify have strict photo guidelines. A uniform white background creates a consistent, trustworthy shopping experience that makes your whole storefront feel more professional. It cuts out all the visual noise, forcing a potential customer's eye to land squarely on your product’s details, textures, and key features.
The Impact on Customer Trust and Sales
Think about it: when every product is presented in the same clean way, it builds credibility. Shoppers are far more likely to trust a store that looks polished and put-together. This simple change removes distractions and helps people make faster, more confident buying decisions.
This isn't a new trend, either. The move toward clean visuals has been transforming e-commerce for over a decade. In fact, some studies show that product listings with white backgrounds can sell up to 30% more effectively than those with busy, distracting backdrops. The industry is moving in this direction, and it's predicted that by 2025, over 75% of major platforms will likely require this format.
The whole point is to make the product the hero. A white background is the perfect blank canvas. It allows the item’s colors to look more vibrant and its shape to be clearly defined—which is absolutely critical when a customer can't pick it up and examine it in person.
Mastering this one skill is a fundamental part of selling online. It's just as vital as understanding things like professional Amazon product photography if you want to stand out. You're not just editing a photo; you're turning a simple snapshot into a high-converting sales asset.
Choosing the Right Online Editor for the Job
Picking the right tool to give your photos a clean, white background can feel like a big decision, but it's simpler than you might think. Your choice really boils down to two main options: a specialized AI tool designed for the job, or a general-purpose photo editor.
General editors like Canva or Pixlr are great all-rounders for many creative projects. But when your specific goal is creating crisp, consistent product shots for your online store, a dedicated solution often wins out. These specialized tools are built from the ground up for e-commerce, laser-focused on providing speed and precision for background removal.
Specialized AI vs. General Editors
A specialized tool like ProdShot uses artificial intelligence that has been trained specifically on product images. What does that mean for you? It's simply much better at identifying those tricky, complex edges—think the fine straps on a handbag or the delicate chain of a necklace—and removing the background without leaving behind awkward, pixelated artifacts.
For anyone who needs to process more than just a handful of photos, this focused approach is a huge time-saver. While powerful, general editors often force you to do more manual cleanup to achieve that same professional look. When you're trying to quickly change a background to white for a whole product line, those extra clicks and adjustments really start to add up.
This image really highlights the business impact of using a dedicated tool for product photos.
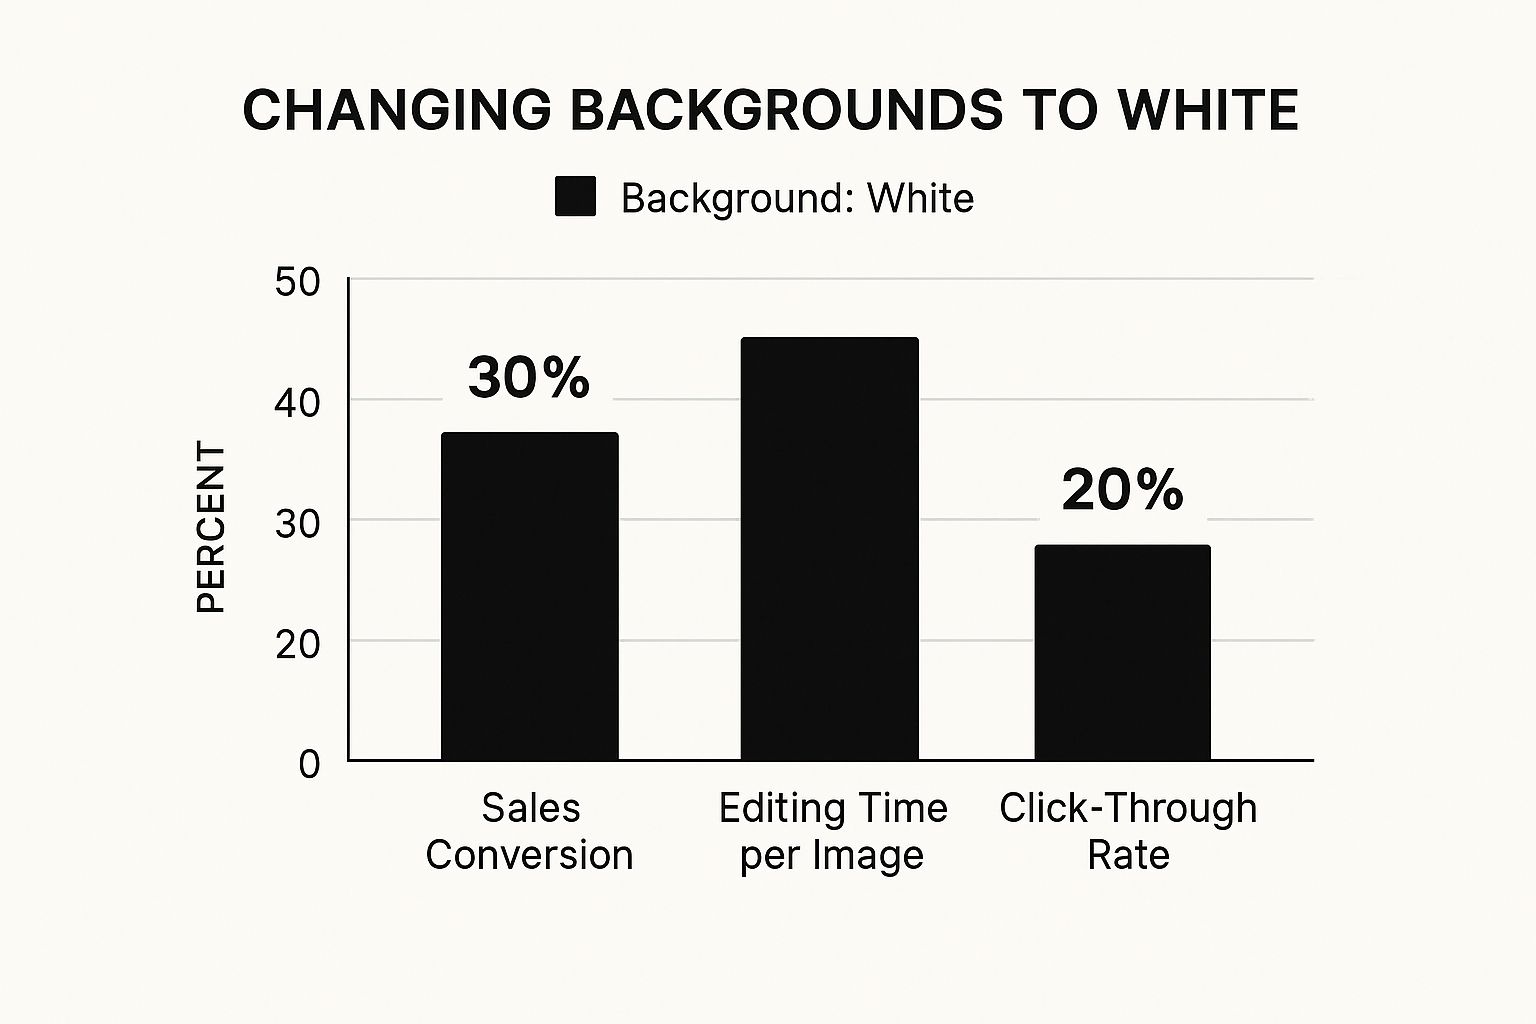
As you can see, the boost in efficiency and the potential for higher conversion rates make a compelling argument for a specialized online photo editor. Many of the best AI photo editor online free tools now include features built just for this kind of work, so they're worth exploring.
To help clarify the differences, here’s a quick breakdown of how these tools stack up for this specific task.
Comparing Online Background Editor Features
| Feature | Specialized AI Editors (e.g., ProdShot) | General Photo Editors (e.g., Canva, Pixlr) | Professional Desktop Software (e.g., Photoshop) |
|---|---|---|---|
| Speed & Automation | Excellent: Fully automated, one-click background removal. | Fair: Often requires manual selection and refinement. | Good: Powerful selection tools but requires manual skill and time. |
| Accuracy | Excellent: AI trained on product images for high precision on complex edges. | Good: Works well for simple shapes but can struggle with details. | Excellent: Highest level of precision but depends entirely on user skill. |
| Ease of Use | Excellent: Extremely simple, no technical skills needed. | Good: User-friendly interfaces, but background tools can be complex. | Poor: Steep learning curve; designed for professional designers. |
| Consistency | Excellent: Delivers a uniform, professional look across all images automatically. | Fair: Consistency depends on manual effort for each photo. | Good: Can achieve consistency with templates and actions, but it's a manual setup. |
| Cost | Affordable: Typically uses a credit-based or low-cost subscription model. | Freemium: Basic features are free, but advanced tools are often behind a paywall. | Expensive: High upfront cost or monthly subscription. |
Ultimately, the right tool is the one that fits your workflow and goals.
The bottom line is this: If you need high-quality product images consistently and without the hassle, a specialized AI editor is almost always the more efficient and effective choice. It gives you professional results without the steep learning curve.
Your Guide to a Perfect White Background
Jumping into an online photo editor to swap out a background for a clean, crisp white one is way easier than you might think. We'll be using ProdShot for this walkthrough, but honestly, the main ideas apply to most of the modern, AI-powered tools out there. It’s about more than just clicking a button, though—it all starts with feeding the AI the best possible image to work with.
This prep work is the one step I see people skip all the time, but it’s what separates a "good enough" result from a great one. A blurry, poorly lit photo is going to give any AI a headache, no matter how smart it is.
Preparing Your Image for the Best Results
Before you even think about uploading, take a second to look at your original photo. The goal here is simple: make it as easy as possible for the AI to see your product clearly.
- Lighting is everything. A well-lit photo with soft, even light helps the editor see the difference between your product and what’s behind it. Harsh shadows can get confusing and might be mistaken for part of the object itself.
- Focus and resolution matter. Always start with the sharpest, highest-resolution photo you have. A crisp edge on your product is exactly what the AI needs to make a clean, precise cutout.
- A little contrast goes a long way. It's not always an option, but shooting your product against a background that contrasts with it can make a huge difference in how well the automated tools work.
Nailing these things upfront will save you so much time you'd otherwise spend on tedious manual corrections.
The One-Click Editing Process
Okay, this is where the magic happens. With an online photo editor like ProdShot, the process is incredibly straightforward. You just upload your prepped image, and the AI takes over.
Artificial intelligence has totally changed this game, especially with the huge leaps we've seen since 2018. Now, tools can remove a background automatically in just a few seconds. They use complex neural networks trained on millions of images to figure out exactly what your product is and slice it away from even the most cluttered backgrounds. This is the tech that lets some tools process hundreds of photos at once.
Once the AI does its thing, you’ll see your product floating on a transparent or temporary background. From there, all you have to do is select pure white (#FFFFFF) as your new canvas.
Final Touches and Exporting
The automated result is usually almost perfect, but I always recommend zooming in to check the edges. Look for any tiny spots the AI might have missed, especially around tricky shapes or fine details like hair or fabric fuzz. Most editors have a refine-edge or touch-up brush for these little fixes.
Your final step is choosing the right file format. This decision directly impacts how your image performs online and where you can use it.
When you're happy with how it looks, it's time to export. Here’s a quick rundown:
- JPG: This is your go-to for web use when file size is a big deal, like on your main website or blog. Just remember, this format doesn't support transparency.
- PNG: Use this format if you ever need a transparent background for other design projects. But for a solid white background, a JPG is almost always the better choice because it's a smaller file.
With your shiny new image ready to go, don't forget to optimize images for web performance to keep your site loading fast. And for anyone selling on Shopify, our guide on how to remove the background for Shopify images has some extra platform-specific advice.
What About Those Tricky Edges?
Let's be real: even the best AI photo editor can get tripped up sometimes, especially when you're trying to put a complex product on a clean white background. Automated tools are incredible time-savers, but they’re not magic. What happens when your product has wispy hair, sheer fabric, or delicate, intricate jewelry?
This is where a little bit of smart prep work can save you a ton of frustration later.
The absolute best way to get a clean edge has nothing to do with editing software. It happens during the photoshoot. Seriously. If you can shoot your product against a simple, solid-colored background that contrasts sharply with the item itself, you’ve given the AI a massive head start. For a dark product, use a light background; for a light one, go dark. This one step can solve 90% of edge-detection problems before you even upload the file.
Refining the Finer Details
For subjects that are just naturally difficult—think glassware, fuzzy sweaters, or anything with fine mesh—you'll probably need to roll up your sleeves and use the editor's manual tools. After the AI has done its thing, zoom way in and scan the edges for any little imperfections.
Most online editors, including ProdShot, give you a couple of key tools for this kind of cleanup:
- The Refine Edge Brush: This is your secret weapon for things like stray hairs or the soft, fuzzy edges of a blanket. Instead of just being a hard eraser, it intelligently samples the pixels around the edge to create a much more natural, believable transition. It’s perfect for those soft-focus areas.
- Manual Erase and Restore: For more obvious mistakes, like a chunk of the old background that got left behind, the classic eraser tool is your go-to. And if the AI got a little too enthusiastic and clipped off part of your actual product, the restore brush lets you simply paint that area back in. Easy.
Getting a perfect result on tricky images is always a two-step dance. First, give the AI a high-contrast photo to work with. Then, use the manual tools for a final polish to clean up anything it missed.
Think of the AI as your really fast assistant who does the heavy lifting, and the manual tools as your own expert touch-up. It's this combination of automation and control that gets you polished, professional images every single time, no matter how complicated the subject is.
Creative Next Steps Beyond a White Background

Once you've nailed that clean white background, the real fun begins. You're not just left with a standard product listing image; you’ve created a flexible, powerful asset that can be dropped into marketing campaigns, social media posts, and so much more. Think of that perfectly isolated product as your creative starting block.
The first step beyond white is often about adding a touch of realism. A simple, soft drop shadow can make a world of difference, grounding your product so it doesn't look like it's awkwardly floating in a void. It’s a subtle detail, but it instantly adds a layer of professionalism and makes the item feel more tangible to the viewer.
Adding Color and Context
From there, you can start playing with different solid-color backgrounds. This is a fantastic trick for seasonal promotions or for creating social media content that perfectly matches your brand's specific color palette. A pop of bold color can be just the thing to stop someone from scrolling past your product on a crowded feed.
Background removal isn't just a technical fix—it’s the first step toward creating more dynamic and engaging visual content. It transforms a static image into a flexible component for any design.
This kind of quick editing has become incredibly accessible, thanks to a surge in mobile photo apps. In fact, downloads for these tools have jumped by over 120% since 2020, largely fueled by the boom in social commerce. That flexibility is exactly what you need to keep your content looking fresh and engaging without a ton of effort.
You can also take that clean image and feed it into an AI product photo generator. This lets you place your product into completely new, hyper-realistic scenes without ever needing to set up a physical photoshoot.
Got Questions About Changing Photo Backgrounds?
Whenever you're using a new tool to get that perfect white background, a few questions are bound to come up. I've been there. Let's walk through the most common ones so you can get clean, professional-looking shots every single time.
Will I Lose Image Quality?
This is probably the biggest worry I hear from people. Will messing with the background make my product look fuzzy or pixelated?
The short answer is no, not if you do it right. As long as you start with a decent, high-resolution photo, modern AI editors are incredibly good at preserving the original quality of your subject. The magic is in the software—it's designed to isolate your product without degrading the pixels.
The real trick is to avoid over-compressing the image. Try to get all your edits done in one go and then save the final version. For a solid white background, a high-quality JPG is your best friend.
What File Type Should I Use?
Choosing the right file format is more important than you might think, especially for website speed and versatility.
For almost any e-commerce site where you need a crisp white background, JPG is the way to go. It gives you fantastic quality but at a much smaller file size. That means your product pages will load faster, which is a huge deal for keeping customers engaged.
The only time you'd really need a PNG is if you want a transparent background. This is super useful if you plan to place your product on different colored banners or in marketing materials later. A PNG file saves that transparency information.
Quick tip from experience: Don't save your white-background photos as PNGs. It technically works, but the file size will be way bigger than a JPG for no real benefit. Keep your site zippy and stick to JPGs for solid backgrounds.
What If the AI Slips Up?
Look, even the smartest AI isn't perfect. Sometimes it might snip off a tiny edge of your product or leave a weird little artifact behind, especially with really complex shapes or fuzzy textures. Don't panic—it's an easy fix.
Any good online editor will have manual touch-up tools. You're looking for something like an "Erase" or "Restore" brush. All you have to do is zoom in on the problem spot and gently paint back the missing piece of your product or wipe away the leftover bit of background. It takes just a few seconds and makes all the difference between a good photo and a flawless one.
Ready to create stunning product photos with zero hassle? Try ProdShot today and see how easy it is to get professional, conversion-driving images in seconds. Get started for free at ProdShot.