

You don't need a sprawling studio or a five-figure budget to take product photos that actually sell. In fact, you can get incredible results with just three core things: a camera, a good light source, and a clean background.
A smart setup will always beat an expensive one. You can get surprisingly far with a smartphone, a sunny window, and a crisp white poster board.
Understanding Your Core Photography Equipment
Jumping into product photography feels like a huge undertaking, but it really boils down to just a few key pillars. Forget the overwhelming lists of complicated gear for a moment. At its heart, a powerful setup is surprisingly simple.
This diagram breaks it down to the absolute essentials.
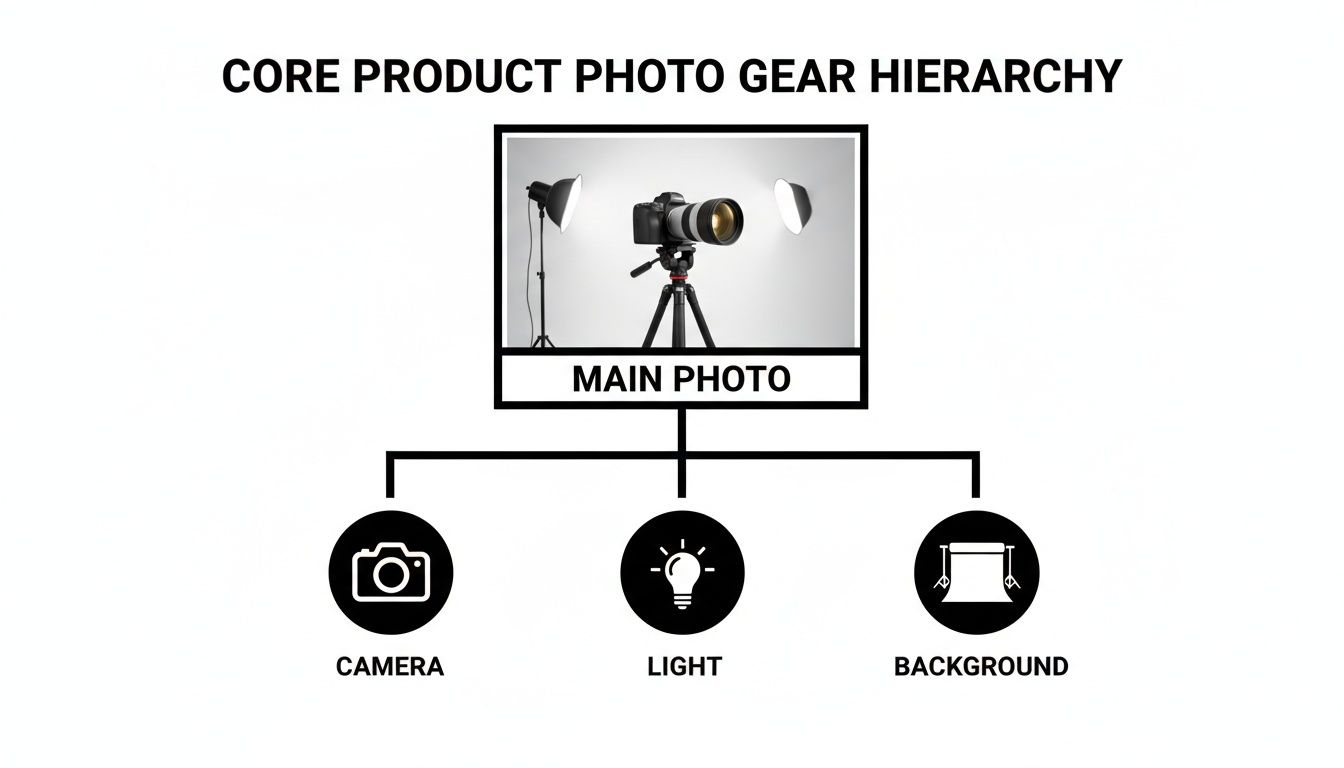
As you can see, your camera, lighting, and background are the foundation. Everything else is built on top of getting these three things right.
Before we dive into the specific gear, here’s a quick overview of the essential components, their purpose, and what your options look like at different budget levels.
Core Product Photography Equipment At a Glance
| Equipment Category | Primary Function | Budget-Friendly Option | Professional Option |
|---|---|---|---|
| Camera | Captures the image | Smartphone | DSLR or Mirrorless Camera |
| Lighting | Illuminates the product | Natural light (window) | Strobes or LED Panels |
| Background | Sets the stage, removes distractions | Poster board, paper roll | Seamless paper, cyclorama wall |
| Support | Keeps the camera steady | DIY stand, small tripod | Professional tripod, C-stand |
This table gives you a roadmap. We'll explore each of these categories in more detail, but it’s helpful to see how you can start small and scale up as your needs grow.
Why Quality Visuals Matter More Than Ever
Investing in the right gear—even simple gear—is a direct investment in your sales. High-quality visuals are no longer a nice-to-have; they're the engine of e-commerce.
The e-commerce product photography market is a massive slice of the commercial photography industry, accounting for roughly 45% of a market projected to hit $5.1 billion by 2025. That e-commerce piece alone is expected to climb to $275.4 million by 2030, which tells you everything you need to know about how critical great photos are for selling online.
Your goal isn't just to show a product. It's to help a customer see it in their life. Your equipment is simply the toolkit you use to build that vision.
A Smartphone-First Approach to Success
Today, you don't need to be a pro photographer to get pro-level results. A "smartphone-first" approach, especially when you pair it with smart AI tools, completely changes the game.
Modern sellers can skip the steep learning curve and high costs of a traditional setup. You can snap a simple photo on your phone and let a tool like ProdShot handle the heavy lifting—instantly removing the background, correcting the colors, and generating realistic shadows.
This is a lifesaver when you're dealing with a huge number of products. If you're wondering how to tackle a large inventory, you can learn more about photographing 1,000 items in a batch.
This guide will walk you through all the essential equipment, breaking down how each piece helps you create compelling images that drive people to click "add to cart."
Choosing the Right Camera and Lenses

The camera and lens are the heart of your setup. It's easy to get lost in the tech specs, but the best choice really comes down to balancing convenience, control, and what you’re actually selling.
For a lot of sellers, the best camera is already in your pocket. Modern smartphones pack some seriously impressive imaging tech, making them a powerful and practical place to start. Their biggest win is simplicity. You can shoot, edit, and upload all from one device, making your entire workflow incredibly efficient.
And when you pair a smartphone with an AI editing tool like ProdShot, it goes from a "good enough" option to a truly professional one. You can focus on getting a good shot, then let the software do the heavy lifting like removing the background and fixing the colors. The result? Marketplace-ready images without the massive learning curve.
Dedicated Cameras for Maximum Control
On the flip side, a dedicated DSLR or mirrorless camera gives you complete manual control. Think of it like cooking: a smartphone is like a microwave—fast, easy, and gets the job done. A DSLR is a full chef's kitchen, giving you precise control over every single ingredient.
This control comes from two main things:
- Larger Sensors: These cameras physically have bigger image sensors, which means they can capture a lot more light and detail. The difference is cleaner, sharper images with richer colors, which really shows when you need to print your photos or zoom in on the details.
- Manual Settings: You get to adjust the aperture (how much light the lens lets in), shutter speed (how long the sensor is exposed to light), and ISO (the sensor's sensitivity to light). Mastering these settings gives you total creative freedom over how your final photo looks and feels.
Your camera choice isn't about "good" vs. "bad." It's about picking the right tool for the job. A smartphone gives you speed and efficiency, while a dedicated camera offers precision and creative depth.
Decoding Lenses for Product Photography
The lens is your camera's eye, and the one you choose has a massive impact on how customers see your product. A classic rookie mistake is just using the default wide-angle lens on a phone or camera. This can distort the shape of your product, making it look bowed or warped—not exactly ideal.
For most products, a 50mm prime lens is the industry workhorse. It's often called the "nifty fifty" because it captures things much like the human eye does, giving you natural-looking proportions without any weird distortion. It's a fantastic all-around choice for everything from clothing to home goods.
But, if you're selling small, detailed items like jewelry, watches, or tiny electronics, a macro lens is a must-have. This specialized lens lets you get incredibly close to your subject to capture those fine details—think the texture on a watch face or the delicate setting of a gemstone—with breathtaking clarity.
The Tripod: Your Unwavering Assistant
No matter what camera you use, a tripod is non-negotiable. It’s like a surgeon's steady hand; it gets rid of camera shake and ensures your images are perfectly sharp, every single time. But its real magic is in creating consistency.
A tripod guarantees that every single product in a collection is shot from the exact same angle and distance. This creates that cohesive, professional look you see across top-tier online stores. This one simple piece of photography equipment for product photography will elevate your images from amateur snapshots to polished, commercial-quality photos.
Mastering Light to Create Professional Images
If your camera is the heart of your setup, then light is its soul. Honestly, getting a handle on lighting is the single biggest leap you can make to turn your product shots from amateur-hour snapshots into professional, eye-catching images.
Light does more than just make things visible. It sets the mood, carves out the shape of your product, and brings out all the little details and textures. It’s your most powerful tool, period.
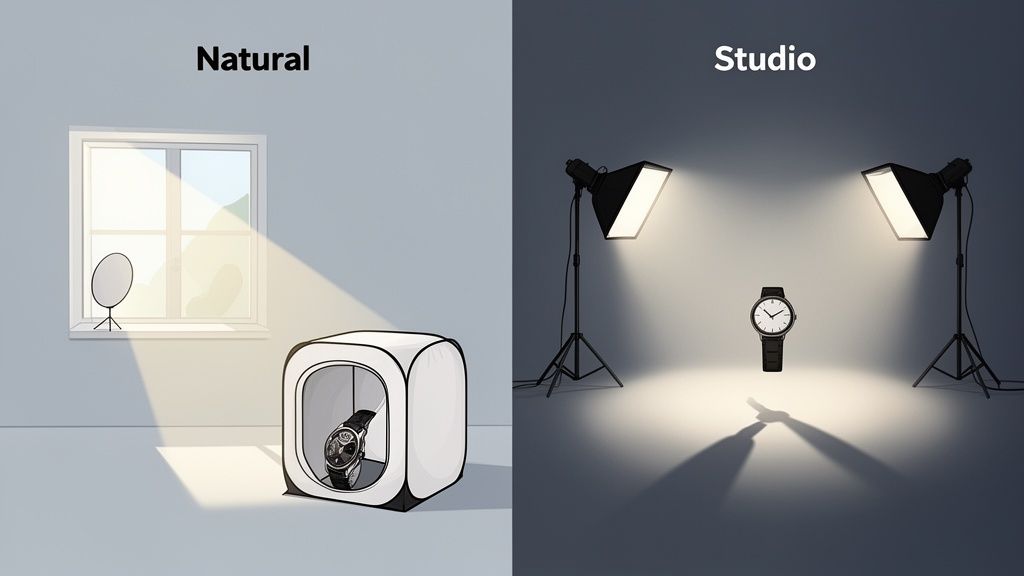
Your first big decision is whether to go with natural or artificial light. Natural light from a big window? It's gorgeous, soft, and best of all, free. But it has a mind of its own. It shifts throughout the day and vanishes at night, making it a real headache to keep your photos looking consistent across your whole product line.
Artificial light, on the other hand, puts you in the driver's seat. You get total control and rock-solid consistency. This is where dedicated photography equipment for product photography really proves its worth. You can shoot at 2 PM or 2 AM and get the exact same look every single time, which is key for a polished, professional storefront.
Getting a Grip on Artificial Light Sources
Once you decide to use artificial light, you’ll find two main players on the field: continuous lights and strobes.
-
Continuous Lights: These are exactly what they sound like—they stay on the whole time. Think of them as very bright, very specialized lamps. This "what you see is what you get" approach makes them perfect for beginners. You can move the light around and see the shadows change in real-time, no guesswork involved.
-
Strobes (or Flashes): These guys are different. They let out a super-powerful, super-fast burst of light the exact moment you click the shutter. They take a bit more getting used to, but that power lets you create incredibly crisp images and completely overpower any weird ambient light in the room.
For most e-commerce sellers just starting out, continuous LED lights are the way to go. They offer the perfect mix of control, affordability, and ease of use without the steep learning curve that comes with strobes.
Here's the thing to remember: the goal of lighting isn't just to illuminate a product; it's to shape it. Good lighting sculpts your product, highlighting its best angles and making it feel three-dimensional and real, even on a flat screen.
Shaping Light with Modifiers
A bare lightbulb or flash creates ugly, harsh light and sharp, distracting shadows. It can make even the most premium product look cheap. That's where light modifiers come in—they're tools that soften, spread, and shape the light for you.
The king of all modifiers is the softbox. It's basically a fabric box that goes over your light source, with a white sheet of diffusion material on the front. It takes that small, harsh point of light and turns it into a big, soft, gentle source that wraps beautifully around your product, kind of like the light from an overcast sky. This smooths out shadows and creates that clean, flattering look you see in all the top e-commerce stores.
If you’re shooting smaller items like jewelry, makeup, or watches, a light tent (often called a lightbox) is a fantastic all-in-one solution. It's a cube-like tent that surrounds your product and diffuses light from every direction. The result is an almost shadowless look, perfect for those classic, clean shots on a pure white background.
Lighting gear is the engine that drives professional product photography. Tools like softboxes and light tents are non-negotiable for e-commerce sellers because they get rid of those harsh shadows on everything from shiny gadgets to soft sweaters. It's a huge deal, especially when you consider product shots are tied to a massive 45% of the entire commercial photography market. You can dive deeper into the numbers by checking out the global photography equipment market report.
Building Your Scene With Backdrops and Props
A great product photo does more than just show an item; it tells a story. It helps your customers picture that product in their own lives. The background and props you choose are the stage for that story, and getting them right can turn a simple shot into a compelling visual that stops the scroll.
You’ve seen those classic, clean product photos on Amazon, right? The ones where the item seems to float in a clean, white void. That look is usually achieved with a seamless paper sweep. It’s just a big roll of paper that curves smoothly from behind the product to underneath it, creating an endless, distraction-free background. If you're on a budget, a large piece of white poster board can do the same job for smaller items.
Choosing the Right Backdrop Material
While that pure white background is a must-have for clean e-commerce shots, it’s far from your only option. Different materials can create completely different feelings and give your products a more lifestyle-focused vibe.
- Vinyl Backdrops: These are fantastic for faking texture. You can find vinyl printed to look like hyper-realistic wood, marble, slate, or concrete. It gives your photos a high-end, editorial feel without having to haul an actual marble slab into your studio.
- Fabric Backdrops: Materials like linen or muslin add a soft, organic touch. They're perfect for wellness products, handmade goods, or clothing.
- Foam Boards: A few colored foam boards from a craft store are a cheap and easy way to inject some bold, on-brand color into your shots for a more vibrant, modern look.
The golden rule for backdrops is simple: the background sets the scene, but the product must always be the star. Keep it clean and uncluttered to make sure the focus stays exactly where you want it.
Using Props to Enhance Your Story
Props are the little details that bring your product’s story to life, but you have to be intentional. A prop should always complement the main item, never compete with it for attention. The goal is to add context, suggest a use case, or just create a specific mood.
For instance, scattering a few fresh coffee beans next to a bag of coffee immediately hints at its rich aroma and flavor. A pair of sunglasses and a book placed beside a bottle of sunscreen on a towel? Instant vacation vibes. Each prop adds another layer to the narrative, helping the customer connect with your product on an emotional level.
Beyond just the gear, learning specific techniques like mastering flat lay photography can really elevate your images. This approach is all about carefully arranging your product and props from a top-down view to create a beautiful, cohesive story all in one frame.
The final touches are what separate a good product photo from a great one. It’s all about the small things—the little accessories that give you consistency and the post-production workflow that adds that final, professional polish.
Think about a remote shutter. It's a tiny gadget that completely eliminates the camera shake you get from pressing the button, keeping your images perfectly crisp. A simple bubble level does the same thing for alignment, ensuring every shot is perfectly straight. This creates a much more cohesive and professional look across your entire product catalog.
If you want to give customers a more complete view, a turntable is your best friend. It lets you capture your product from every single angle, which is perfect for creating those 360-degree interactive images that really build buyer confidence.
Another game-changer is shooting "tethered"—connecting your camera directly to a computer. Instead of squinting at a tiny camera screen, you see your shots pop up instantly on a large monitor. This makes it so much easier to spot a focus issue or a weird shadow right away, not after you've packed everything up.
From Shooting to Selling: The Post-Production Step
Once you’ve captured your photos, the real magic begins in the editing room. The global photography equipment market was valued at an incredible $11.76 billion in 2023, and while pro gear from giants like Canon and Nikon is amazing, the software you use afterward is often where you find the biggest wins in efficiency.
Sure, manual editing software like Photoshop gives you incredible control, but let's be honest—it comes with a steep learning curve. For online sellers who need to list new products now, AI-driven tools are a much faster route to professional, consistent results.
AI editing tools are like a workflow superpower. They handle the tedious, time-sucking retouching tasks, freeing you up to focus on selling instead of spending hours tweaking pixels.
This is exactly what tools like ProdShot are built for. You just upload your raw photos and, in seconds, you get back images that are ready for any marketplace, complete with clean backgrounds and perfect lighting. If you're looking to reclaim your time, it's worth exploring different product photo editing services to see just how much of the process you can automate.
And your workflow doesn't have to stop at still images. If you're looking to add product videos to your listings, checking out some essential video editing tips is a great next step to take.
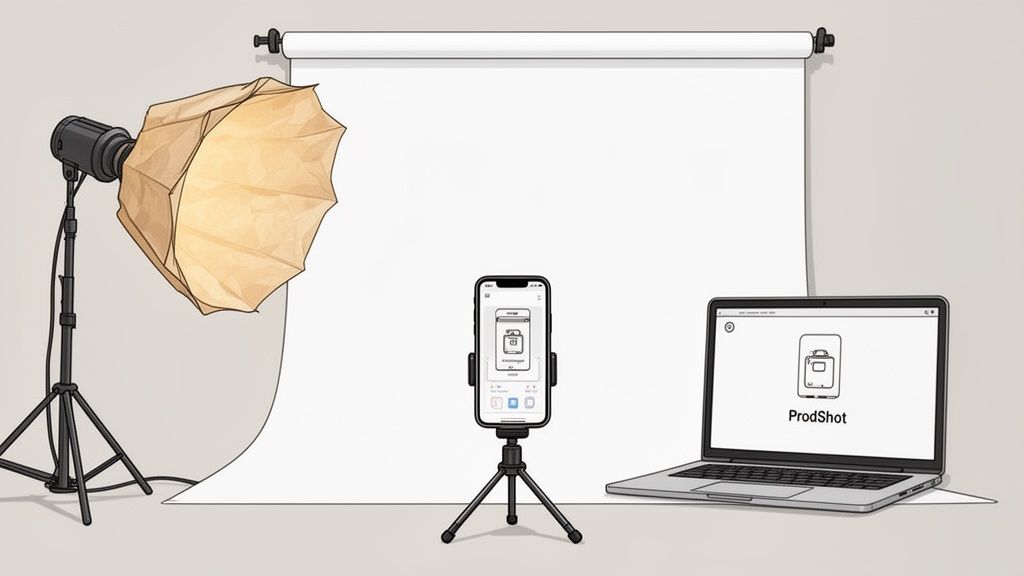
Your Smart and Affordable Smartphone Studio
You don’t need a sprawling, expensive studio to create product images that actually sell. For the modern seller, especially when you're just starting out, the best gear is often the camera you already have in your pocket. With just a few clever, affordable accessories, you can turn any corner of your home or office into a surprisingly powerful mini-studio.
First thing's first: master your light. Go find the biggest window you have. The soft, diffused light that comes through it is incredibly flattering for just about any product you can think of. Set up your product so the light is hitting it from the side. This creates gentle shadows that give your product shape and dimension, making it look real and tangible.
Next up, get a tripod. Seriously, this isn't optional. It’s the single most important accessory for killing the blur and ensuring every shot is tack-sharp. Even a cheap phone tripod will give you the stability you need for crisp, consistent photos—and consistency is key for a professional-looking product catalog.
Clever DIY Lighting Hacks
You don't have to shell out big bucks for fancy lighting gear. Simple items you probably have lying around the house can work wonders for taming harsh light and softening up shadows, giving you that high-end look for practically nothing.
- Parchment Paper Diffuser: Tape a sheet of parchment paper over a desk lamp. It instantly turns a harsh glare into a soft, beautiful light, basically mimicking what a professional softbox does.
- Foam Board Reflector: Grab a white foam board (or even a big piece of white poster board) and prop it up opposite your light source. It will bounce light back onto the dark side of your product, filling in those deep shadows.
Your smartphone isn't a compromise; it's a powerhouse waiting to be unlocked. The secret lies not just in how you shoot, but in how you leverage technology to finish the job.
The real magic happens when you connect your solid smartphone shots to a smart post-production workflow. This is where your phone graduates from a simple camera to a legit tool for creating top-tier imagery.
Bridging the Gap with AI Editing
This is the final step that turns your simple phone pictures into marketplace-ready assets. Instead of wrestling with complex editing software for hours, an AI-powered tool can become your digital darkroom, handling the most tedious and difficult tasks for you—automatically.
Tools like the ProdShot AI product photo generator can take a raw image from your phone, instantly clip out the background, fix the colors, and even add realistic shadows. This seamless handoff elevates your smartphone from a convenient camera to the very heart of an efficient, professional workflow. It truly makes high-quality product photography something anyone can do.
Still Have Questions? Let's Clear Things Up
Getting started with product photography gear can feel like diving into the deep end. It’s totally normal to have questions. Here are the straight-up answers to a few that we hear all the time from sellers just like you.
Do I Really Need a Big, Fancy Camera for My Product Photos?
Honestly? No, you don't. While a pro-level DSLR or mirrorless camera gives you a ton of manual control, the cameras packed into modern smartphones are shockingly good.
When you pair your phone with decent lighting and a smart editing tool like ProdShot to handle the cleanup, you can absolutely create high-converting images for any e-commerce platform. It's the best way to get professional results without dropping a ton of cash upfront.
What's the Single Most Important Piece of Gear I Should Buy First?
Lighting. One hundred percent, it's the lighting.
Good lighting will make a bigger, faster difference in your product photos than anything else. You could have a $5,000 camera, but if your lighting is bad, your photos will still look cheap. Before you even think about a new camera, invest in a simple, solid lighting kit—even just a couple of softboxes or a big ring light. It’s the fastest path to leveling up your images.
The most crucial investment you'll make in your photography equipment for product photography isn't the camera—it's the light. Quality lighting is what separates a quick snapshot from a professional, sales-driving image.
How Do I Get That Perfect, Pure White Background?
Trying to nail a perfectly pure white background (that's RGB 255, 255, 255 for the nerds) right out of the camera is a massive headache. It usually requires a complicated studio setup with multiple lights, and even then, it's tricky.
The fastest and most reliable way to get it done is in post-production. You could spend hours tracing your product in Photoshop, but an AI-powered service is way more efficient. It automatically snips out the original background and drops in that perfect white in just a few seconds.
Natural Light vs. Artificial Light: Which One is Better?
Both can give you stunning results, but they're for different jobs. Natural light from a big window is soft, beautiful, and best of all, free. The catch? It's unpredictable. It changes with the weather and the time of day, making it tough to get consistent shots.
Artificial light, like LEDs, gives you total control. You can shoot at midnight and get the exact same look every single time, which is critical for a cohesive storefront. For most e-commerce sellers who need a repeatable, scalable process, artificial light is the smarter long-term bet.
Ready to skip the gear anxiety and turn your simple smartphone photos into professional, marketplace-ready images? Let ProdShot handle the heavy lifting. Get started for free and see how our AI can transform your product visuals in seconds.