
You don't need a fancy studio or a huge budget to get started with product photography. In fact, some of the most important product photography accessories are simple, affordable tools that give you control over light and stability—and that's what makes all the difference for your smartphone photos.
A basic kit is all it takes to go from amateur snapshots to polished, professional images that make customers feel confident hitting "buy." We're talking about a tripod, a decent light source, and a clean background. That's it.
Building Your Foundational Photography Kit
Creating high-quality product images is hands-down one of the best investments you can make for your e-commerce shop. It might feel like a big, complicated thing, but the truth is, a few well-chosen accessories can make your smartphone photos look like they came from a pro.
Forget spending thousands. You just need to know what each tool does and how it helps you get that perfect shot.
The whole point of this starter kit is to control the two most critical elements in any photo: light and stability. A blurry, poorly lit photo just screams low quality, no matter how amazing your product is. On the flip side, a sharp, well-lit image instantly builds a perception of value and makes your brand look trustworthy. Your first goal is simply to create a controlled space where your product is the star.
Core Components of a Starter Kit
Your first few purchases should be all about versatility and getting the most bang for your buck. Think of these as the absolute essentials for creating clean, consistent product shots.
- A Sturdy Tripod: This is non-negotiable. A tripod gets rid of camera shake, guaranteeing every single image is perfectly sharp. It also lets you keep your framing consistent from one shot to the next, which is crucial for a cohesive look on your product pages.
- A Continuous Light Source: Natural light from a window is great, but it's also unpredictable. A simple LED light, especially one with a softbox, gives you total control. You can shoot day or night and get the exact same look every single time.
- A Clean Backdrop: A roll of white seamless paper or even a simple poster board creates a clean, distraction-free background. This makes your product the hero of the shot, which is exactly where the focus should be.
This small investment pays for itself almost immediately. When you think about the cost of professional product photography, putting together a simple DIY setup is a no-brainer.
The demand for these tools is exploding. The global camera accessories market is expected to jump from USD 4.80 billion in 2025 to a massive USD 13.16 billion by 2032. That’s a huge indicator of just how vital good visuals have become for sellers everywhere.
If you're using a smartphone, checking out some detailed iPhone camera comparisons can help you understand your phone's capabilities and choose accessories that play to its strengths. Once you master these basic tools, you'll be able to create compelling photos that actually drive sales and help grow your brand.
How to Shape Light for Flawless Product Shots
Great lighting isn't just about making things bright; it's about control. Anyone can point a lamp at a product, but learning how to shape that light is what separates a quick snap from a professional photo that actually drives sales. Honestly, it's one of the most impactful skills you can develop for your online store.
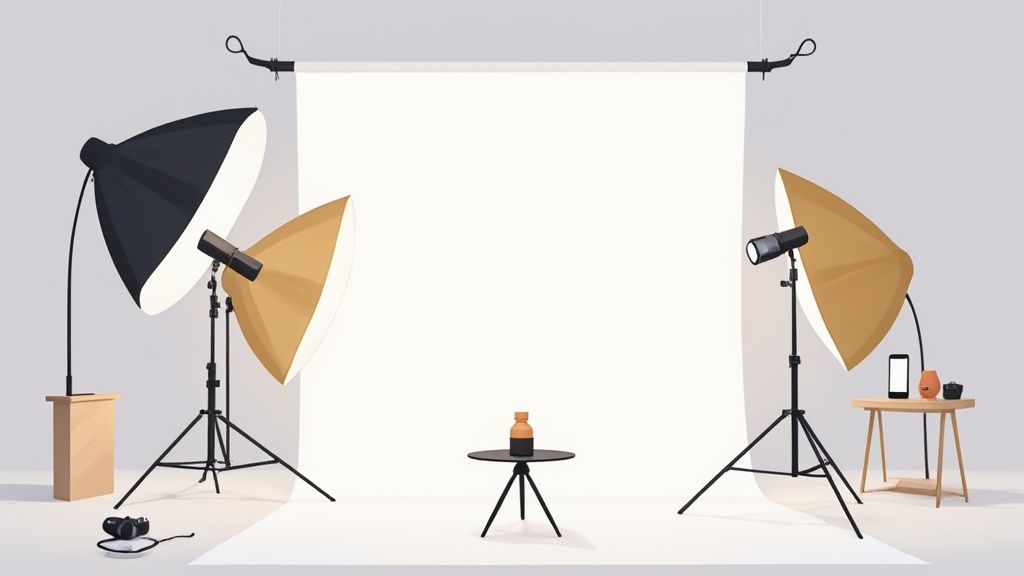
The good news? You don't need a crazy-expensive, multi-light studio setup. A simple two-light rig is surprisingly powerful. For most of us selling online with our smartphones, a pair of affordable continuous LED lights is more than enough to create consistently beautiful shots, day or night.
The Key and Fill Light Method
Your main light source is what we call the key light. Think of it as your portable sun. You'll want to place it at roughly a 45-degree angle to your product. This is the light that does the heavy lifting—it creates the main highlights and really defines the product's shape and texture.
The second light is your fill light. Its only job is to soften the shadows thrown by the key light. Place it on the opposite side of your product, also around a 45-degree angle, but dial back the brightness. A good rule of thumb is to set it to about half the intensity of your key light. This simple trick keeps the shadows from getting too dark and distracting, bringing out more detail without making the whole shot look flat.
"The key to good bourbon and beverage photography is to manage highlights and reflections. We don’t want to eliminate them completely because it will look fake and boring. They need to be reigned in to make a compelling photo."
This two-light technique is a classic for a reason. It adds a sense of depth and professional polish that you just can't get from a single, head-on light source. It ensures your product looks fantastic from every angle.
The image below breaks down a simple workflow, from stabilizing your phone to controlling the light and setting the scene. It’s a great visual for how all the pieces come together.
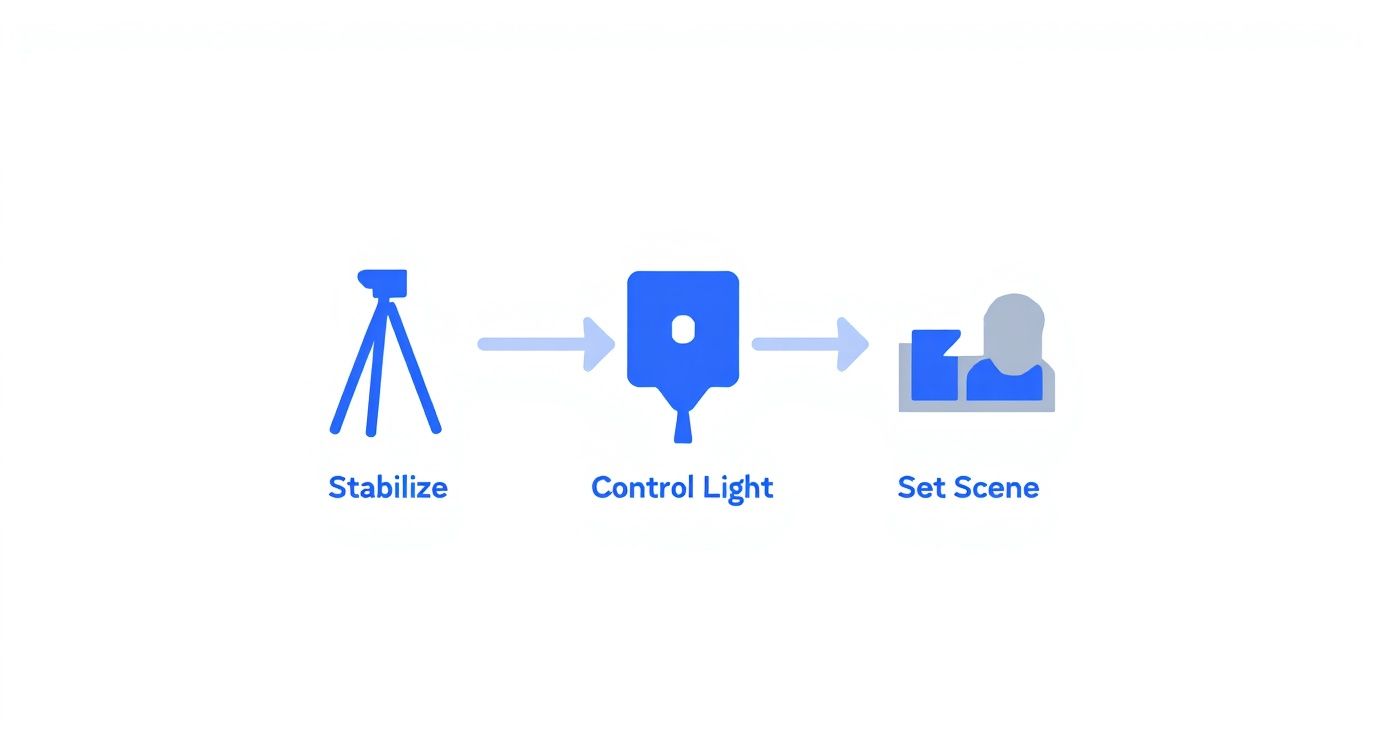
This process shows how essential product photography accessories like a tripod and good lighting build on each other to create a controlled, professional shooting environment.
Using Modifiers for Softer Light
Here's a pro tip: direct light from an LED bulb is harsh. It creates sharp, distracting shadows and ugly hotspots, especially on anything remotely shiny. This is where light modifiers become your best friend. They are essential accessories that tame that harsh glare and turn it into soft, flattering light.
- Softboxes: These are basically tents that fit over your lights. They diffuse the light through a white panel, spreading it out evenly and making your light source feel much bigger and softer. This is the secret to getting that clean, high-end look with gentle, appealing highlights.
- Diffusers: Don't have a softbox? No problem. A simple diffusion panel or even a thin white bedsheet held between the light and your product can do the trick. It just needs to scatter the light to soften those shadows and kill the glare.
Getting this right is becoming more and more important. The market for photography accessories, including things like light stands and reflectors, was valued at USD 424 million in 2024 and is expected to nearly double to USD 844 million by 2031. You can check out more details on this growth trend over on Valuates Reports. This isn't just a niche hobby anymore; it's a critical part of e-commerce.
By learning to shape your light, you're not just taking a photo—you're crafting a high-quality visual asset that will help your business grow.
Creating a Clean Scene with Backdrops and Stabilization
Even the best lighting can’t rescue a great product from a messy background or a blurry shot. Once your lighting is dialled in, the next step is creating a clean, controlled scene. This all comes down to two foundational pieces of gear: a reliable backdrop and a sturdy tripod.
Think of it this way: these tools work together to put your product on a pedestal, completely free from visual noise. A busy background instantly distracts a customer from what you're actually trying to sell. The goal is to create a seamless, professional stage where your product is the undisputed star.
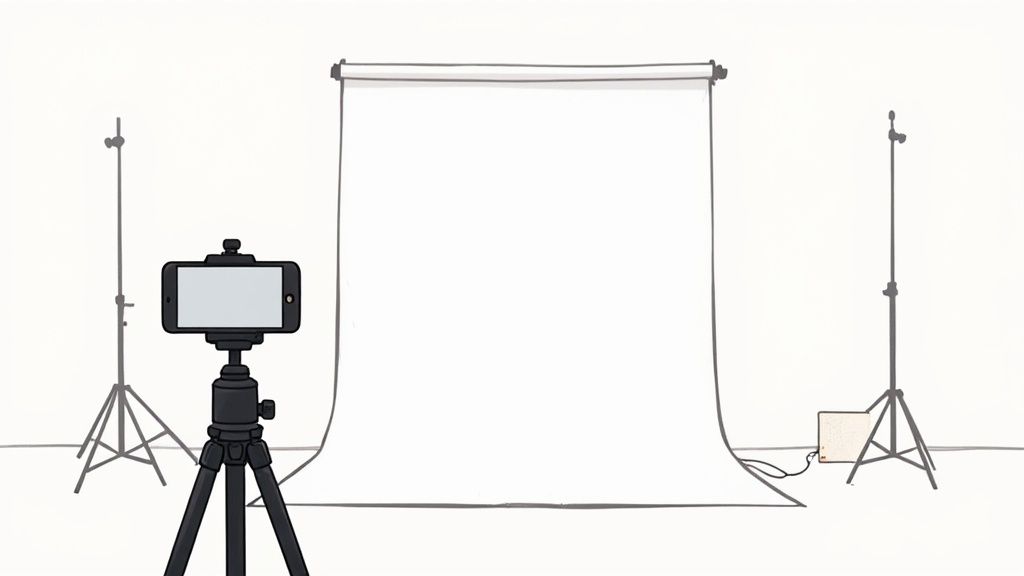
This setup is a perfect example of just how simple it can be to get a professional look with just a few key accessories.
Choosing Your Backdrop
The right backdrop really depends on the vibe you’re going for with your brand. The good news is, there are plenty of affordable and versatile options to choose from.
- Seamless Paper: This is the industry standard for a reason. If you want that classic, clean e-commerce look, a roll of pure white seamless paper is your best friend. It’s inexpensive and creates what's called an "infinity cove" effect, where the background seems to disappear, making your product pop. The best part? When it gets dirty, you just snip off the used section and roll down a fresh piece.
- Poster Board: Selling smaller items? A simple white poster board from any craft store is an incredibly budget-friendly way to get the same look. You can gently curve it up against a wall to get that seamless effect without investing in a full paper roll and stand.
- Vinyl or Fabric: If you're aiming for more of a lifestyle feel, textured backgrounds can add some great context. Think a faux marble slab for luxury skincare or a rustic wood texture for handmade goods. Just be mindful of wrinkles—always steam or iron fabric before you start shooting.
No matter which one you pick, make sure it's secure. Use clamps or strong painter’s tape to hold it taut and smooth. A single wrinkle or crease can cast an ugly shadow that’s a real pain to edit out later.
A clean, consistent background is one of the hallmarks of a trustworthy brand. It tells the customer that you pay attention to detail and care about the quality of your presentation.
The Non-Negotiable Tripod
While the backdrop sets the stage, a tripod guarantees your image is sharp and consistent. Let’s face it, handheld shots, especially with a smartphone, are prone to tiny movements that result in soft focus or downright blur. A tripod eliminates this problem entirely.
But it’s not just about preventing camera shake; it’s about consistency.
When you’re shooting multiple angles of the same product, a tripod locks your phone in place. This ensures every single shot is perfectly aligned, which makes your product pages look far more polished. It also makes the editing process a thousand times easier. Even with a perfectly shot photo, you might find our product photo editing services can help you achieve that perfectly uniform look across all your listings.
Look for a tripod with a reliable smartphone mount that grips your device securely. This simple tool frees up your hands to adjust lighting or move reflectors around, making your whole workflow more efficient. It’s a small investment that delivers a massive improvement in image quality.
Once you've nailed your lighting and have a stable setup, it's time to bring in the fun stuff—the product photography accessories that add a bit of flair and capture those all-important details. This is where you graduate from simple, static images to creating a full-blown product story. You start showing customers not just what they're buying, but giving them a real feel for it in a way that builds serious excitement and trust.
Two pieces of gear will absolutely change the game for you: turntables and clip-on smartphone lenses. And no, these aren't just for fancy, big-budget studios anymore. There are plenty of affordable options out there that can make a massive difference in how your products look and feel online. They let you show off motion and get up close and personal with the fine details, helping you cut through the noise of a crowded marketplace.
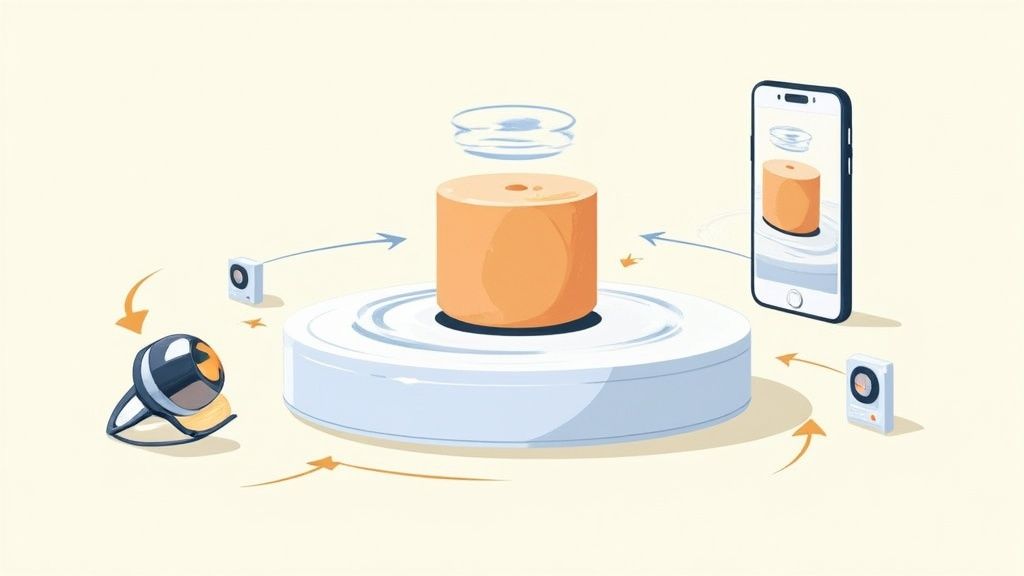
Create Dynamic 360-Degree Views with a Turntable
A motorized turntable is probably one of the smartest investments you can make. It’s a simple tool that lets you effortlessly capture your product from every single angle. You can then stitch those images together to create an interactive 360-degree view or a looping GIF that grabs attention. That little bit of motion is proven to boost a customer's confidence because it gives them a much better sense of the product's actual size, shape, and features.
Here’s a quick workflow to get you started:
- Set the Scene: Pop the turntable onto your backdrop and place your product right in the middle.
- Lock It Down: Mount your phone on its tripod, making sure it's perfectly level and the product is framed just right.
- Start Shooting: Get the turntable spinning. You can either take a smooth video or snap photos at regular intervals—say, every 10 degrees—until it’s done a full rotation.
- Stitch It Together: Use a simple app or an online tool to combine your shots into an animated GIF or an interactive 360 view.
This one technique adds a layer of professionalism and interactivity that a flat image just can't compete with.
By showing every angle, you answer customer questions before they even think to ask them. That kind of transparency builds trust and can directly increase conversions by getting rid of any hesitation they might have.
Capture Fine Details with Specialized Lenses
Clip-on lenses are another secret weapon for smartphone photographers. They're tiny, portable, and can completely transform your shots. For product photos, two types are absolute must-haves.
A macro lens is your go-to for capturing the tiny, intricate details that scream quality. Think about the delicate clasp on a piece of jewelry, the perfect stitching on a leather wallet, or the rich texture of a skincare product. A macro lens lets you get incredibly close, showing off the kind of craftsmanship that justifies your price.
Then there's the polarizing filter (or CPL). This little guy is your best friend when shooting anything reflective. If you're photographing sunglasses, glass bottles, or electronics with screens, a polarizer cuts right through the glare to show the true color and detail underneath. Just clip it on and twist the filter until the distracting reflections vanish.
The market for this kind of gear is booming, even in niche areas. For instance, the instant camera and accessories market is expected to grow by a staggering USD 466.3 million between 2025 and 2029. This just goes to show how much people value tools that create unique visual styles—a trend that e-commerce sellers can jump on to make their listings stand out. You can learn more about these market trends and how they're shaping photography.
Snapping gorgeous photos is a huge win, but the job isn't truly finished until those images are live on your store and making you money. The secret to bridging the gap between your camera roll and your sales is a smooth, repeatable workflow. It’s what saves you countless hours and keeps your brand looking sharp and consistent.
This is where all the work you did with your product photography accessories really pays off.
A smart shooting process is your first line of defense against wasted time. Before you even think about hitting the shutter button, whip up a simple shot list for each product. Make sure you cover all the essentials: front, back, side, a nice 45-degree angle, and any crucial detail shots. Nailing this down means you won’t have to tear down and rebuild your entire setup just for one forgotten picture.
Even with the best plan, you’ll run into little snags while shooting. Don't sweat it. This is where getting good at on-the-fly fixes comes in handy.
https://www.youtube.com/embed/_GFlR5e1ueY
Quick Fixes During Your Shoot
Dealing with a stubborn reflection on a glass bottle? Try backing your main light source away a bit or adding another layer of diffusion with some fabric. If you notice your lighting looks different from one shot to the next, check for stray light from the room. Turning off all other lights is a simple trick that solves this problem 90% of the time.
Playing with the angles of your bounce cards can also do wonders for filling in awkward shadows without messing with your main lights. Getting quick with these little adjustments will make your sessions fly by.
A great photoshoot is your foundation, but a slick post-production workflow is where you get a serious edge. It’s how you turn good raw images into amazing, high-converting assets without losing your mind.
From Raw Photo to Polished Listing
Once you’ve got your raw images, it's time to make them shine. In the old days, this meant hours hunched over complex software, meticulously tracing product outlines to get rid of the background. Thankfully, AI-powered tools have totally changed the game, putting pro-level results within anyone's reach.
This is where a tool like ProdShot really comes into its own. You can upload the photos from your carefully planned shoot, and in just a few seconds, the AI perfectly strips away the background. From there, it's easy to pop on a brand template, add a realistic shadow, or even generate a full lifestyle scene to show your product in action.
This blend of physical product photography accessories and smart digital tools is the modern seller's secret weapon. A solid setup gives you high-quality raw material, and an AI editor transforms it into polished, on-brand listings in a flash.
If you happen to be a Shopify seller, it's worth exploring how a dedicated Shopify photo editor can make this process even smoother inside your store's ecosystem.
Finally, after all that work, you need to make sure your beautiful images are displayed correctly on your site. For Shopify merchants, getting to know the Shopify Product Image API can give you a deeper level of control over how your visuals are managed. This complete workflow—from tripod to final listing—is how you get professional, high-converting images live on your site faster than ever.
Of course. Here is the rewritten section, crafted to sound like an experienced human expert, following your provided style guide and examples.
Your Top Product Photography Questions, Answered
Jumping into product photography accessories can feel like opening a Pandora's box of gadgets. There are so many options out there, it's easy to get overwhelmed. Let's cut through the noise and tackle the questions I hear most often from sellers building out their first real photo kit.
Think of this as your cheat sheet for the most common hurdles. The goal isn’t to buy a mountain of gear, but to make a few smart investments that solve real problems and get you professional results, faster.
What’s the One Accessory I Absolutely Need to Start?
If you’re just starting out with your smartphone, the single most important piece of gear you can buy is a sturdy tripod with a good phone mount. I know everyone wants to talk about lighting—and we’ll get there—but stabilization is the bedrock of a good product shot.
A tripod immediately kills camera shake, which is the number one cause of blurry, amateur-looking photos. It also lets you lock in your framing, so every shot you take of a product is perfectly consistent. That consistency is what makes an online store look polished and professional. Plus, it frees up your hands to tweak your product, adjust a reflector, or fine-tune your lighting. It just makes the whole process smoother.
Can I Get Away With Just Using Window Light?
Look, natural light from a window can be beautiful, and it's free. But it's also a total diva—completely unreliable. The color and brightness of the light are constantly shifting as the day goes on, and it’s a no-show on cloudy days or after sunset.
Investing in even one simple, continuous LED light with a softbox puts you in the driver's seat. It means you can shoot whenever you have the time—day or night, rain or shine—and get the exact same professional-looking result for every single product.
That kind of consistency is what builds a cohesive brand. It tells your customers you’re a serious business that cares about the details.
How Do I Stop Awful Reflections on Shiny Products?
Ah, the dreaded glare. Reflections on jewelry, glass, or glossy electronics are the bane of every product photographer's existence. The fix starts with your light source. You want big, soft, diffused light—a softbox is perfect for this. It creates gentle, flattering highlights instead of sharp, distracting hot spots.
Next, you have to play with your angles. Sometimes moving your camera or your light just an inch or two is all it takes to make a reflection disappear. You can also use black or white foam boards just outside the frame to block or absorb light where you don't want it.
But if you want the ultimate weapon, a circular polarizing filter (CPL) is a true game-changer. It's a small filter that clips right over your smartphone lens. As you rotate it, you can literally dial down or even completely erase reflections from surfaces like glass and metal. It's a tiny piece of gear that makes a massive difference.
Ready to turn those carefully crafted product shots into money-making assets? With ProdShot, you can take your images and instantly create professional, on-brand visuals. Remove backgrounds, apply stunning templates, and even generate lifestyle scenes in seconds. Give it a try for free at https://prodshot.net.