

For any online beauty brand, your product photography for cosmetics is easily the most powerful sales tool you have. Think about it—customers can't swatch that new lipstick or feel the texture of your best-selling cream. Your images are their only way to experience the product, and that single visual impression directly shapes their decision to buy.
Why Great Cosmetic Photography Drives Sales
In the incredibly crowded beauty market, your product photos are your silent salesperson on the floor, working 24/7. They do so much more than just show what you're selling. They build trust, scream your brand's identity from the rooftops, and forge a real emotional connection with shoppers.
A blurry, poorly lit photo of a foundation bottle doesn't just look bad; it suggests a low-quality product and a brand that doesn't care. On the other hand, a crisp, beautifully styled image communicates professionalism, quality, and value before a customer ever reads your product description.
That first impression is everything. Customers are making a split-second judgment about your entire brand based on that one image. High-quality visuals are absolutely essential for bridging the gap between the screen and the real-world experience you want them to have.
The Financial Impact of Visuals
The link between strong imagery and your revenue is direct and easy to measure. It's a fact: professionally photographed products convert worlds better than amateur shots. This is especially true in cosmetics, where a photo has the tough job of accurately representing shimmer, pigment, and feel.
In fact, some studies show professional photos can boost conversions by as much as 30%. On the flip side, poor images are a major reason behind a staggering 67% of cart abandonment rates. You can find more details about these beauty industry statistics over at Bizplanr.ai.
When a customer can’t swatch a lipstick or feel a cream's texture, the photograph becomes the entire sensory experience. Your goal is to make that experience so compelling they feel confident clicking "add to cart."
Building Brand and Trust
Beyond the immediate sale, consistent, high-quality photography is how you tell your brand's story.
Are you a minimalist, clean-beauty brand? Your photos should reflect that with simple backgrounds and soft, natural light. Are you all about being bold and vibrant? Use dynamic compositions and rich, saturated colors to get that message across.
This visual consistency across your website, social media, and ads builds brand recognition and, over time, fosters real customer loyalty. For brands trying to figure out the best path forward, understanding the cost of professional product photography can bring a lot of clarity to the investment versus the return.
Ultimately, investing in excellent imagery isn't just a line item expense—it's a direct investment in your brand’s long-term success.
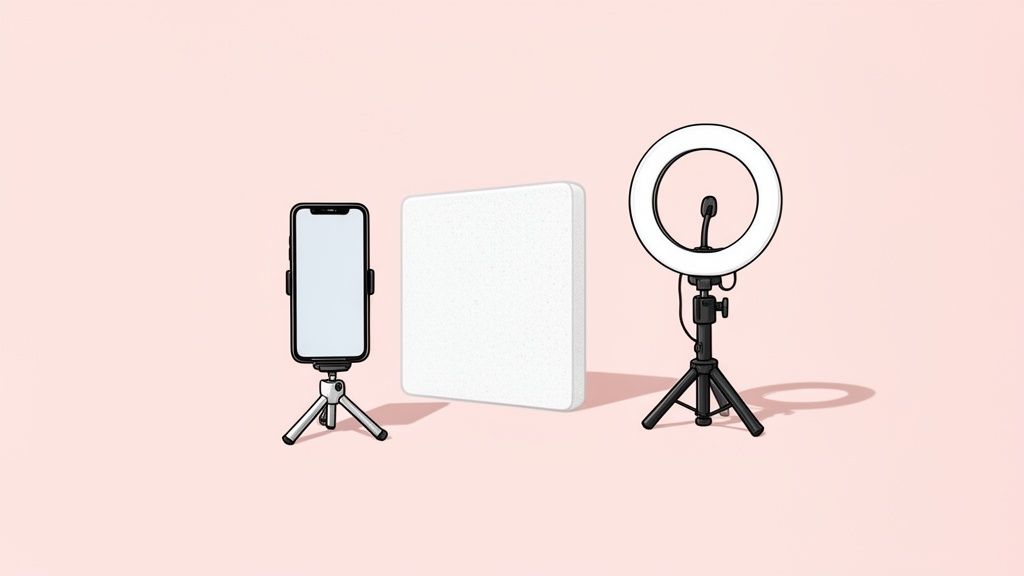
Your Budget-Friendly Photography Toolkit
You absolutely do not need a high-end studio or a fancy DSLR to create stunning cosmetics photos. The powerful camera you already carry around in your pocket—your smartphone—is more than capable of capturing professional-quality images when you pair it with a few simple, affordable accessories. This setup is perfect for indie brands who want polished results without the professional price tag.
The foundation of any great photo is light. A fantastic place to start is with the best free light source there is: a large window on an overcast day. This gives you soft, diffused light that minimizes harsh shadows and perfectly flatters cosmetic products, whether you're shooting matte foundations or shimmering highlighters.
For more control and consistency, especially if you're shooting at night or on gloomy days, an affordable LED ring light is a game-changer. They provide even, continuous light that's ideal for beauty products, ensuring your colors stay true and consistent from one photo to the next.
Essential Accessories for Sharp and Bright Photos
Beyond your light source, a few key items will elevate your smartphone shots from looking like a quick snap to a professional shot. These tools are incredibly inexpensive but make a huge difference in the final quality of your images.
- A Small Tripod: This is completely non-negotiable. Even the steadiest hands introduce tiny movements that result in slightly blurry photos. A tripod keeps your smartphone perfectly still, guaranteeing crisp, tack-sharp images every single time.
- White Foam Boards: These are your secret weapon for manipulating light. Just place a white foam board opposite your main light source to bounce soft light back onto your product. This simple trick fills in dark shadows and illuminates details without creating harsh glare on shiny packaging.
- Elegant Backdrops: A clean, uncluttered background makes your product the hero. You can use large sheets of paper, fabric, or vinyl backdrops in neutral tones or on-brand colors. A simple, consistent backdrop ensures your entire product line looks cohesive and professional.
A tripod isn't just about stability; it's about consistency. Locking your phone in place allows you to style your product and adjust lighting without ever changing the camera's angle, creating a uniform look across your entire product gallery.
This minimalist toolkit is proof that you don't need to spend a fortune to get started. By focusing on controlling your light and eliminating camera shake, you can produce bright, clear, and compelling cosmetic photos that will captivate customers and drive sales—all with the device you use every day.
Styling Your Cosmetics to Tell a Story
This is where the magic happens. Styling is how you take a simple shot of your product and turn it into a visual story that grabs your customer’s attention. It’s the art of arranging your cosmetics to show off your brand’s personality, hint at the key ingredients, and just make people feel something. This is what separates a basic snapshot from a high-converting, professional product photography for cosmetics asset.
Think of your product as the main character. Everything else—the props, the background, the textures—is the supporting cast. If you're a clean, minimalist brand, your story might be a simple white background with one elegant prop. But if your brand is all about vibrant, bold energy, you'll want to use dynamic layouts and rich colors that match that vibe.
The whole point is to create a scene that looks and feels intentional, speaking directly to the person you want to buy your product. A well-styled photo doesn't just display lipstick; it sells confidence.
Choosing Your Styling Approach
Your styling choices have to line up with your brand identity, period. A confusing style sends mixed signals and weakens your message. Before you place a single item, think about the mood you want to create.
Here are a few popular routes you can take:
- Clean and Minimalist: This style is all about negative space, simple backgrounds, and very few props. It’s perfect for brands that want to communicate sophistication, purity, or a focus on high-quality formulas. Picture a single lipstick tube lying on a clean, solid-colored surface.
- Rich and Textural: Bring in props like silk fabrics, marble slabs, or fresh botanicals to add some depth and context. This is a fantastic way to highlight natural ingredients or create a seriously luxurious feel. Imagine a vitamin C serum sitting next to a freshly cut slice of orange.
- Playful and Dynamic: This is where you get to create some action. Think artistic lipstick smears, beautifully spilled powder, or glistening water droplets on a bottle. It’s a super effective way to show off a product's texture and color payoff in a way that feels really engaging.
Quick pro tip: Always keep a lint-free cloth and a small, soft brush on hand during your shoot. Nothing kills a gorgeous close-up of a cream jar faster than a stray fingerprint or a tiny speck of dust on the lid.
Composition That Converts
How you arrange everything in the frame is just as important as what you put in it. Good composition is what guides the viewer's eye right to your product, creating a balanced and satisfying image.
The rule of thirds is your best friend here. It's a classic for a reason. Imagine your screen is split into a 3×3 grid. By placing your product along these lines or where they cross, you create a much more dynamic and interesting photo than just sticking it in the dead center. It just feels more natural and less staged to the human eye.
Don't forget about negative space—that’s all the empty area around your product. Seriously, don't be afraid to leave plenty of room. Negative space stops the image from feeling cluttered and makes your cosmetic product the undeniable hero of the shot. To really capture your audience's imagination, you'll want to master different visual storytelling strategies for social media, which is a powerful way to style your products and build a compelling brand narrative.
The e-commerce product photography market is exploding, projected to hit US$275.4 million by 2030. Brands are getting creative to stand out. In fact, 3D photography now holds over 65% of the market share because it gives customers an immersive view that can slash return rates by 25% and crank up conversions by 30% in the beauty space. You can discover more insights about these product photography statistics and how they're changing the game.
Get The Shot: Nailing Your Smartphone Photos
Great lighting is the single most important ingredient for turning a simple snapshot into a professional product photo. Your smartphone is absolutely capable of capturing stunning, magazine-worthy images of your cosmetics, but only if you get the light right. The goal here is soft, flattering light that shows off your product’s true color and texture without creating any of those harsh, distracting reflections.
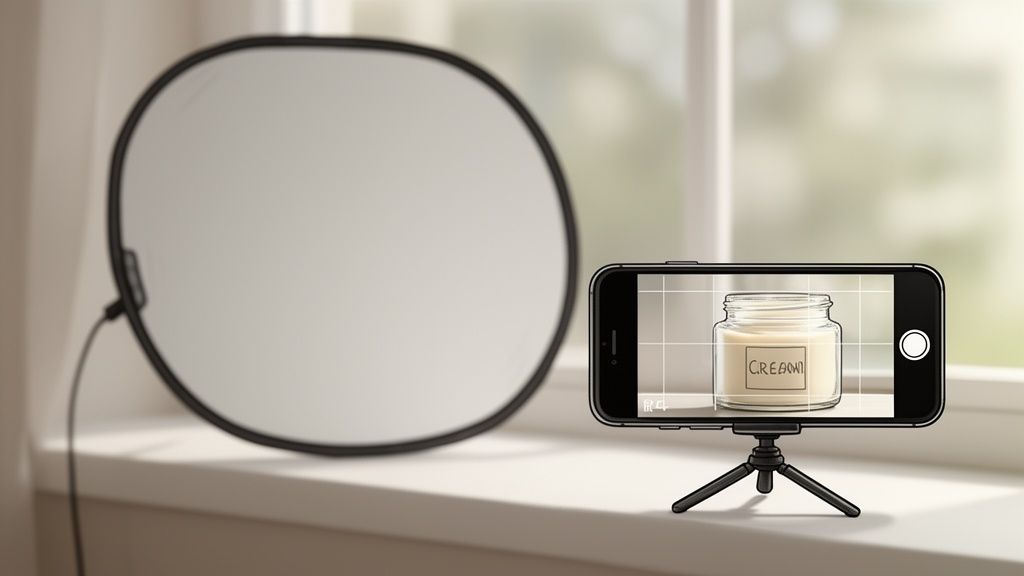
Often, the best light source you can find is completely free. Just set up your product near a large window on a day when it's slightly overcast. This gives you beautiful, diffused natural light that wraps around your products, minimizes hard shadows, and really brings out the subtle shimmer in a highlighter or the rich pigment of a lipstick.
Want to take it up a notch? Grab a simple piece of white foam board from a craft store and place it opposite the window. This will bounce light back onto your product, filling in any lingering shadows and giving you that clean, bright, professional look.
If you're using an artificial light like an LED ring light, resist the urge to point it directly at your product. That’s a recipe for flat lighting and ugly reflections on glossy packaging. Instead, position your light at about a 45-degree angle, to the side and slightly above your item. This is a classic technique called side-lighting, and it works wonders for carving out the product's shape and adding beautiful dimension.
Dialing in Your Smartphone Camera Settings
Once your lighting is sorted, it’s time to take control of your phone's camera. Don't just point and shoot! Spending a few extra seconds on these settings will make a huge difference in the final quality of your photos.
The most critical thing you can do is lock your focus and exposure. On just about any smartphone, you do this by tapping and holding on your product right on the screen. You’ll see a little yellow box or icon pop up to confirm it’s locked. This single action stops the camera from automatically readjusting the brightness or focus if you move your hand, ensuring your product stays perfectly sharp and correctly lit.
Pro Tip: Locking your exposure is especially vital for cosmetics. It prevents the camera from getting confused by a bright white background or a dark, moody product, which often leads to photos that are either washed out or way too dark.
After locking focus, you can fine-tune the brightness. Look for a little sun icon next to the focus box—just slide your finger up or down to adjust. Tweak it until the product’s color looks true-to-life and all the important details are crystal clear.
Here's a quick cheat sheet to get you started.
Smartphone Camera Settings For Cosmetic Photography
This table is a quick reference guide to the essential smartphone camera settings and why they matter for capturing beautiful cosmetic product photos.
| Setting | Recommended Action | Why It's Important For Cosmetics |
|---|---|---|
| Focus/Exposure Lock | Tap and hold on your product until the lock icon appears. | Prevents the camera from shifting focus or auto-adjusting brightness, keeping your product sharp and perfectly exposed. |
| Gridlines | Turn on in your camera settings (usually a 3×3 grid). | Helps with composition, making it easy to use the rule of thirds for more dynamic, professional-looking shots. |
| Brightness/Exposure | After locking focus, manually slide the brightness control. | Allows you to fine-tune the lighting to ensure true-to-life colors and prevent details from being lost in shadows or highlights. |
| Portrait Mode | Use for single-product hero shots. | Creates a beautiful blurred background (bokeh), making your cosmetic product pop and look incredibly high-end. |
| Flash | Turn it OFF. | The built-in flash is harsh and creates unflattering glare on cosmetic packaging. Natural or soft artificial light is always better. |
Remember, these settings are your starting point. The best way to learn is to experiment and see what works best for your specific products and lighting conditions.
Frame Your Shot For Maximum Impact
Composition is just a fancy word for how you arrange things in your photo to guide your customer's eye. A well-composed shot just feels right—it's balanced, professional, and makes your product look more desirable. And your smartphone has tools built right in to help you nail this every time.
First, dive into your phone's camera settings and turn on the gridlines. This will overlay a simple 3×3 grid on your screen. Now, you can use the rule of thirds. Instead of sticking your product right in the dead center of the frame, try placing it along one of the lines or where two lines intersect. It’s a simple trick that instantly makes your images more dynamic and visually interesting.
Most modern smartphones also have a 'Portrait' mode, and it’s a game-changer for product photography. This feature creates what photographers call a shallow depth of field, which means your product is perfectly sharp while the background gets a lovely, soft blur. It’s an effortless way to make your cosmetic item the undeniable star of the show, eliminating background distractions and adding that high-end, professional touch to your images.
Streamlining Your Edit with AI Tools
Let's be honest, post-production can be a total grind. It's often the most time-consuming part of creating professional product photography for cosmetics. But it really doesn't have to be. Instead of sinking hours into complicated software, a smart workflow using AI-powered tools can transform your raw smartphone photos into polished, e-commerce-ready shots in minutes.
These tools are built to do the heavy lifting. They let you achieve a consistent, high-end look across your entire product line without needing a lick of technical design skill. The whole process is refreshingly simple.
This diagram breaks down the modern AI editing workflow into three core steps.
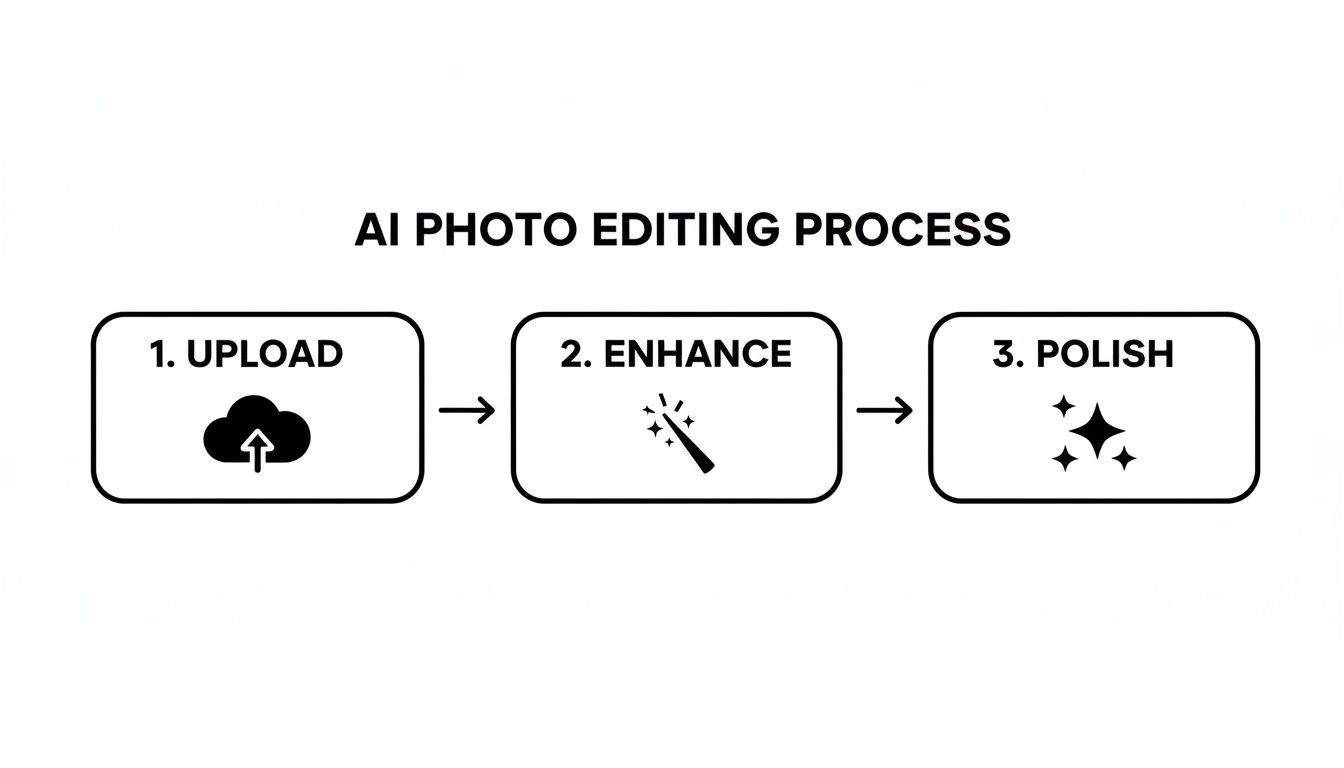
As you can see, the journey from a raw photo to a finished asset is just a matter of uploading your shot, letting the AI work its magic, and then making a few final tweaks. This slashes the manual labor that editing used to demand.
One-Click Background Removal
One of the most game-changing features in modern editing apps is instant background removal. Getting that crisp, pure white background required by platforms like Amazon and Shopify used to be a painstaking process. Now, AI can identify your product and flawlessly erase the background with a single click.
This isn't just a time-saver; it’s a brand-builder. It ensures every product photo looks uniform and professional, creating a clean and trustworthy shopping experience. You can instantly place your product on a white, colored, or even a custom branded background to fit your store's vibe.
The goal of post-production is consistency. When every product image has the same clean background and accurate colors, it elevates your brand's perceived value and builds subconscious trust with shoppers browsing your store.
Intelligent Color Correction and Retouching
For cosmetics, color accuracy is everything. A customer needs to trust that the shade of foundation or lipstick they see on screen is exactly what's going to show up at their door. AI tools are brilliant at this, automatically analyzing and correcting the colors in your photo to match the real-life product.
On top of that, these tools can intelligently spot and remove minor imperfections that might have slipped past you.
- Dust and Lint: Those tiny specks of dust that landed on your product during the shoot? Gone.
- Fingerprints: Minor smudges or fingerprints on glossy packaging can be subtly wiped away without hurting the product's texture.
- Minor Blemishes: Small scuffs or imperfections on the packaging itself can be cleaned up for a flawless finish.
This automated retouching gives you a perfect final image without you ever having to zoom in and manually clone or heal pixels. If you want to see these features in action, you can explore a dedicated AI product photo generator and test them out yourself.
It all starts with a good, clean shot. With the right setup, you can give the AI the perfect raw material to refine into a polished, conversion-ready image for any e-commerce platform.
Optimizing Your Images for Ecommerce and Social Media
A stunning photo is only half the battle. If it isn’t properly formatted for the platform where your customers will see it, all that hard work styling and shooting goes to waste.
Every marketplace and social channel has its own technical rulebook. Ignoring those rules can lead to blurry images, painfully slow load times, and ultimately, lost sales. The trick is to hit that sweet spot between image quality and file size. A massive file looks incredible but will drag down your site speed, tanking your SEO and frustrating visitors. Go too small, and your product will look pixelated and unprofessional on modern high-resolution screens.
Platform-Specific Requirements
What works for Instagram won’t necessarily fly on Amazon. You have to tailor your shots to the platform's specific needs to look professional and make the sale.
- Shopify: Generally loves a square (1:1) aspect ratio. Aiming for 2048 x 2048 pixels helps create that clean, uniform grid look that makes a collection page feel polished and cohesive.
- Amazon: Has strict rules. They demand a pure white background and require the longest side of your image to be at least 1000 pixels. This is non-negotiable if you want to enable their all-important zoom feature.
- Instagram: It’s more flexible these days, but square (1:1) and vertical (4:5) images still get the most love in the feed, taking up more screen real estate and grabbing more attention.
Here's a pro-tip that so many people miss: name your files for SEO. Ditch generic names like
IMG_8475.jpg. Instead, be descriptive:brand-name-radiant-glow-foundation-shade-ivory.jpg. This is a simple but powerful way to help search engines understand what your image is about, boosting your product's discoverability.
If you really want to get into the weeds of this, there's a complete guide to image optimization for web that covers everything.
And to make sure you nail the specs every single time without the headache, a simple online tool is your best friend. You can use a handy image resizer to quickly tweak your photos for any platform's exact requirements.
Of course, here is the rewritten section with a more natural, human-expert tone, following the provided style guide.
Your Top Cosmetic Photography Questions, Answered
When you're trying to get your cosmetic photos just right, a few common frustrations always seem to pop up. I see them all the time. Let’s walk through the most frequent culprits and how to solve them so you can get back to creating images that sell.
How Do I Avoid Reflections on Shiny Packaging?
Ah, reflections. They’re the classic enemy of anyone shooting cosmetics. That glossy lipstick tube or shiny serum bottle can feel impossible to capture without seeing your own reflection staring back.
The secret here is using soft, diffused light. Never, ever point a light source directly at your product—that’s just asking for a harsh, distracting glare. Instead, your goal is to soften and scatter that light. Place your light at a 45-degree angle and bounce it off something like a white foam board, or use a simple diffuser sheet. This creates a much gentler light that wraps around the product instead of bouncing straight back into your lens.
Sometimes, the fix is even simpler. Just physically moving your camera can make a world of difference. Try shifting your angle slightly up, down, or to the side. Often, a tiny adjustment is all it takes to make that pesky glare completely disappear.
Why Do My Colors Look Wrong on Camera?
There's nothing more frustrating than having a photo misrepresent your product’s color. A vibrant red lipstick that looks orange on screen? That’s a guaranteed way to disappoint a customer.
Nine times out of ten, this problem comes down to one thing: white balance. Your camera is trying to guess what "white" looks like in your scene, and it often gets it wrong. Natural daylight is usually your best bet for accurate tones, but even that changes color depending on the time of day.
Most smartphone cameras have a manual white balance setting. If your product looks too yellow (warm) or too blue (cool) in the shot, dive into those settings and adjust them until what you see on the screen is a perfect match for the real thing.
Here's a trick I swear by: place a truly white object, like a plain sheet of printer paper, right next to your product when you're setting up. Then, adjust your camera's white balance until that paper looks pure white on your screen. When the white is right, all the other colors in your shot will fall into place.
And remember, you always get a final chance to nail the colors during editing. A final tweak in post-production can ensure absolute accuracy before you upload.
Tired of wrestling with lighting and spending hours editing? ProdShot is the shortcut. It uses AI to turn your simple smartphone snaps into flawless, professional cosmetic photos in seconds. Give the free trial a spin and see for yourself.