
Think of your product photos as your digital storefront, your best salesperson, and your brand ambassador, all rolled into one. For anyone selling online, great images aren't just a "nice-to-have"—they're the engine that drives trust, sales, and how people see your brand. Honestly, it can make or break your entire business.
Why Pro-Level Images Are a Must-Have for Online Sellers
In the world of e-commerce, your photos have to do all the heavy lifting. Since shoppers can't physically pick up or inspect your products, they're relying completely on what they see to judge quality, value, and whether they can trust you. This isn't just theory; it's how people shop online. A blurry, poorly lit photo screams a lack of care, planting a seed of doubt in a buyer's mind.
On the flip side, a crisp, clean, and beautifully composed image does the exact opposite. It builds instant credibility and makes your product feel more valuable. This visual proof is often the single biggest factor in someone's decision to click "Add to Cart" or bounce to a competitor.
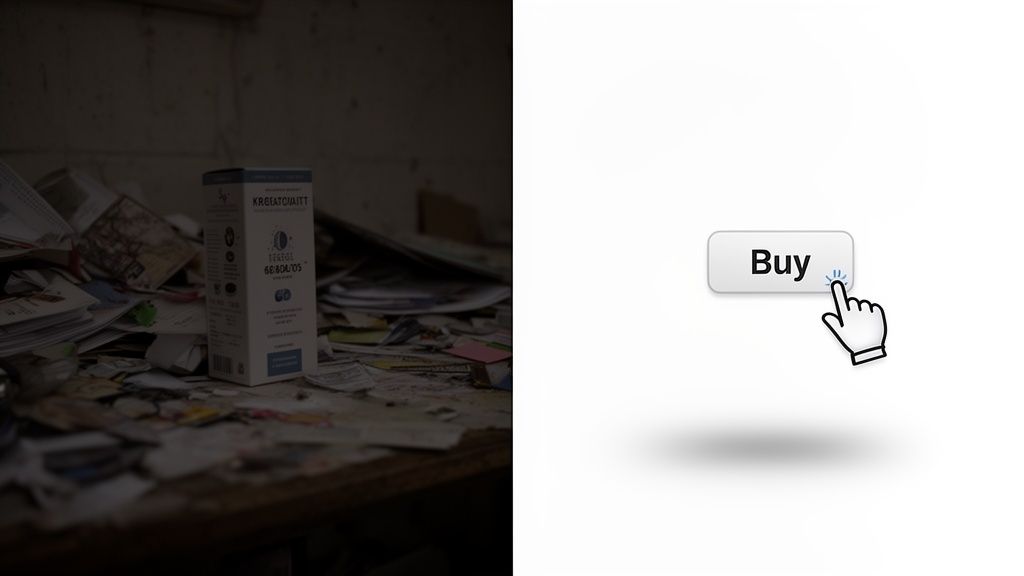
The Psychology Behind the "Buy" Button
Picture this: you're scrolling through Etsy looking for a handmade leather wallet. You find two listings at a similar price. The first one has a dim photo taken on a messy desk, and you can't really see the details in the shadows. The second listing shows off the wallet with bright, sharp images against a clean backdrop, highlighting the stitching, the texture of the leather, and its true color.
Which one do you trust more? It’s a no-brainer. The second seller’s professional-looking photos have already answered your questions and made the decision to buy feel safe and easy.
That’s visual storytelling at its best. Great images help customers:
- Picture themselves owning it. They can actually visualize using the product in their own lives.
- Justify the price. High-quality photos signal a high-quality item worth paying for.
- Build instant trust. The professionalism in your images carries over to trust in your brand as a whole.
The Hard Numbers: How Quality Photos Impact Your Bottom Line
It's not just about feelings and psychology; the data tells a powerful story. High-quality visuals are directly tied to real business results, from conversion rates to how many people bail on their shopping carts. Online shoppers are incredibly visual—a staggering 7 in 10 will leave a product page if the images are bad or if there aren't enough of them. For sellers on places like Amazon or Shopify, this means those quick, amateur phone snaps just won't cut it.
The quality of your photos has a direct and measurable effect on your success.
How Photo Quality Impacts Key E-commerce Metrics
| Metric | Impact of Amateur Photos | Impact of Professional Photos |
|---|---|---|
| Conversion Rate | Significantly lower; creates friction and doubt. | Higher; builds trust and encourages purchase. |
| Return Rate | Higher; product doesn't match expectations. | Lower; images accurately represent the product. |
| Brand Perception | Seen as untrustworthy, low-quality, or hobbyist. | Perceived as credible, high-quality, and professional. |
| Cart Abandonment | Higher; uncertainty about the product's quality. | Lower; clear visuals remove hesitation. |
Ultimately, the right images don't just show your product—they sell it.
Your product photography isn't just a part of your online store; it is your online store. It's the first handshake, the product demo, and the final sales pitch all at once.
The best part? You no longer need a massive budget or a fancy studio to get this professional look. That high-powered camera in your pocket, combined with some smart AI editing tools, can produce scroll-stopping, professional product photos that are more accessible than ever. This guide will walk you through exactly how to pair your smartphone with the right tech to create images that look incredible and actually grow your business. And as you start to grow, you may want to look into the full cost of professional product photography.
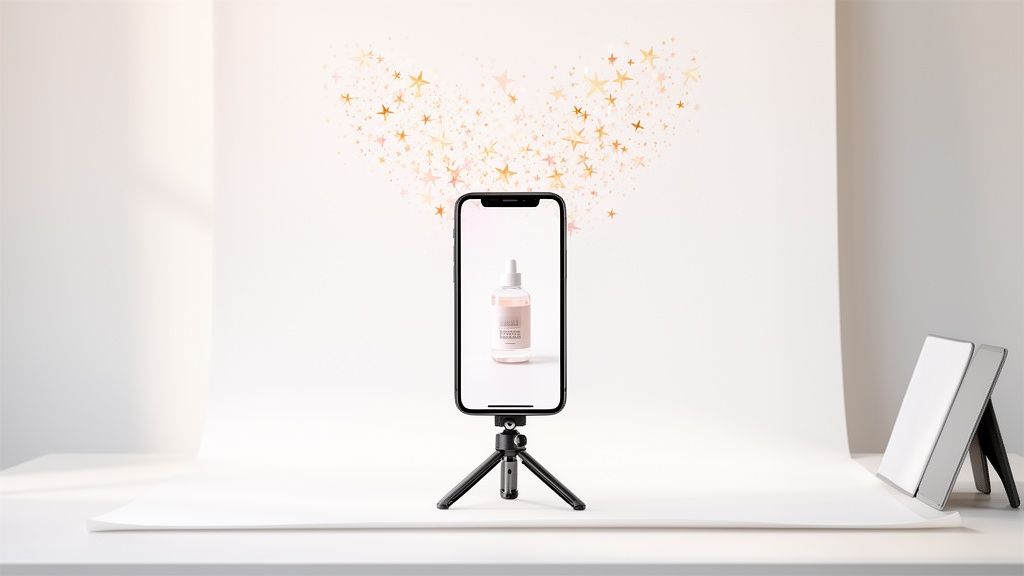
Creating Your DIY Smartphone Photo Studio
You don't need a high-end studio or a pile of expensive gear to take incredible product photos. In fact, you can put together a surprisingly professional setup using things you probably already have lying around the house.
This is all about being resourceful and focusing on the fundamentals: light, background, and stability. Once you get these right, your smartphone becomes a powerful tool for capturing images that look like they came straight from a professional shoot. It all starts with finding the perfect light.
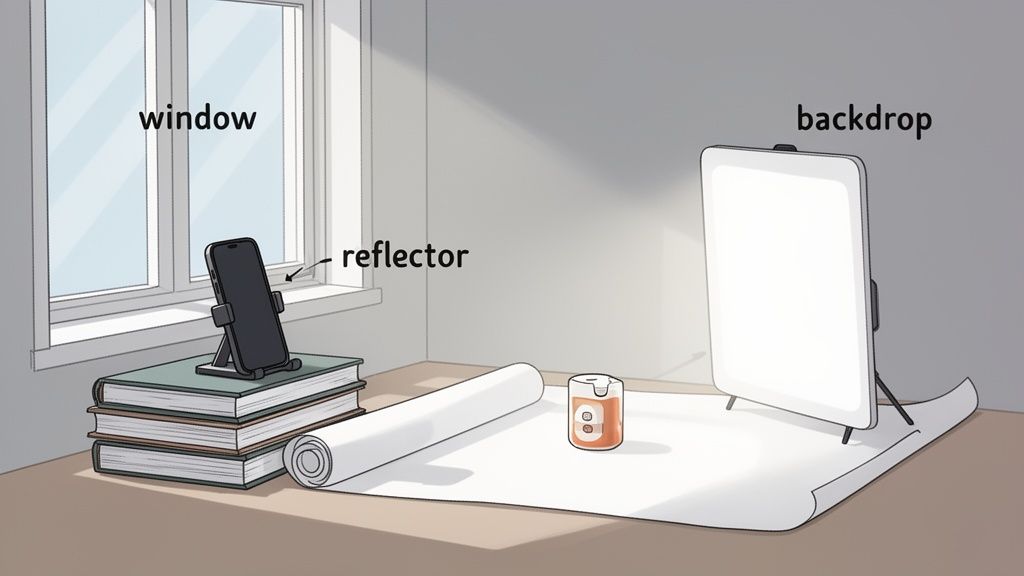
Find the Right Natural Light
The best (and cheapest) light source you can find is the sun. But you have to be strategic about it. Direct, harsh sunlight is your enemy—it creates ugly, dark shadows that hide product details and wash out colors. What you're really looking for is soft, diffused natural light.
The sweet spot is usually near a large window that isn't getting hit with direct sun. A north-facing window is often ideal because it provides consistent, gentle light all day. Set up your product so the light hits it from the side. This simple trick creates soft shadows that give your product a sense of depth and make it pop.
Build Your Flawless Backdrop
A clean, simple background ensures your product is the star of the show. You don't need a professional photography sweep to pull this off. One of the best investments you can make is a simple roll of white craft paper or a large piece of poster board.
Just tape the paper to a wall behind your shooting surface and let it curve down onto the table. This creates a seamless "infinity" background, getting rid of that distracting horizontal line where the wall and table meet. An ironed white bedsheet can also do the job in a pinch. The goal is a neutral canvas that doesn't fight for attention.
A clean background does more than just look professional—it removes any visual noise that could distract a potential customer. Your product should be the only thing they focus on.
The quality of your visuals is no small thing. Poor images are the number one reason shoppers leave a product page, with 70% of them bouncing because of it. On the flip side, listings with five or more high-quality photos can see 20-30% higher conversions on platforms like Etsy and eBay. If you're curious, you can explore more photography statistics to see just how much visuals matter.
Keep Your Smartphone Steady for Ultimate Sharpness
Even the steadiest hands have a little bit of shake, which is all it takes to make a photo just slightly blurry. To get those tack-sharp, professional product photos, your phone needs to be perfectly still. A tripod is fantastic, but it’s definitely not a deal-breaker when you're starting out.
You can easily rig up a stand with things you already own. A stack of books, a coffee mug, or a small box can work perfectly to prop your phone up at the right height. The only thing that matters is that the phone doesn't move when you take the picture.
Pro-Tip: Use your phone’s self-timer. Even just tapping the shutter button can cause a tiny jiggle. Setting a 2 or 3-second timer gives the phone a moment to stabilize after you tap, guaranteeing a much crisper shot.
Master Your Smartphone Camera Settings
Your phone’s camera app has some powerful features that most people completely ignore. Before you start shooting, diving into the settings for a minute can make a huge difference in your final images.
- Lock Focus and Exposure: Frame your product, then tap and hold on it. You'll see a little lock icon appear. This stops the camera from automatically refocusing or changing the brightness if you move slightly.
- Turn on Gridlines: Go into your camera settings and activate the grid. This simple 3×3 overlay helps you compose your shots using principles like the Rule of Thirds for a more balanced, professional look.
- Never Use Digital Zoom: Just don't do it. Digital zoom isn't real zoom—it just crops the image and blows it up, which destroys the quality. If you need a closer shot, physically move your phone closer.
Getting comfortable with these settings gives you creative control instead of letting the phone's auto mode make all the decisions. This simple DIY setup, combined with a few smart techniques, is your first step toward creating photos that actually sell your product.
Making Your Products Look Irresistible: Composition and Lighting
Now that your makeshift studio is ready, we can get to the fun part. This is where we move beyond just taking snapshots and start creating images that tell a story and make people want what you're selling. You don't need a fancy art degree—just a few timeless principles that photographers use to guide the viewer's eye and spark interest.
Great composition and lighting are what separate a flat, uninspired photo from one that makes a customer feel like they can almost reach out and touch the product. It’s how you show off the tiny details, the rich textures, and the overall quality that convinces someone to click "Add to Cart."
A Simple Trick to Guide the Viewer's Eye
Composition is just a fancy word for how you arrange things in your photo. One of the easiest and most powerful techniques is the Rule of Thirds.
Picture a tic-tac-toe grid drawn over your screen. The rule suggests that instead of plonking your product right in the bullseye, you should place it along one of the lines or where the lines cross. So, for a single bottle of face oil, try positioning it on the left or right vertical line. It’s a small change that makes a huge difference.
This simple shift instantly makes the photo more dynamic and professional. It encourages the eye to move around the frame, making the entire image more engaging. Go into your phone’s camera settings right now and turn on the grid overlay—it's the best guide you'll ever have.
The Essential Angles Every Product Needs
To give shoppers the full picture and earn their trust, you have to show your product from all sides. Think of it as a virtual tour. Each angle answers a different question a customer might have.
Here are the must-have shots for any product listing:
- The Hero Shot (Front-On): This is your main event. A crystal-clear, straight-on view of the product against a clean background. No distractions, just the product in all its glory.
- The 45-Degree Angle: This one adds a sense of depth and dimension. By showing the front and one side, you give people a much better feel for the product's actual shape and form.
- The Detail Shot (Macro): Time to get up close and personal. This is where you highlight what makes your product special—the intricate stitching on a leather bag, the texture of a hand-thrown ceramic mug, or the clasp on a piece of jewelry.
- The Lifestyle Shot: Show your product in its natural habitat. A stylish watch on someone's wrist, a scented candle on a cozy nightstand, or a new backpack out on a trail. This helps customers imagine it in their own lives.
A gallery with these angles covers all the bases. You’re answering questions before they’re even asked, which is a massive step toward securing a sale.
Don’t just show your product; present it. A great set of professional product photos walks the customer through a discovery process, highlighting the features and quality that justify their purchase.
How to Tame Light with One Simple Tool
Lighting is the secret sauce of photography. But you don't need a truckload of expensive gear to control it. In fact, one of the most powerful tools in your kit will cost you less than a coffee: a plain white foam board.
When you use a window for light, one side of your product looks great, but the other often gets lost in dark shadows. A foam board acts as a reflector. It catches that beautiful, soft window light and bounces it right back into the shadows.
Just prop the board up on the side of your product opposite the window, keeping it just out of the shot. Tilt and adjust it until you see the shadows on your product magically soften and fill in with light. It’s an incredibly simple trick that delivers a more even, professional look every single time. This is the key to creating those bright, clear, and high-quality professional product photos that sell.
Your AI Editing Workflow: From Raw Photo to Perfect Listing
Getting a sharp, well-lit photo with your smartphone is a huge win, but it's only half the story. The real transformation—where a decent photo becomes a serious, sales-driving asset—happens in the edit. But you can forget spending hours wrestling with complicated software. Modern AI tools have completely changed the game.
This isn't some tedious, step-by-step tutorial on manual editing. Think of this as your roadmap to a lightning-fast workflow that delivers professional product photos in minutes. We'll walk through how AI can take a simple phone snapshot and turn it into something polished and ready for any e-commerce platform, building trust and driving sales along the way.
From Raw Snapshot to Polished Asset
Let's say you just snapped a photo of a handmade leather wallet on your kitchen table. The lighting is okay, but your cluttered background is distracting, and the colors don't quite capture the rich texture of the leather. This is the exact point where an AI tool like https://prodshot.net/ai-product-photo-generator steps in to do the heavy lifting.
The process is surprisingly simple: upload your raw image, and the AI gets to work. This isn't just about slapping on a filter; it's a series of smart, automated enhancements designed specifically for selling products online.
The goal of AI editing isn't to create a fake image. It's to reveal the true quality of your product by removing all the distractions. It’s about creating a clean, trustworthy visual that lets the customer focus entirely on what you're selling.
Before you even get to editing, though, you need the right raw materials. This breakdown shows the essential shots you should always capture to give customers a complete picture of your product.
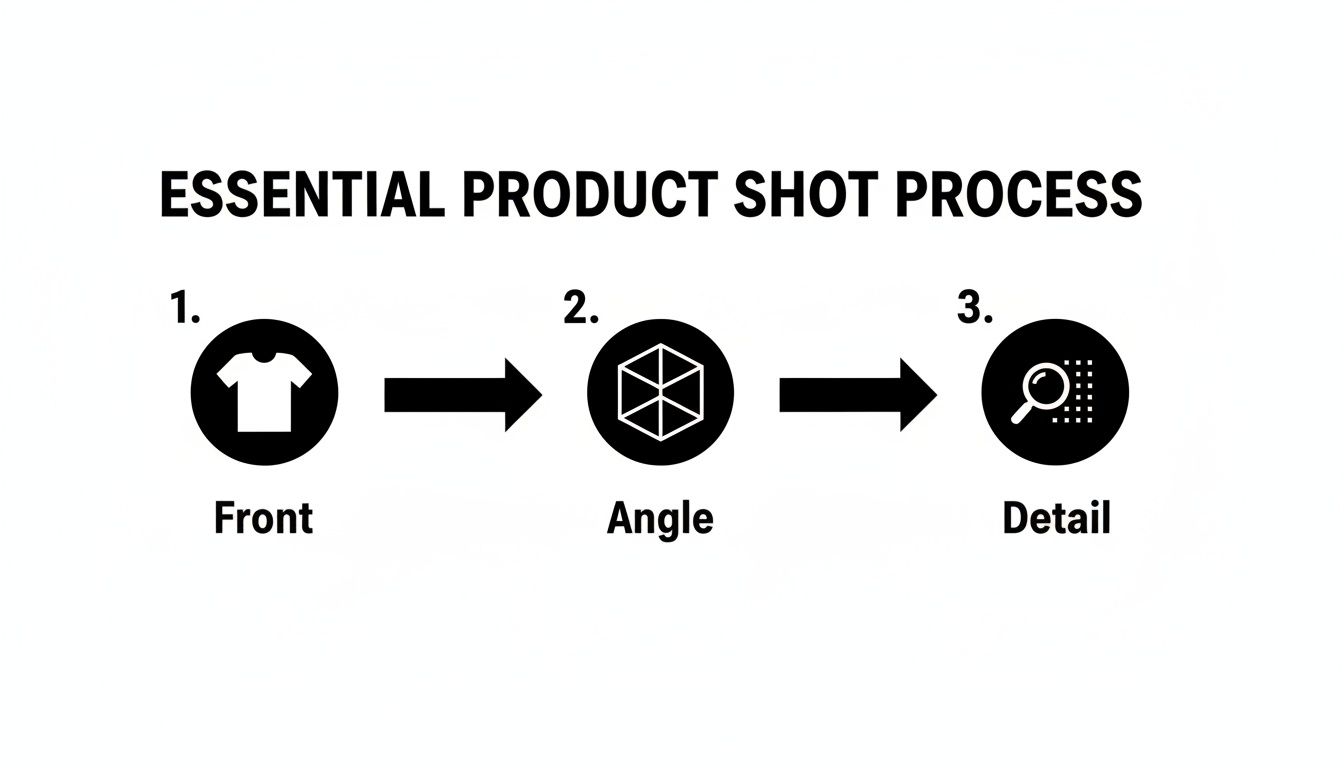
Nailing these three angles—front, angled, and a close-up detail shot—answers most of a buyer's questions visually before they even have to ask. It’s a massive confidence booster.
The Magic of Automated Enhancements
Once your photo is uploaded, a few key things happen almost instantly. These are the core functions that save you a ton of time and deliver consistently professional results.
- Flawless Background Removal: The AI intelligently identifies your product and strips away the background with surgical precision. This gives you that perfect, pure-white canvas that marketplaces like Amazon demand and creates a clean, cohesive look across your entire store.
- Intelligent Color and Lighting Correction: The tool analyzes the image and makes smart tweaks to brightness, contrast, and color balance. It makes colors pop accurately without looking oversaturated and ensures the lighting is bright and even across the entire product.
- Realistic Shadow Generation: A product just floating on a white background can look flat and unnatural. A good AI tool adds a soft, realistic shadow underneath, giving it weight and grounding it in the frame. It’s a subtle touch, but it adds a crucial layer of professionalism.
This isn't just a niche trend. The photography industry is already embracing this shift, with around 50% of photographers now using AI in their workflows. A specialized tool built for e-commerce can turn simple snapshots into optimized visuals in seconds—no studio required. For sellers, this can mean massive cost savings of up to 80% compared to outsourcing traditional photography, not to mention a dramatic boost in speed.
Fine-Tuning and Exporting for Success
After the AI does its initial magic, you still have control. Want a slightly different background color to match your branding? Or maybe a different shadow style? These changes are typically just a click away.
The best tools keep the interface simple, allowing sellers to generate multiple high-quality variations of their product photos without needing any design skills.
Once you’re happy with the result, you just export the image, perfectly formatted for any platform. This kind of workflow completely demystifies photo editing and makes it accessible to anyone. If you're looking to integrate more advanced tools into your process, exploring resources on the Best AI Image Generator can provide even more options.
How to Optimize Images for Every Sales Channel
So you’ve got the perfect photo. It’s edited, polished, and looks absolutely stunning. But here’s something a lot of sellers miss: a great photo is only half the battle.
If that image is slow to load, sized incorrectly, or totally invisible to search engines, its power to convert a shopper drops like a rock. Optimizing your images is the final, crucial step that transforms a pretty picture into a sales-generating machine. This isn't just about ticking some technical boxes; it’s about making sure all your hard work actually pays off everywhere you sell.
The thing is, every sales channel plays by its own rules. An image that looks incredible on your Instagram feed might get rejected by Amazon or grind your Shopify site to a halt. When you ignore these platform-specific needs, you’re risking a clunky user experience and terrible search visibility—both of which will cost you sales.
Mastering Platform-Specific Image Requirements
Think of each online marketplace as having its own unique "language" for images. To get the best results, you have to speak that language by formatting your photos to their exact specs. A one-size-fits-all approach just won’t cut it.
Take Amazon, for instance. They are famously strict. Your main product image must have a pure white background (RGB 255, 255, 255) and the product has to fill at least 85% of the frame. That’s a non-negotiable rule designed to create a clean, consistent look across the entire platform.
Shopify, on the other hand, gives you a bit more creative leeway. But they strongly recommend square images—often 2048 x 2048 pixels—to keep your collection pages looking uniform and professional. Then you have a platform like Etsy, where a more creative, handcrafted vibe thrives. There, landscape (horizontal) photos often perform best in search results, helping your listing stand out from the crowd.
A photo that takes too long to load is a sale lost. For every second your site takes to load, conversion rates can drop by over 15%. Properly optimized professional product photos are essential for speed.
This is exactly why getting the details right for each platform is so critical. Using the correct dimensions and aspect ratios ensures your products are displayed clearly without any awkward cropping. This is especially important for mobile shoppers, who now make up the vast majority of e-commerce traffic.
E-commerce Platform Image Specification Cheat Sheet
Getting these specs right is a must for ensuring your photos look professional and load quickly on every platform. Here’s a quick-reference guide to the essential image requirements for the biggest online marketplaces.
| Platform | Recommended Dimensions | Aspect Ratio | File Type |
|---|---|---|---|
| Amazon | At least 1000px on the longest side | Varies, but product must fill 85% of frame | JPEG, PNG, GIF |
| Shopify | 2048 x 2048 pixels for square images | 1:1 (Square) is recommended for consistency | JPEG, PNG, WebP |
| Etsy | 2700px on the short side | 4:3 (Landscape) is often preferred | JPEG, PNG, GIF |
| 1080 x 1080 pixels (Square Post) | 1:1 (Square) or 4:5 (Portrait) | JPEG, PNG |
Stick to these guidelines, and you'll avoid the dreaded pixelated, stretched, or cropped images that can make a great product look unprofessional.
Unlocking Visibility with Image SEO
Search engines like Google can’t actually "see" your photos in the way a person does. Instead, they rely on the text you associate with them to understand what they're about. This is where image SEO comes in, and it's a powerful tool for driving organic traffic to your listings.
It all starts with the file name.
Please, never upload an image with a generic name like IMG_8034.jpg. It tells search engines absolutely nothing. Instead, rename your files with descriptive, keyword-rich phrases that describe the product.
- Bad:
IMG_8034.jpg - Good:
handmade-brown-leather-tote-bag-front.jpg
The second piece of the puzzle is alt text (or alternative text). This is a short, simple description of the image that serves two key purposes. First, it's what screen readers announce to visually impaired users, making your site more accessible. Second, it's a huge ranking factor for Google Images.
Write compelling alt text that describes the image accurately while naturally weaving in your main keywords. For that same leather bag, a great alt text would be: "A woman carrying a handmade brown leather tote bag with brass hardware." It's descriptive, helpful, and gives your SEO a nice boost.
And if you need to get your images perfectly sized, check out this simple image resizer to nail your platform needs every time.
A Few Common Questions About Product Photography
Alright, you've got the gear and the basic techniques down. But as you start shooting, some practical questions are bound to come up. Getting a good picture is one thing, but building a smart, repeatable strategy is what really separates the pros.
Let’s tackle some of the most common hurdles I see online sellers face. Think of this as your quick-start FAQ to iron out the details and get you shooting with confidence.
Do I Really Need a White Background for All My Photos?
This is probably the number one question I get, and the answer isn't a simple yes or no. For your main "hero" shot—the first one a customer sees on places like Amazon—a clean, pure white background is pretty much the gold standard. It’s not just a trend; it's a requirement on many platforms because it eliminates distractions and makes your product the absolute center of attention.
But don't stop there. Once you've got that perfect, clean shot, your secondary images are where you can get creative and tell a story. This is where lifestyle or "in-context" shots work their magic. Show your necklace on a model, your coffee mug sitting on a sunlit kitchen counter, or your hiking boots out on a muddy trail. These images help people feel what it’s like to own your product.
A winning strategy uses both: a flawless, AI-perfected white background for the main image, followed by a series of compelling lifestyle and detail shots that build a connection.
How Many Photos Should I Have for Each Product?
When it comes to your product listings, more is almost always better, as long as you're not sacrificing quality. I always tell people to aim for a minimum of 5-8 high-quality images for every single product.
That number isn't just pulled out of thin air. It gives you enough room to show your product from every important angle and build a strong visual argument for why someone should buy it.
- The Essentials: At a bare minimum, you need the front, back, and side views. A 45-degree angle shot is also great for showing dimension.
- Get Close: Zoom in on what makes your product special. Is it the stitching, a unique texture, a custom engraving? Show it off! These close-ups scream quality.
- Show It in Action: Always include at least one photo of the product being used. This helps customers imagine it in their own lives and answers unasked questions about size and scale.
Remember, online shoppers can't pick up your product, feel its weight, or see the craftsmanship up close. Your photos have to do all that heavy lifting for them.
Your image gallery isn't just a slideshow. It's a visual sales pitch. Every single photo has a job to do—whether it's showing scale, highlighting a key feature, or creating an emotional connection.
Are AI Editing Tools Actually Worth It Over Free Apps?
Free phone apps are fantastic for a quick brightness adjustment on a vacation photo. But for e-commerce, they just don't have the muscle you need.
Specialized AI editing tools are built from the ground up to solve the unique problems of product photography. They automate the tedious, time-sucking tasks that are essential for a polished, professional look. Things like perfect background removal or adding a subtle, realistic shadow would take ages to do by hand, but an AI tool can knock it out in seconds.
Think of it as an investment in your time and your brand's credibility. The small monthly cost is easily covered by the hours you save and the boost in sales you get from having consistently beautiful, trustworthy product listings.
Ready to turn your phone's camera roll into a collection of scroll-stopping, professional product photos? With ProdShot, you can automate the entire editing workflow. Get perfect backgrounds, ideal lighting, and platform-ready images in just a few clicks. Try ProdShot for free and see the difference it makes for your online store.