
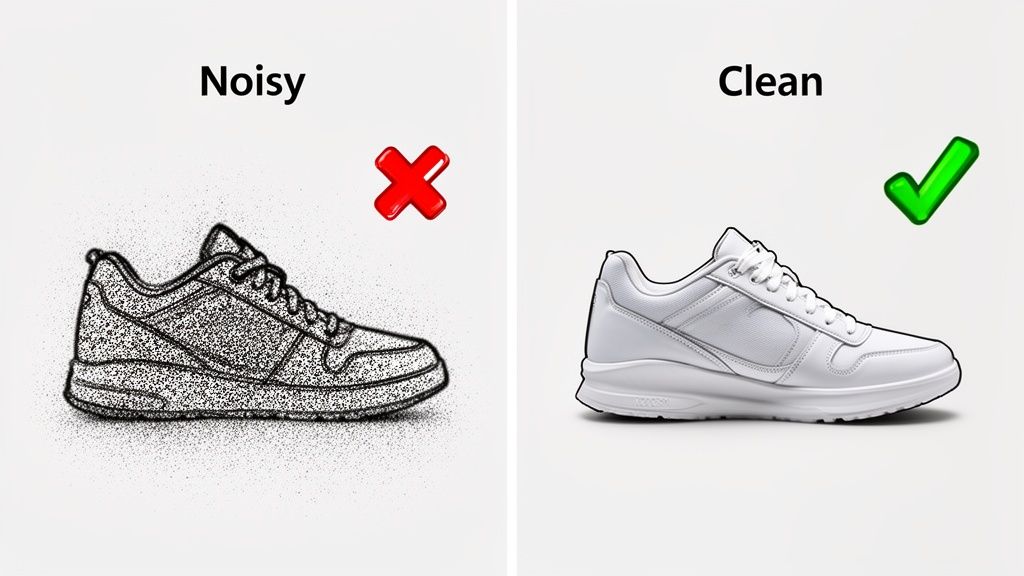
Image noise. It's that gritty, speckled texture that can creep into your photos, especially in low light, turning a potentially great shot into an amateur-looking one. In product photography, it's a deal-breaker.
So, what does "reducing image noise" actually mean? It’s the process of digitally smoothing out that graininess to get a clean, polished, and professional final image. For anyone selling online, this isn't just a nice-to-have; it's a critical step because clean images directly impact customer trust and conversion rates.
Why Crystal-Clear Product Photos Are Non-Negotiable
Think about your own shopping habits on Shopify or Amazon. When you see a grainy, fuzzy product photo, what’s your first thought? It screams low quality, maybe even untrustworthy. It plants a seed of doubt.
On the flip side, a sharp, clean image signals professionalism and quality. It builds subconscious trust, making it that much easier for a shopper to hit "add to cart." A speckled photo does the exact opposite.
The Two-Fold Approach to Flawless Images
Getting rid of noise isn't about finding one magic button in your editing software. The best results come from a two-part strategy that I’ve relied on for years.
- Prevention First: Your best defense is a good offense. The most effective way to deal with noise is to stop it from showing up in the first place. This all comes down to mastering your lighting, keeping your ISO as low as possible, and making sure your camera is perfectly still.
- Powerful Correction: Even with the best prep, some noise is inevitable. That's where post-processing comes in. Modern tools, especially those with AI, are incredible at removing grain while keeping all those important product details sharp.
The push for perfect visuals has created a huge demand for these tools. In fact, the image noise reduction market is expected to hit $1.8 billion by 2033. That number alone shows just how vital clean images have become for e-commerce and professional photography.
Quality Starts at the Source
At the end of the day, the quality of your final image is almost entirely dependent on the quality of your initial shot. It's just that simple.
Investing in gear known for great optics can make a world of difference. Even looking into the top refurbished iPhones for stunning product photos can give you a major leg up. Taking this step first makes the whole editing process faster and less of a headache.
And while you could hire a pro, understanding the cost of professional product photography often shows why learning to do it right yourself is so valuable. This guide is all about giving you the actionable advice you need to get those pro-level, marketplace-ready images that actually sell.
The best way to deal with image noise is to stop it from ever showing up in the first place.
Think of it this way: it’s a lot easier to cook with fresh, high-quality ingredients than it is to save a dish that’s already been scorched. Your camera, your lighting, and your setup—those are your ingredients.
This simple, proactive mindset will save you hours of frustration in post-processing and always, always leads to a better final photo. Honestly, getting this right in-camera is the single most important skill you can develop for creating professional product photos.
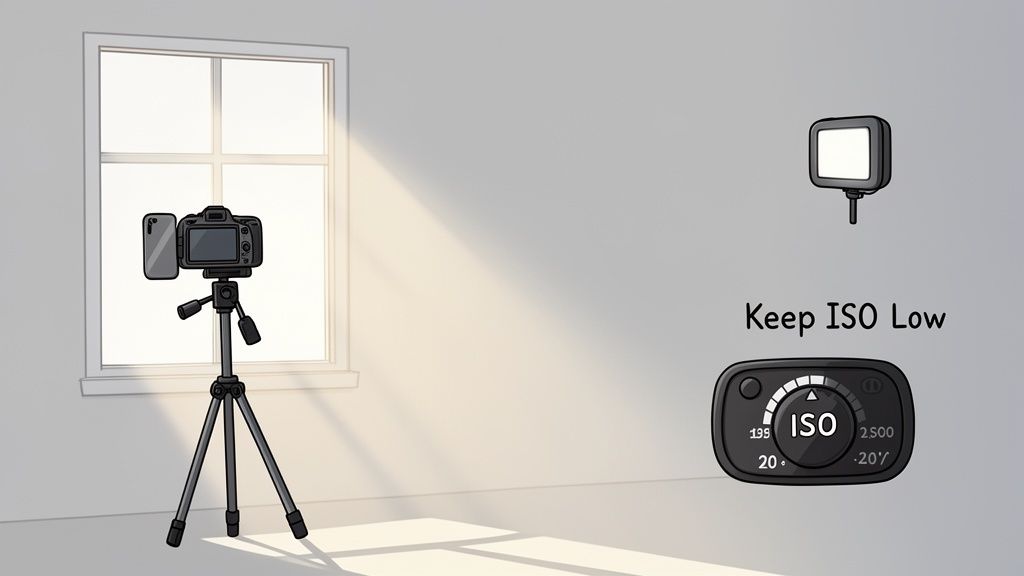
Flood Your Scene With Light
The number one enemy of a clean, noise-free image is a dark scene. It's that simple.
When your camera's sensor is starved for light, it has to digitally boost the signal it does receive. That amplification process is what creates digital noise—the ugly, distracting grain that ruins an otherwise great shot.
The fix? Give your sensor more light. And you don't need a high-end studio to do it.
- Go Natural: Set up your product next to a large window. An overcast day is perfect, as the clouds act like a giant, free softbox, giving you beautiful, diffused light that minimizes harsh shadows and lets you keep your ISO low.
- Grab an LED Panel: A good, affordable LED panel is a game-changer. It gives you total control over the brightness and temperature, meaning you can create perfect, consistent light any time of day or night.
By properly lighting your product, you’re giving your camera the freedom to use its lowest native ISO setting (usually ISO 100 or 200). This is the foundation of a crystal-clear image and a non-negotiable step for anyone serious about professional Amazon product photography.
Master Your Camera Settings for Less Noise
Once your lighting is sorted, a few key camera settings will lock in that noise-free quality.
First off, always shoot in RAW format, not JPEG. A RAW file is the digital negative—it holds all the raw, unprocessed data straight from the sensor. This gives you way more information to work with in editing, which means noise reduction tools can do their job much more effectively. JPEGs, on the other hand, are compressed and have already thrown out a ton of that crucial data.
The camera hardware itself plays a massive role. The global image sensor market, which is the heart of your camera, reached $20.66 billion in 2024. A significant portion of this technology is dedicated to improving low-light performance and integrating better noise reduction right into the hardware. Discover more insights about this growing market on marketsandmarkets.com.
Next, get serious about stability. The slightest camera movement can force you into a faster shutter speed, which often means you have to crank up the ISO to compensate—and that brings back the noise.
- Use a Tripod: This is absolutely essential for product photography. A sturdy tripod completely eliminates camera shake. No excuses!
- Set a Timer: Even just pressing the shutter button can cause a tiny vibration that softens your image. Use your camera's 2-second timer to ensure everything is perfectly still when the picture is taken.
Here’s a quick reference table to keep these settings straight in your head during a shoot.
Key Camera Settings To Minimize Image Noise
This little cheat sheet compares the settings that invite noise with the ones that kick it to the curb.
| Setting | Best Practice For Low Noise | What To Avoid |
|---|---|---|
| ISO | Use the lowest native setting possible (e.g., ISO 100). | High ISO values (e.g., ISO 1600+), which amplify sensor noise. |
| File Format | Shoot in RAW for maximum data and editing flexibility. | Shooting in JPEG, which compresses data and limits recovery options. |
| Stability | Use a sturdy tripod and a remote or 2-second timer. | Hand-holding the camera, which introduces shake. |
| Lighting | Use ample, well-diffused light (natural or artificial). | Shooting in dim or poorly lit conditions. |
Getting these fundamentals right isn't just about taking a picture. It’s about capturing the highest quality data you possibly can, which makes the entire editing process faster, easier, and far more effective.
Choosing Your Noise Reduction Toolkit
Even if you nail every step in-camera, a little post-processing is almost always needed to get that truly professional, noise-free finish. This is where you face a choice: do you stick with the old-school manual sliders, or do you embrace the new wave of intelligent AI tools? Both paths can lead to a cleaner image, but the journey and the final destination are worlds apart.
For years, the go-to method was to jump into a program like Adobe Lightroom and start fiddling with the Luminance and Color noise reduction sliders. It's a delicate dance—you're trying to smooth out the graininess without completely obliterating the fine textures that make your product look real.
Push that Luminance slider just a little too far on a photo of a wool blanket, and suddenly that cozy texture turns into a soft, plastic-like surface. It's a constant trade-off between getting a clean image and keeping the details that actually sell the product.
The Old Guard: Manual Sliders
Going the manual route gives you total control, which sounds great in theory but can be a real headache in practice. You’re telling the software how much to smooth things out, but the software itself isn’t very smart. It applies your settings across the board, unable to tell the difference between random digital noise and the crucial facets of a diamond or the delicate weave of a silk scarf.
Here’s the compromise you’re constantly making:
- Luminance Slider: This tackles the black-and-white, grainy noise. It's powerful, but using too much of it is the fastest way to lose sharpness.
- Detail Slider: This tries to claw back some of the sharpness you just lost, but crank it up, and you might just re-introduce the noise you were trying to remove.
- Color Slider: This is for getting rid of those ugly red, green, and blue splotches you see in high-ISO shots. You can usually be a bit more aggressive here without causing too much damage.
The fundamental problem with manual tools is that they treat every pixel the same. You're essentially giving a blanket command to "blur all the tiny dots," and just hoping it doesn't also blur the tiny, important details that make your product desirable.
The Rise of Intelligent AI Denoisers
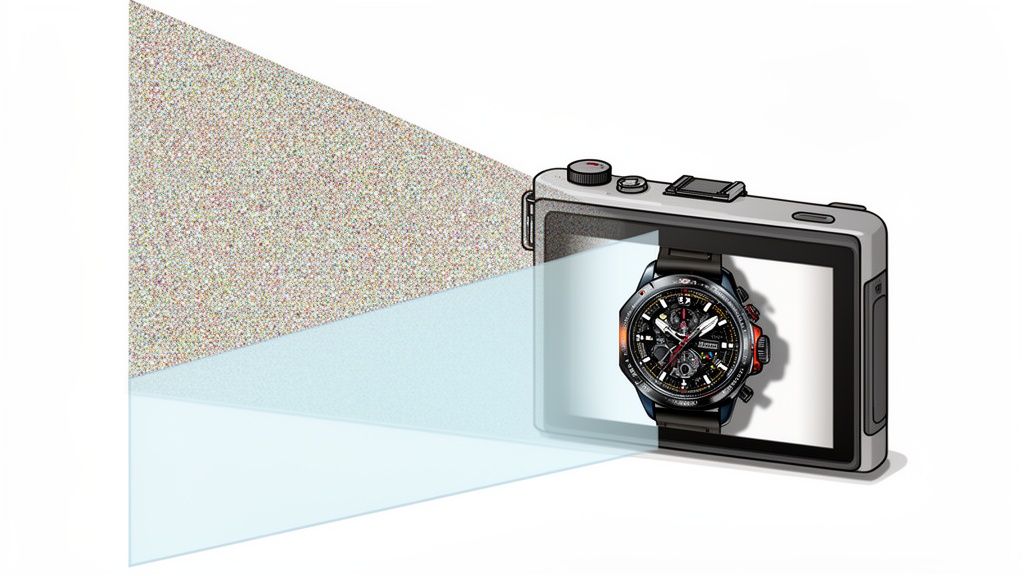
This is where everything changes. Modern AI denoisers have been trained on millions of images, learning to intelligently distinguish between ugly digital noise and essential product detail. Instead of just smearing pixels around, they analyze the content of your photo and selectively target only the grain.
The difference is night and day. You can clean up a noisy shot of a detailed watch, and the AI will preserve the crisp edges of the hands and the subtle brushed texture of the metal. It understands context in a way that simple sliders never could.
This is more than just a trend; it's a massive shift in the industry. The AI image editor market is expected to grow by $109.8 million by 2029, with retouching tools leading the charge. This growth, especially in North America, shows just how much businesses are leaning on tools that can turn flawed photos into polished, money-making assets. You can dig into the numbers in these market findings from Technavio.
And this tech isn't limited to still photos. While your focus is on product shots, just look at how an AI video quality enhancer can automatically de-noise, sharpen, and upscale footage. The core principle is the same: let intelligent software do the heavy lifting for a cleaner, better result.
For product photography, this means you can save images that were shot in poor lighting without sacrificing the critical details that convince a customer to click "buy." For a busy shop owner using a tool like ProdShot, this AI-powered cleanup happens automatically. You get clean, sharp, and marketplace-ready images in seconds, skipping the manual guesswork and saving a ton of time.
A Streamlined Workflow for Marketplace-Ready Images
When you're running an online store, efficiency is the name of the game. You simply don't have hours to spend painstakingly editing every single product photo. This is where a smart, repeatable workflow for cleaning up image noise and polishing your shots becomes a massive advantage, getting you from a raw photo to a marketplace-ready hero shot in minutes.
The goal isn't just to clean up a photo; it's to do it fast without ever sacrificing quality. Thankfully, modern tools have made this incredibly accessible. The whole process kicks off the moment you import your photos.
The One-Click Transformation
Forget about juggling multiple programs for different fixes. The most efficient way to work is with an integrated tool that does all the heavy lifting in one go. When you upload a photo to a platform like ProdShot, its AI doesn't just scan for noise; it runs a whole suite of essential edits at the same time.
- Background Removal: That cluttered or distracting background vanishes, instantly isolating your product on a clean, white canvas that marketplaces love.
- Lighting and Color Correction: The AI analyzes your image and automatically tweaks the brightness, contrast, and color balance, making your product really pop.
- Intelligent Denoising: This is the crucial part. The AI identifies and scrubs away both luminance and color noise without you touching a single slider. It's smart enough to preserve the important textures that make your product look and feel authentic.
This flowchart shows just how much the process has evolved, moving from tedious manual tweaking to intelligent, one-and-done AI.
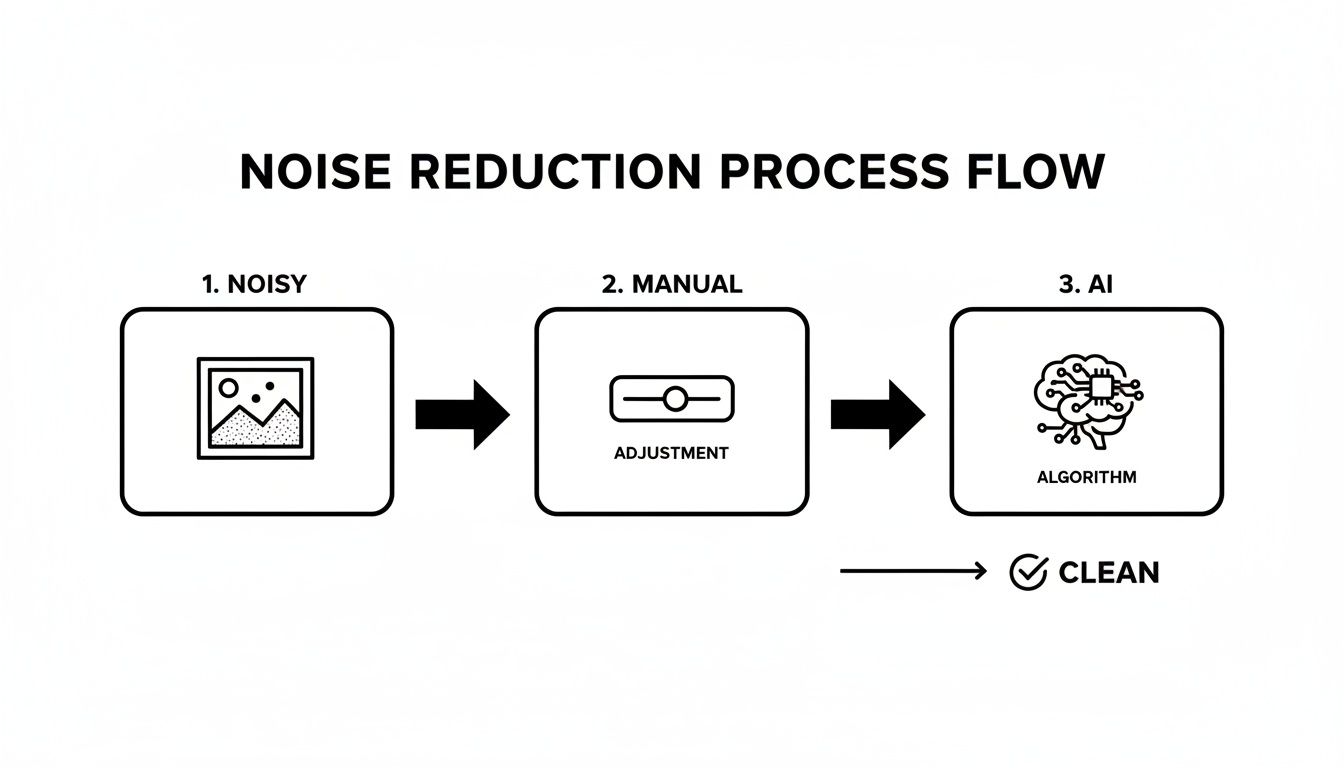
The key takeaway is how AI automates the most time-consuming parts of the job, delivering a clean result in a fraction of the time.
This automated first pass is a total game-changer for busy entrepreneurs. It takes care of 90% of the work in seconds, freeing you up to focus on the final, human touches. This is a core principle of modern product photo retouching—prioritizing speed without ever compromising on the quality of the final image.
The Final Quality Check and Sharpening
After the AI has worked its magic, your final step is a quick but critical quality check. You can't judge an image at a glance; you have to zoom in to see what's really going on.
Zoom in to 100% magnification on your edited image. This is the only way to properly inspect the details and confirm the noise reduction worked without making things look soft or artificial. Pay close attention to the edges of your product and any fine textures.
Once you've confirmed the image is clean, you might feel it could use a little more pop. That's completely normal. The best practice is to apply a subtle amount of sharpening after the noise reduction is done. If you sharpen first, you risk amplifying the very noise you're trying to remove.
A final, gentle sharpen brings back that crisp, tactile look, making the product feel more tangible to your online shoppers. This simple two-step process—AI cleanup followed by a manual quality check and sharpen—is the fastest route to consistently professional images that are ready for any marketplace.
Common Noise Reduction Mistakes And How To Fix Them
Even with the best software, tackling image noise is a delicate balancing act. It’s shockingly easy to push the sliders a little too far and completely ruin the photo you’re trying to save. Knowing the common pitfalls is the first step to sidestepping them entirely.
One of the most frequent mistakes I see is just plain over-processing. You spot some grain, you crank up the noise reduction, and suddenly your product looks like it was molded from plastic. This happens when the software goes overboard on luminance noise, completely stripping away the fine textures that make an object feel real.
You know the look. A wool sweater loses its cozy, intricate weave. A wooden table looks unnaturally smooth and sterile. This plastic-y effect completely kills the tactile quality that makes a product desirable in the first place.
The Pitfall of Aggressive Denoising
The solution here is simple: restraint. Instead of trying to obliterate 100% of the noise, your goal should be to dial it back to a level where it’s no longer a distraction. Modern AI tools are much smarter about this, as they can often tell the difference between unwanted grain and essential detail, but even they have their limits if you push them too hard.
The thing to remember is that some texture is natural. A perfectly sterile, noiseless image can look fake and unappealing. You're not chasing sterile perfection; you want a clean, professional shot that still feels authentic to the customer.
Another major error is applying one single level of noise reduction across the entire photograph. Noise is almost never evenly distributed. It’s always more visible in the dark shadow areas and much less noticeable in the bright, well-lit parts of your image. A blanket approach is both inefficient and destructive.
Using Selective Adjustments
When you apply the same heavy-handed fix to the whole image, you end up softening areas that didn't even need it. The better way is to work selectively.
- Use Masking Tools: In software like Lightroom, you can use masking brushes or gradients to paint on noise reduction only where it’s needed most—like in the deep shadows—while leaving crisp details alone.
- Rely on Smart AI: An even better (and faster) approach is to use a tool like ProdShot, which analyzes the image automatically. Its AI is smart enough to apply noise reduction more aggressively in the shadows and gently in the highlights, preserving detail exactly where it counts.
Finally, a classic workflow mistake is sharpening the image before you deal with the noise. Sharpening algorithms work by boosting contrast along edges, but they can't tell the difference between the edge of your product and a speck of digital grain.
This means you end up sharpening the noise itself, making it pop even more and creating a much bigger mess for your denoising tool to clean up. The rule is simple: always denoise first. Then, apply your final sharpening as the very last step to bring back that crispness without amplifying any leftover grain.
Common Questions About Taming Image Noise
When you're chasing that perfectly clean product shot, a few technical questions always seem to pop up. Let's tackle some of the most common ones I hear from photographers trying to get spotless images.
Does Shooting In RAW Really Make That Much Difference?
It’s a game-changer. Seriously.
Think of a RAW file as the digital negative—it’s all the raw, unprocessed data your camera sensor captured. A JPEG, on the other hand, is like a quick print where the camera has already made a bunch of decisions for you and thrown away the "extra" information to save space.
That "extra" information is pure gold for noise reduction. When software, especially a smart AI tool, has more data to work with, it can make much better calls about what's unwanted grain versus what's the essential, fine texture of your product. For product photos where every tiny detail can make or break a sale, shooting in RAW is non-negotiable.
Can I Actually Save a Really Noisy Photo?
These days? You’d be surprised. Modern AI noise reduction tools can pull off some incredible rescues on shots that, just a few years ago, we'd have tossed in the trash. While getting it right in-camera is always the best plan, advanced algorithms can do a fantastic job scrubbing away severe grain from high-ISO images.
The trick is to use a high-quality tool built for that kind of heavy lifting. Just be realistic—an extremely noisy photo might lose some of its finest, most delicate details in the cleanup process. The goal is recovery, but nothing beats starting with the cleanest possible shot from the get-go.
Quick tip: The real enemy isn't just a high ISO number; it's underexposure. A properly exposed photo at ISO 1600 will look way cleaner than an underexposed shot at ISO 800 that you have to crank up in editing.
Will Getting Rid of Noise Just Make My Photos Blurry?
That’s a very real fear, and it comes from a history of dealing with older, clunkier noise reduction tools. If you've ever pushed a traditional "Luminance" slider too far, you know exactly what I'm talking about—that soft, plastic-y look that wipes out all the good texture.
This is where today’s AI-driven tools are completely different. They’re designed to be smarter, targeting the noise specifically while actively working to preserve the sharp edges and details that matter.
A good workflow also includes adding a touch of sharpening after the noise reduction is done. This final step is key to bringing back that perfect crispness, leaving you with an image that’s both impeccably clean and perfectly sharp.
Ready to stop wrestling with sliders and let AI handle the heavy lifting? ProdShot transforms your product photos into clean, sharp, and marketplace-ready images in seconds. Try it for free and see the difference.